Resource Management
The Resource Management page serves as a repository where you can upload files (such as images, .txt, .csv or excel files) to the server, associated with a particular product. These files can then be used in configurations and other functionalities of the platform, like notifications, Studio and EMS.
Select the product you want to work with from the products drop-down menu, then click User Application > Resource Management in the Product menu to see a list of resources uploaded, edit them, or upload new resources. See the image below to learn more about this page.
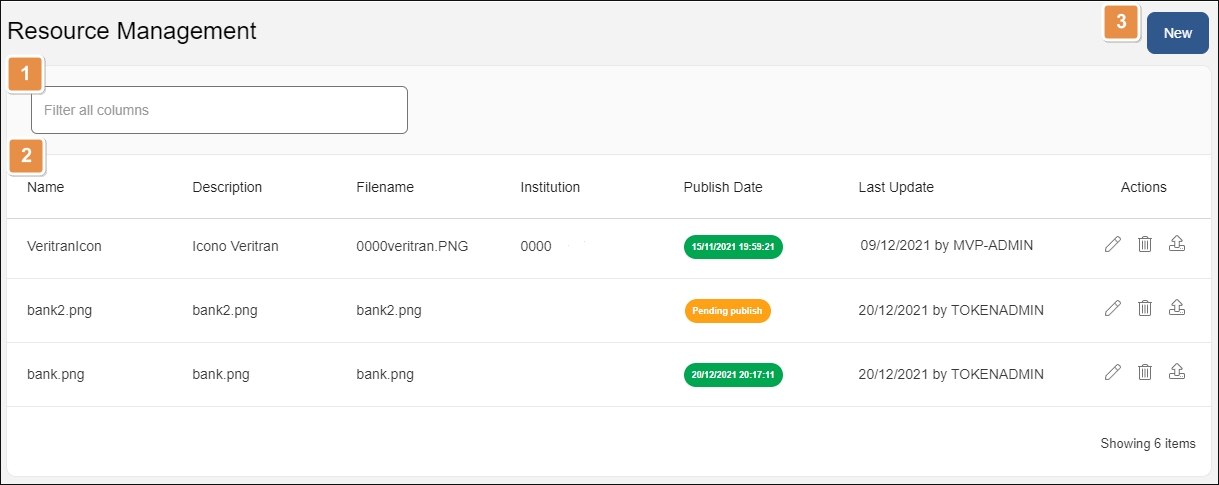
Search bar. Search resources by name, description, filename, institution or last update.
Resources list. Shows every resource uploaded to the server for the product selected on the products drop-down menu. The resource's information is divided into the following columns:
Name
Name given to identify the resource.
Description
Description given to identify the resource.
Filename
Name of the file uploaded.
Institution
Financial Institution to which this resource applies. This is mandatory for resources generated from Middleware. If left blank, the default value is 0000.
Publish Date
Date the resource was published to the server. If in green, it means the resource is published. If you make an update to a resource and do not publish it, this field shows the status Pending Publish in yellow.
Last Update
Date the resource was last updated.
Actions
Edit
Click to edit a resource. You can upload a new media file and edit every field except for the resource's name.
Delete
Click to delete a resource.
Publish
After adding a new resource or making any updates to existing resources, click Publish to publish the resources to the server.
New. Click to add a new resource.
Read Remote Resources to learn how to configure remote resources in Middleware.
Add or Edit a Resource
To add a new resource for a product, select the product from the drop-down menu, go to the Resource Management page (User Application > Resource Management in the Product menu) and click New. The New Resource Management window opens.
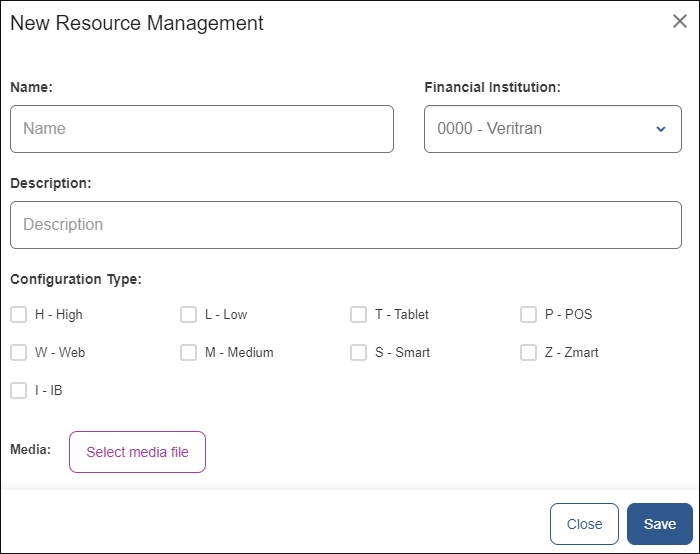
Add a name to the file, a description and, optionally, select a financial institution to link it to.
Then, select one or more configuration types where this resource is going to be used.
On the Media field, click the Select media file button to select a resource from your device. Click Save to save the new resource and finish.
To edit a resource, go to the Resource Management page (User Application > Resource Management in the Product menu), find the resource you want to edit and click Edit on the Actions column. The Edit Resource Management window opens, where you can edit the resource's configuration type and description and upload a new media file to replace the current one.
Important
After creating or editing a resource, you need to restart processes on the VT-Net platform so that it detects and applies the new updates. To learn how to do this, go to Restart Processes.
You might need to create resources defined as remote or dynamic. Read Remote Resources to learn how to create and configure these resources in Middleware.
Remote Resources
Remote or dynamic resources are resources that can be updated remotely, without the need of republishing an app's configuration or generating a new binary. Once published through Middleware, the update impacts on the published app.
Note
This feature is available for Middleware version 1.14.11.12 with Workspace's integration, or for Middleware 1.13.9.20 without Workspace's integration.
Activation
To activate this feature, go to vtconsole.vt and set the FEATURE_RESOURCES_DYNAMIC parameter as true. You can also add this parameter manually to Middleware's application.properties file.
If you need assistance with the activation step, contact your admin.
Behavior
When a resource is marked as remote and published on Middleware, two copies of the same resource are created. One copy is named after the original filename, and the other is named after what is set on the name field in Middleware and Studio.
This way, when that resource is updated and provided there is internet connection, the app will retrieve the resource embedded on the binary the first time it is visualized on the app, while downloading the updated resource. The second time the resource is visualized, the updated version will be displayed.
Create or Edit a Remote Resource
Resources are marked as remote from Studio, but need to be uploaded to Middleware as well.
After creating your remote resource in Studio, upload your resource to Middleware following the steps described in Add or Edit a Resource. In the name field, add the same resource name that was set in Studio. Click Save to complete the action.
Then, find your resource on the list and click Publish on the Actions column.
Warning
The asset needs to be uploaded to Studio and Middleware with the same name on the name field. This way, Middleware can recognize both assets as the same one and update it correctly every time it is edited.
To edit a remote resource that is already published, find it on the Resource Management page and click Edit. After uploading your new file, click Publish so that the new resource is shown on the devices.