Workspace Promotion
Within the Workspace platform, the Workspace Promotion module allows you to manage and execute the promotion of your projects with all their elements from a source environment to a target environment. Such elements include the promotion project's configuration, business parameters, institution transactions, transaction response codes and host response mappings.
In Workspace Promotion, you can also access the list of promotions and rollbacks already executed.
Pre-requisites
You must meet certain requirements to work in Workspace Promotion. To promote a project, you must have:
at least two environments: a development environment and a QA or production environment;
access to Middleware for each environment;
the same products and configuration types for each environment;
permissions to promote projects and revert project promotions for each environment granted in Workspace Accounts & Environments.
Access Workspace Promotion
To access Workspace Promotion, you must be registered in Workspace and have been granted permissions to access Promotion for a specific client and environment.
Tip
Permissions to access Workspace Promotion are granted from Workspace Accounts & Environments.
You must also have permissions for the client's Middleware and the environments on which you will be working.
To access Workspace Promotion, enter the client's URL in the browser. Then, enter your credentials (username or email and password) and click Sign in. The home page opens in the Promotions page. Refer to the annotated image below to learn more.
Important
If you are redirected to Workspace Promotion from the Workspace platform, you don't need to enter your credentials again.
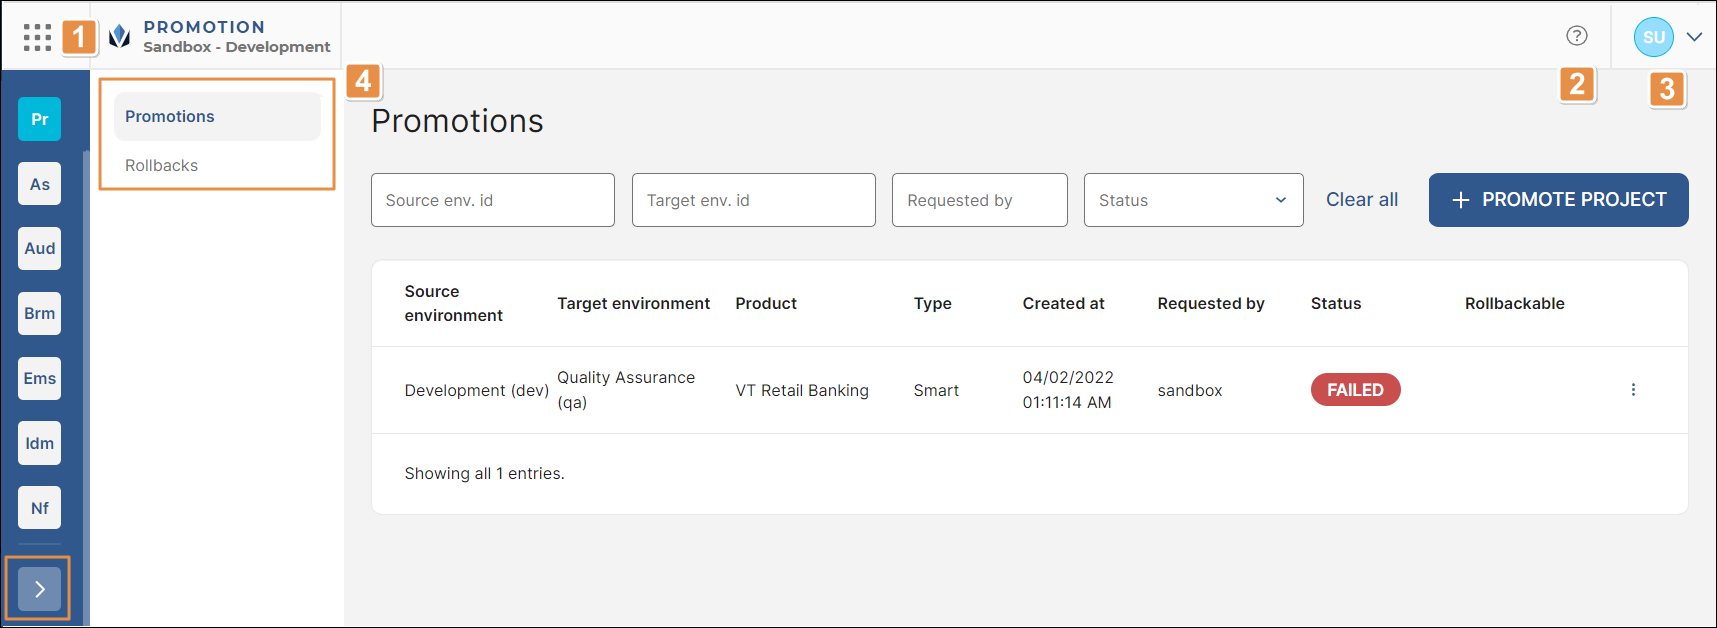
platform components. Click the grid icon to expand a menu where you can see the products available for your client within the Veritran platform. To change the client, click the down arrow and select a client from the Choose client drop-down menu located at the top of the menu. To change the Veritran product, click a product and then click the desired environment. You will be redirected to that product's site without the need to log in again. Click the grid icon again to collapse the menu. You can also click the arrow at the bottom of the menu to expand or collapse this menu.
Note
Only Partner and Superadmin users have the option to change the client in the drop-down menu.
Get help. Click to open Veritran Docs and learn more about Workspace and all the other products within the Veritran platform.
User settings. Click to access the user settings, where you can choose any of the following options: Manage sessions, Change password or Logout. Learn more about the options in the table below.
Manage sessions
Click to see the active sessions of your user. The page includes a list of devices that have logged into your user account—under your username and password. You can revoke any sessions that you do not recognize.
To revoke a session, click Revoke. A modal appears, informing you that revoking the session disables user access to all associated products. Click Revoke again to confirm. To revoke all sessions, click revoke all other sessions. A modal appears, informing you that revoking the sessions disables user access to all associated products. Click Revoke again to confirm.
If there are no active sessions, the message No Active Sessions appears on screen.
Change password
Click to change your password. You must enter your current password and a new one. Passwords must be at least 9 characters long and include at least one uppercase character, one lowercase character and one digit.
Logout
Click to log out and be redirected to the login page.
Main menu. Click any of the sections to go to the corresponding page. By default, Workspace Promotion opens in the Promotions page.
In the Promotions page, you can see the list of project promotions with their status. You can also request new promotions and see the details of those previously executed. Refer to the annotated image below to learn more.
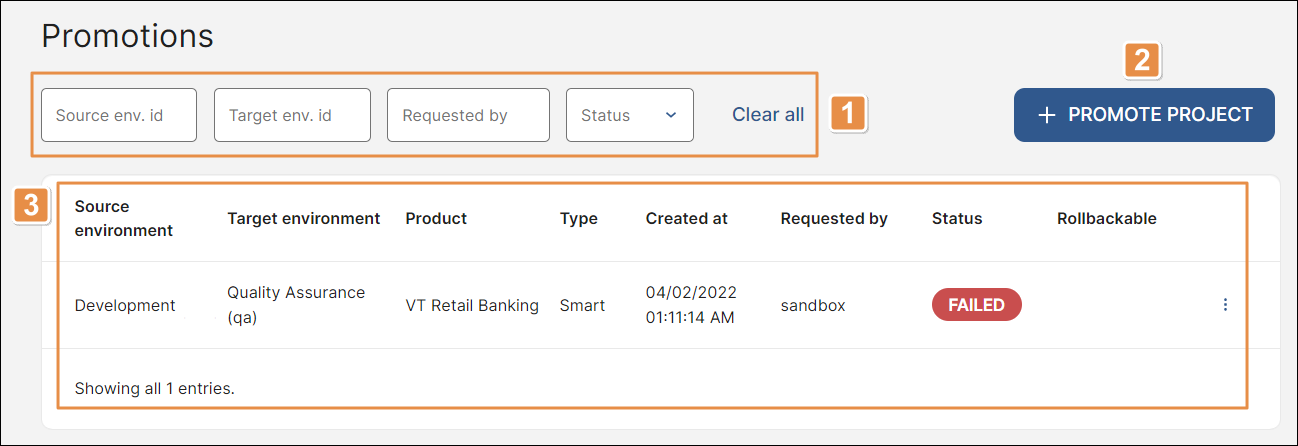
Search bars and Status filter. To find a promotion, click any of the search bars and type the source environment name, the target environment name or the user requesting the promotion, accordingly. To narrow down the list of promotions by status, click the Status filter arrow and select an option from the drop-down menu. The statuses available are: Success, On going, Failed, Dead. To clear your filters and see the full list of promotions, click Clear all.
+ Promote Project. Click to start a new promotion.
List of promotions. Refer to the table below to learn more.
Source environment
Environment from which the promoted project's configuration, parameters and/or transaction codes are obtained.
Target environment
Environment to which the selected project's configuration, parameters and/or transaction codes are promoted.
Product
Product promoted.
Type
Configuration type promoted.
Created at
Date and time the promotion was requested.
Requested by
User who launched the promotion.
Status
Current status of the promotion. Refer to the table below to learn more about each status available.
Success
Indicates that the promotion was successfully executed in the background (green-colored label).
On going
Indicates that the promotion is running. This status only appears from the moment the promotion is requested until the final results are obtained (blue-colored label).
Failed
Indicates that the promotion could not be successfully executed due to an unexpected error (red-colored label). A promotion may fail, for example, if the product or the configuration does not exist in the target environment.
Dead
Indicates that, after a certain period of time, the promotion process ended abruptly (red-colored label).
Note
The maximum time for a promotion's status to go from On going to Success or Failed is two hours. After that period, the status will be Dead.
Rollbackable
Status that indicates whether the promotion can be reverted or not. If the promotion can be rolled back, this field contains a green-colored check icon and if it can't be rolled back, this field is empty.
Tip
The Rollback action is only available if the status of the promotion is Success. For any other status, the only action available is View details.
More options
Click the vertical three-dot icon and then click any of the options available. Refer to the table below to learn more.
View details
Click to see the promotion's details. You are redirected to the promotion's details page, where you can see the basic information about the promotion, and the promotion's details regarding the release configuration, business parameters, institution transactions, transaction response codes and host response mappings. Refer to View Promotion Details to learn more about the information displayed in this page.
Rollback
Click to revert the promotion. A modal pops up, informing you that proceeding with the rollback action reverts the project to its previous published version. To proceed, click Confirm.
View Promotion Details
To see the promotion's details, navigate through the list of promotions to find the desired promotion, click the vertical three-dot icon to the right and then click View details.
The Promotion detail page opens, where you can see the basic information about the promotion, and the details on each element of the project promoted, including its release configuration, business parameters, institution transactions and transaction response codes. Each of these elements also shows a status label and, if the promotion did not succeed, a detail of the error that caused the process to stop.
Refer to the subsections below to learn more about the information displayed on this page.
Note
The information displayed in the Promotion detail page is retrieved from Middleware, according to the environment and product selected in the Basic Info section.
In this section, you can see the main details on the project promotion. It includes information about the promotion description, the user requesting it, the source and target environments, the configuration type and the product involved. You can also see the details on the status of the promotion, the start and end times, and the time elapsed from the moment the promotion was requested until the final results were obtained—if the promotion execution is still in process, or was either successful or failed.
In this section, you can see the identifier and smart configuration parameters. Refer to the table below to learn more.
Identifier | Identifier given to the configuration version in Middleware. |
Previous smart release | Value of the last smart release configuration before the promotion was executed. |
Smart configuration target | Current value of the smart release configuration after the promotion was executed. |
If there is no information about a release configuration, this section contains the message No release configuration has been promoted.
Business parameters are configuration sets that can be used on services' endpoints, in the Studio's app building process, or in a transaction flow.
In this section, you can see the status of the business parameters promotion and the basic information about such parameters. Refer to the table below to learn more.
Code | Parameter code. |
Description | Description used to identify the parameter. |
Value | Parameter value. |
Updated at | Date and time the parameter was last updated. |
Updated by | User who last updated the business parameter. |
If there is no information about business parameters, this section contains the message No business parameters have been promoted.
Read Business Parameters to learn more about this topic.
Institution transactions are transactions associated to a specific financial institution, which means that such financial institution is authorized to execute the transaction.
In this section, you can see the status of the institution transactions promotion and their basic information. Refer to the table below to learn more.
Institution | Institution authorized to execute the transaction. |
Transaction | Transaction name and description. |
Status | Status of the transaction. |
Updated at | Date and time the institution transaction was last updated before the promotion. |
Updated by | User who last updated the institution transaction. |
If there is no information about institution transactions, this section contains the message No institution transactions have been promoted.
Response codes are configured to identify a transaction flow's response and to set a message that will be visualized by the application user after that response.
In this section, you can see the status of the transaction response codes promotion and their basic information. Refer to the table below to learn more.
Code | Transaction response code. |
Technical description | Short description to identify the response code. |
Updated at | Date and time the transaction response code was last updated before the promotion. |
Updated by | User who last updated the transaction response code. |
If there is no information about transaction response codes, this section contains the message No transaction response codes have been promoted.
Read Transaction Response Codes to learn more about this topic.
Host response mappings are response codes that have been identified.
In this section, you can see the status of the host response mappings promotion and their basic information. Refer to the table below to learn more.
Process | Middleware process type. |
Trx. code | Transaction code and step. |
Trx. description | Description that identifies the transaction. |
Host res. code | Host response identifier. |
Response | Transaction response code and description. |
Updated at | Date and time the response code mapping was last updated before the promotion. |
Updated by | User who last updated the response code mapping. |
If there is no information about host response mappings, this section contains the message No host response mappings have been promoted.
Read Response Code Mappings to learn more about this topic.
Promote a Project
To promote a project, go to the Promotions page and click + Promote Project.
To promote a project from Workspace Accounts & Environments, go to the Environments page, navigate through the list of environments to find the environment you want to work with and click Promote project.
In both cases, you are redirected to the Promote project page, where you define the basic information and setup of the promotion. Refer to the sections below to learn more.
Important
If you start the promotion of a project from the Environments page, the Source environment field in the Basic Info section will appear completed with the environment from which you started the promotion.
Basic Info
In this section, you complete the basic settings of the project promotion. All the fields are mandatory except for the Description field. Refer to the table below to learn more.
Source environment | Click the arrow and select an environment from the drop-down menu. Only after you complete this field, you will be able to configure the Product, Configuration type and Target environment fields. |
Product | Click the arrow and select a product from the drop-down menu. |
Configuration type | Click the arrow and select a configuration type from the drop-down menu. |
Target environment | Click the arrow and select an environment from the drop-down menu. |
Promotion description | Enter a short description for the promotion. This field is optional. |
Once you complete all the required fields, click Next. Then, you must complete the Setup section.
Setup
In the Setup section, you determine if you want to promote the project's configuration, business parameters, transactions and responses. Refer to the annotated image below to learn more.
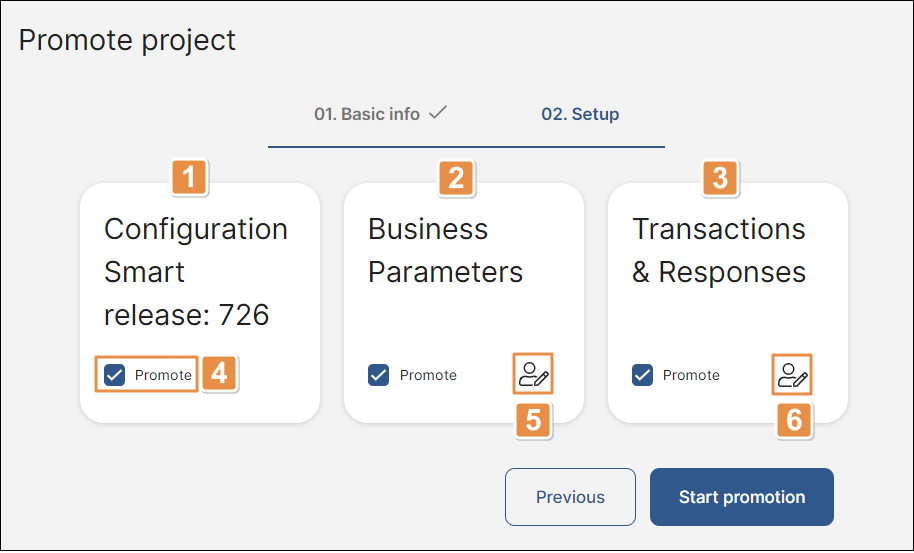
Configuration smart release. Configuration to be promoted and ID given to the configuration in Veritran Studio. To be able to promote a configuration, the smart release parameter must be previously updated in Studio. This means that only newer versions of the configuration can be promoted, and it's not possible to promote the same version of the last configuration published or an older one.
If the parameter value is not updated, a message reading Smart release parameter should be updated to promote configuration appears below the Configuration Smart Release box.
To update the smart release parameter, go to Veritran Studio. Then, go to Parameters (Global > Parameters), find the parameter SMART_CONFIGURATION_RELEASE and increase its value. Lastly, go to the list of apps (Global > My apps) and publish an app with the same configuration combination—product and configuration type. Go back to Promotion, and start the promotion process. You will now be able to promote the configuration, given that the smart release configuration value is higher than the value of the last configuration published.
If you don't need to promote the configuration, unselect the Promote checkbox. In such case, only the business parameters, transactions, response codes and mappings will be promoted.
Notice
The Start promotion button will only be enabled (blue-colored) if the configuration is updated or if its Promote checkbox is not selected.
Business Parameters. Business parameters configured for the product and environment selected in the Basic Info section.
Transactions and responses. Institution transactions, response codes and host response mappings configured for the product and environment selected in the Basic Info section.
Promote. Checkbox to determine whether the promotion includes the Configuration, the Business Parameters and the Transactions & Responses, respectively. By default, all three checkboxes are clicked. If you don't want to promote one of these elements, uncheck the corresponding checkbox. A modal appears, informing you that not promoting the selected element may cause the promotion to fail if there are dependencies that require it. To proceed, click Confirm.
See and Edit Business Parameters. Click to see the details of that product's business parameters. A modal opens, containing the list of parameters and their basic information. To remove a parameter from the parameters to be promoted, uncheck the checkbox to the left of the parameter's code. If you remove any parameters from the promotion, the Promote checkbox will contain a hyphen instead of a checkmark.
To find a parameter, click the search bar and type its code, description or value. To save changes and go back to the Setup section, click Done.
To make changes to the business parameters' settings in Middleware, click Edit Business Parameters.
See and Edit Transactions & Responses. Click to see the details of that product's institution transactions, response codes and host response mappings. A modal opens, containing the Institution transactions and the Response codes & mappings tabs. The Institution transactions tab is opened by default, containing the list of institution transactions with their basic information. To remove a transaction from the transactions to be promoted, uncheck the checkbox to the left of the transaction's institution name. To find a transaction, click the search bar and type its institution name or description. To make changes to the transactions' settings in Middleware, click Edit Institution Transactions.
Click Response codes & mappings to switch the tab. The Response codes & mappings tab contains the list of response codes and mappings, with their basic information. To remove a response code or a mapping from the elements to be promoted, uncheck the checkbox located to the left of the response code or mapping's code.
If you remove any transactions or responses from the promotion, the Promote checkbox will contain a hyphen instead of a checkmark.
To find a response code or mapping, click the search bar and type its code or description. To make changes to the transactions' settings in Middleware, click Edit Response Codes or Edit Mappings, respectively.
To save changes and go back to the Setup section, click Done.
Important
To execute a complete promotion, all the Promote checkboxes must be checked. A full project promotion includes the promotion of the project's configuration, business parameters, institution transactions, transactions response codes and host response mappings.
To make further changes to the Basic Info section, click Previous. If you don't need to make any additional changes, click Start promotion to request the execution of the promotion. A modal opens, informing you the client for which the project promotion is requested, and the source and target environments involved. To proceed, click Promote. You are then redirected to the Promotions page. A modal opens, informing you that the promotion was successfully requested.
The new promotion will appear listed, and its initial status will be On Going. After a brief period of time, the status will change to Success, Failed or Dead. To see the details of the promotion executed, click the vertical three-dot icon to the right and then click View details. Read Promotions to learn more.
Revert a Promotion
To revert a promotion, go to the Promotions page. Navigate through the list of promotions to find the desired promotion, click the vertical three-dot icon to the right and then click Rollback. A modal window opens, informing you that proceeding with the rollback reverts the project to its previous published version. To proceed, click Confirm.
Note
The Rollback action is only available if the promotion selected was successful, which means that it can be reverted.
You are then redirected to the Rollbacks page and a modal opens, informing you that the rollback was successfully requested. The rollback will appear in the list, and its initial status will be On Going.
After a certain period of time (max. two hours), the status will change to Success, Failed or Dead. To see the details of the promotion, click the vertical three-dot icon to the right and then click View details. Read Promotions to learn more.