Studio-GIT Integration
As from version 3.0, Studio is integrated with GIT —the version control system— and managed through GitLab. The key characteristics of this integration include:
Branching. Allows you and your team to work on different aspects of the same app in parallel and then execute commits, to prevent the deployment of unwanted changes. It also allows you to create branches from a productive branch to fix issues and test the fixes before applying any changes to the productive branch. This ensures the quality of the fixes implemented.
Entity storage in GIT. Stores and versions entities such as screens, legacy and lambda processes, transactions, business parameters, action libraries, interfaces, tests and local assets in GIT. Function libraries are also stored and versioned in GIT, but users cannot work simultaneously on different versions. This allows a better traceability of all the changes introduced to the entities through their commit history, eliminating the need for an additional file to follow those changes.
Version control. Provides better control over what you include in each app version, thanks to the information provided on every change introduced to a branch or entity stored in GIT. By integrating with Jira, you can have a thorough understanding of the requirement that led to each fix or improvement. Also, you can easily go through changes applied to an entity by revising the entity's commit history.
Rollback. Allows you to restore screens, legacy and lambda processes, and transactions to a previous version or commit.
When you create an app or module in Studio, a main branch is created by default. It is suggested to use the main branch as a copy of the productive version and to add tags for each published version of this branch. This provides better control over what you include in each app version. You can only add and see tags from GitLab.
Then, as you continue working on your app, you can create as many branches as necessary depending on the type of updates you need to make, and on the branching and delivery strategy defined with the client. Read below to learn about the different types of branches you can create and their uses. Read App Versioning to learn how to implement a branching strategy in your project.
Branch Types
You can select between five different types of branches depending on your needs and on the project's branching strategy. These types have all the same functionalities, but they include a specific prefix that organizes branches according to best practices. For example, if you create a feature branch with the name "qr payments", its complete name will be "feature/qr-payments" (branchtype/branchname).
Note
Spaces between words in the branch name are automatically replaced by hyphens.
Read below to learn about each type of branch you can create in Studio, regardless of your branching strategy.
Develop | Branch from where the feature branches are created. The develop branch is initially created as a copy of the main branch and then modified with each update or fix implemented. It can be used to integrate and test new features or fixes before sending them to the productive version. You can only have one develop branch per app or module. |
Feature | Branch created to work on a new feature or functionality. Once you have the feature ready, you can merge the feature branch to a release branch to test it together with any other features included in that version. This ensures more control over the changes to be sent to the productive version. |
Hotfix | Branch used to fix minor issues or bugs on productive apps or in development environments. Depending on the type of fix, they can be created from the productive branch or from any development branch if the issue appears during the development process. After testing the fixes implemented, the hotfix branch must be merged to the branch from which it emerged and its changes must also be pushed to any other branches affected by the fix. |
Release | Branch used to integrate feature branches and run a comprehensive test of what will be published next. The release branch represents the version package to be delivered. |
Custom | Branch used for special cases that are not contemplated in the previous branch types. It is advised not to use this type of branch too frequently. |
Read Branch Management to learn how to create and delete branches in Studio.
Session Management
As of Studio 3.0, you can only work with one app or module's branch at a time with the same user credentials. This means that you can't edit two different branches at the same time. However, you can open one app's branch, one module's branch and one transaction's branch at the same time, since they will all open in different browser tabs. Read below to learn how sessions work in Studio 3.0.
When you are working on a particular branch (session 1) and then you start a new Studio session (session 2) with the same credentials to access the same app but a different branch, session 1 is blocked and left inactive, as shown below.
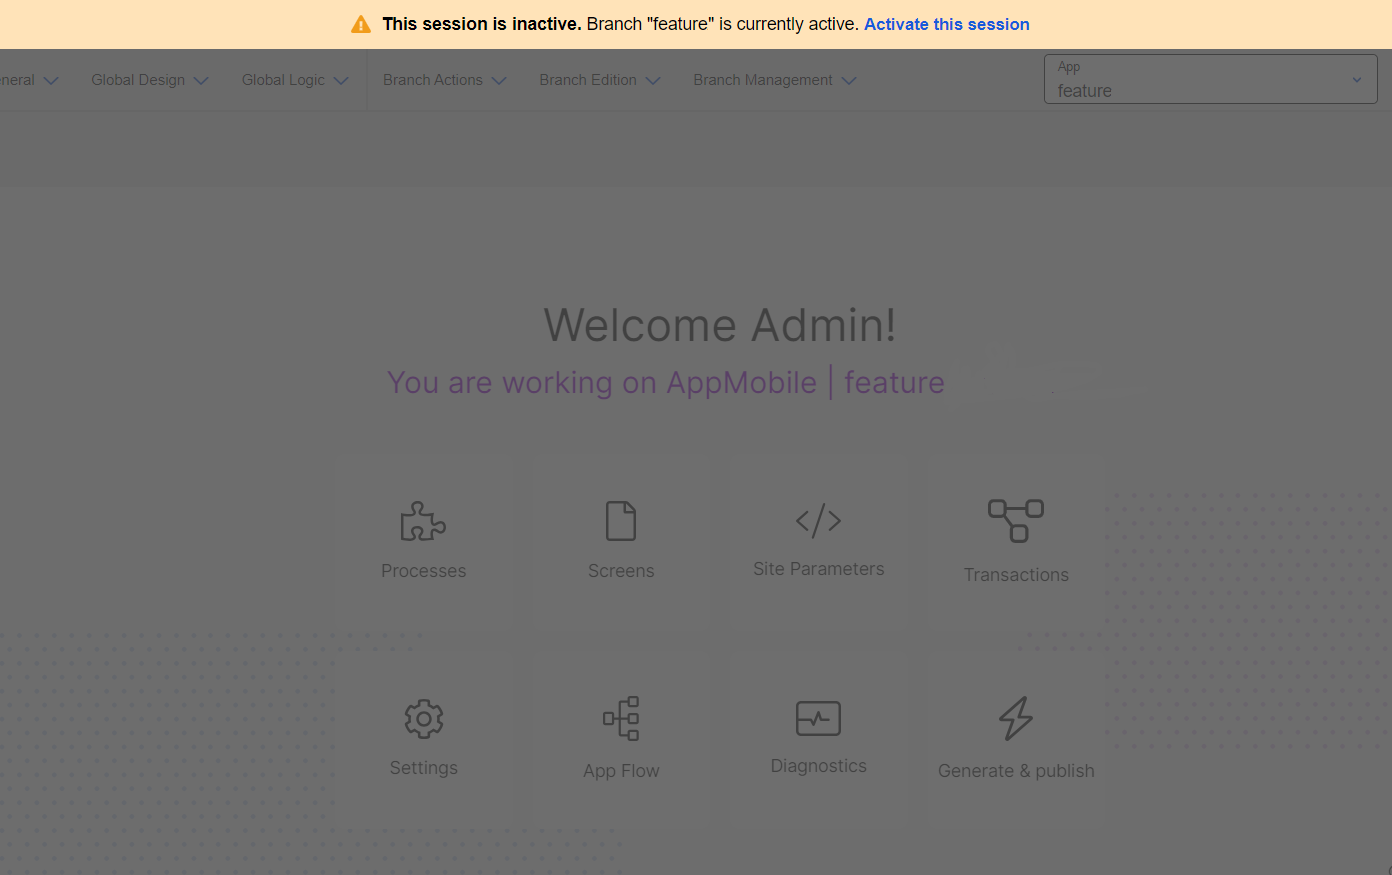
A yellow banner appears informing you that session 1 is inactive, while session 2 is available for editing. To reactivate session 1, click Activate this session, which deactivates session 2 and blocks you from editing it.
Warning
Be cautious when deactivating a session, as you might lose any pending changes, depending on the entities you are working on. Currently, you might lose pending updates on every entity, except for lambda processes, configurable transactions and screens.
If you need to have different branches open at the same time to compare changes, you can ask your admin to create a read-only user (with no editing permissions). This user type can work with both branches in parallel without jeopardizing the integrity of any branch. To use both users simultaneously, one must be opened in an incognito window.
The following entities in Studio are versioned and stored in GIT:
screens;
lambda processes;
legacy processes;
low-code tests;
configurable transactions;
native transactions;
business parameters;
action libraries;
lambda libraries;
assets;
function libraries (users cannot work simultaneously on different versions); and
interfaces.
The rest of the entities are stored in the database.
Important
Due to their connection to GIT, entities' names, as well as screens' sequences and transactions' names and codes cannot be edited once created.
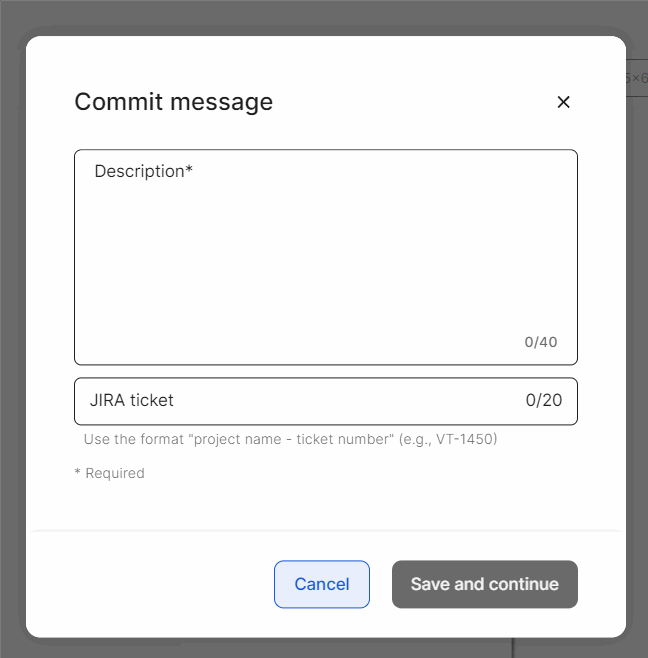
Every time you save changes on an entity stored in GIT, you send a commit to the repository, which you can then visualize in that entity's commit history.
When you save the entity, a modal appears for you to describe the update in a few words and add the ID of the Jira ticket related to that fix or improvement.
When you link the commit of the entity you are working on to the Jira ticket, you and your team can trace every change in detail. This provides better control over what you include in each app version.
Additionally, updating entities stored in the database implies certain risks, since they are not traceable and are not automatically updated when performing a merge. Because of this, it is key to identify the impact changes on these entities will have on entities or elements within Studio.This impact can be measured in three different ways:
Impact on the branch: The change affects only the branch in which the entity is edited. Entities involved: Site parameters, error branching, dependencies, views, external services.
Impact on the repository: The change affects the entire repository of the app, module or transaction logic, regardless of the branch. Entity involved: Multi-language labels.
Impact on the environment: The change affects all repositories in the environment, regardless of branch or type of solution. Entity involved: Themes (although they are not consumed from transaction logic repositories).
Read App Versioning standards documentation to learn how to mitigate risks when versioning, how to handle non-versioned entities to avoid inconsistencies and how to define a working approach to incorporate them into the versioning scheme.
Concurrence
There might be more than one user trying to edit the same entity simultaneously. If another user edits and saves the changes made to an entity that you are working on, and you try to save your changes to that same entity, a warning modal pops up informing you that the changes could not be saved. This happens because the other user saved the changes before you did, so the version you are currently editing becomes outdated.
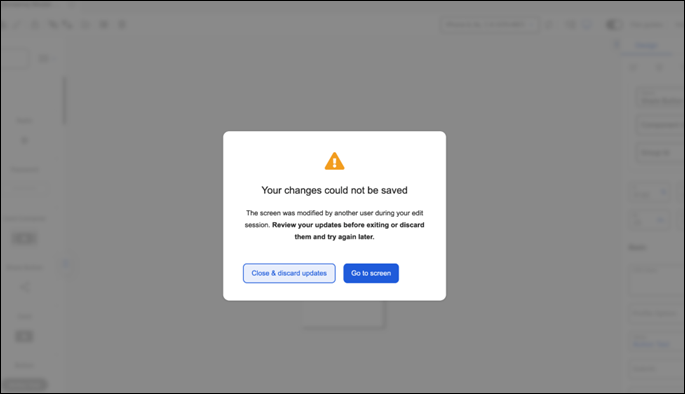
You get the same concurrence warning when another user rolled back an entity to a previous version before you could save your changes.
You can close the entity's edit page or go back to the entity. In any case, you won't be able to save any changes and you will have to open the entity's last version again.
Important
This only applies to entities stored in GIT.
The Commit History feature helps you go through changes applied to an entity with ease and gives more control over what is included in each update. It also allows you to download the commits' .xml file for the entity selected to see in detail the updates applied within each commit. Additionally, if there is an error with the entity and you need to restore it to a previous version, there is a Rollback option that enables you to restore an entity's previous commit.
Important
Make sure you have permission to the Commit History and Rollback features in Studio. If you do not see the History option in Studio, contact your lead.
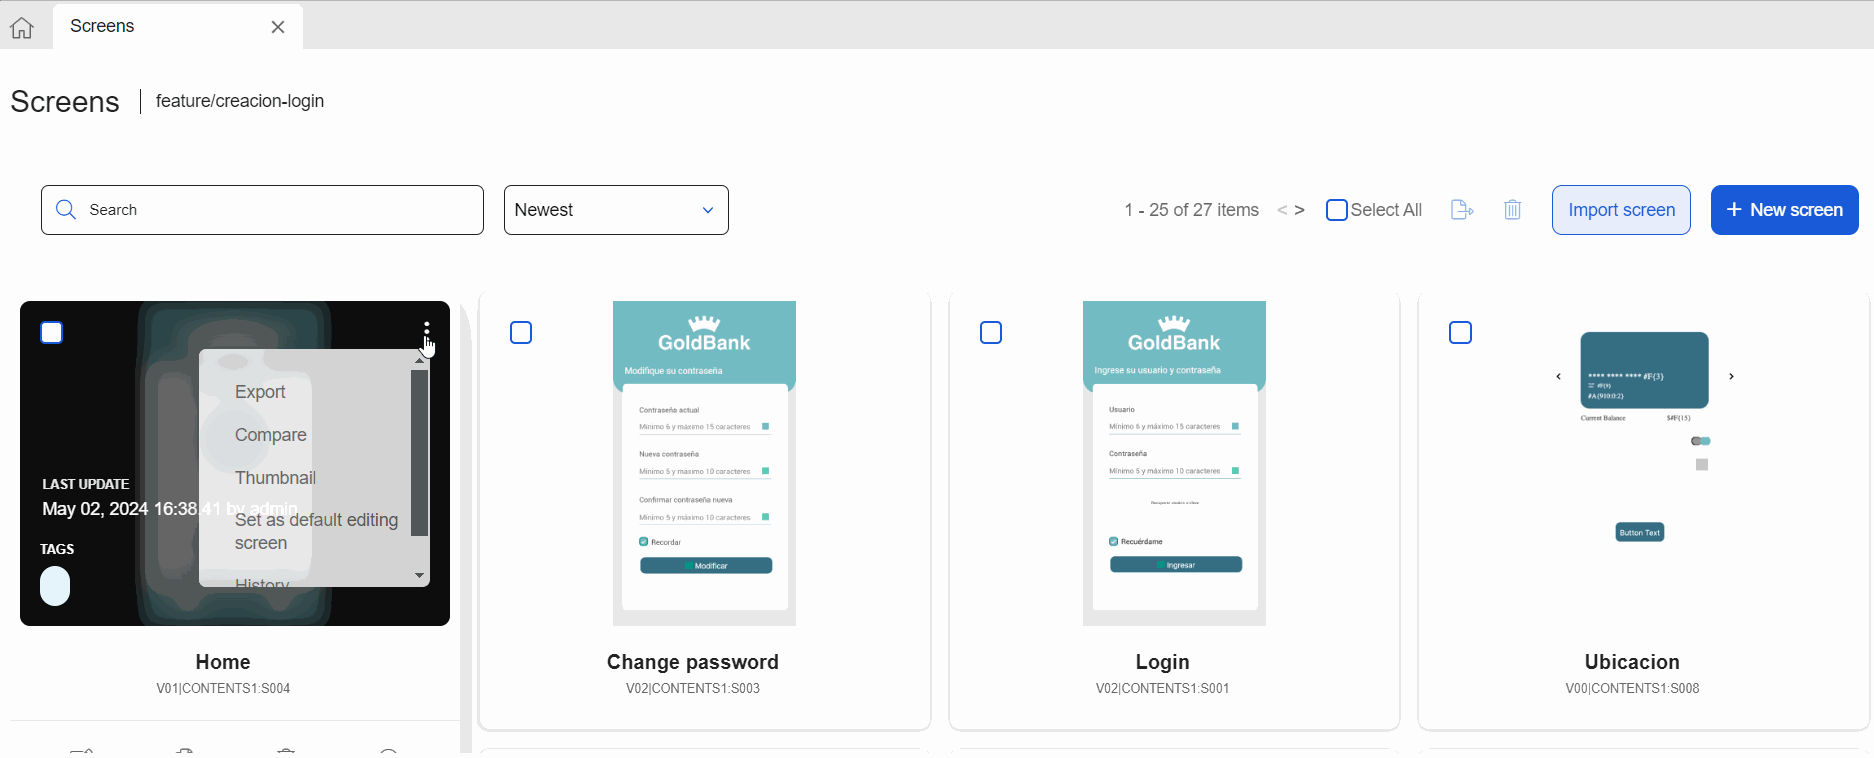
To see an entity's Commit history, look for the entity in Studio, click the More options vertical three-dot icon, and then History.
Important
The Commit History and Rollback features are available for screens, legacy and lambda processes, native and configurable transactions and low-code tests.
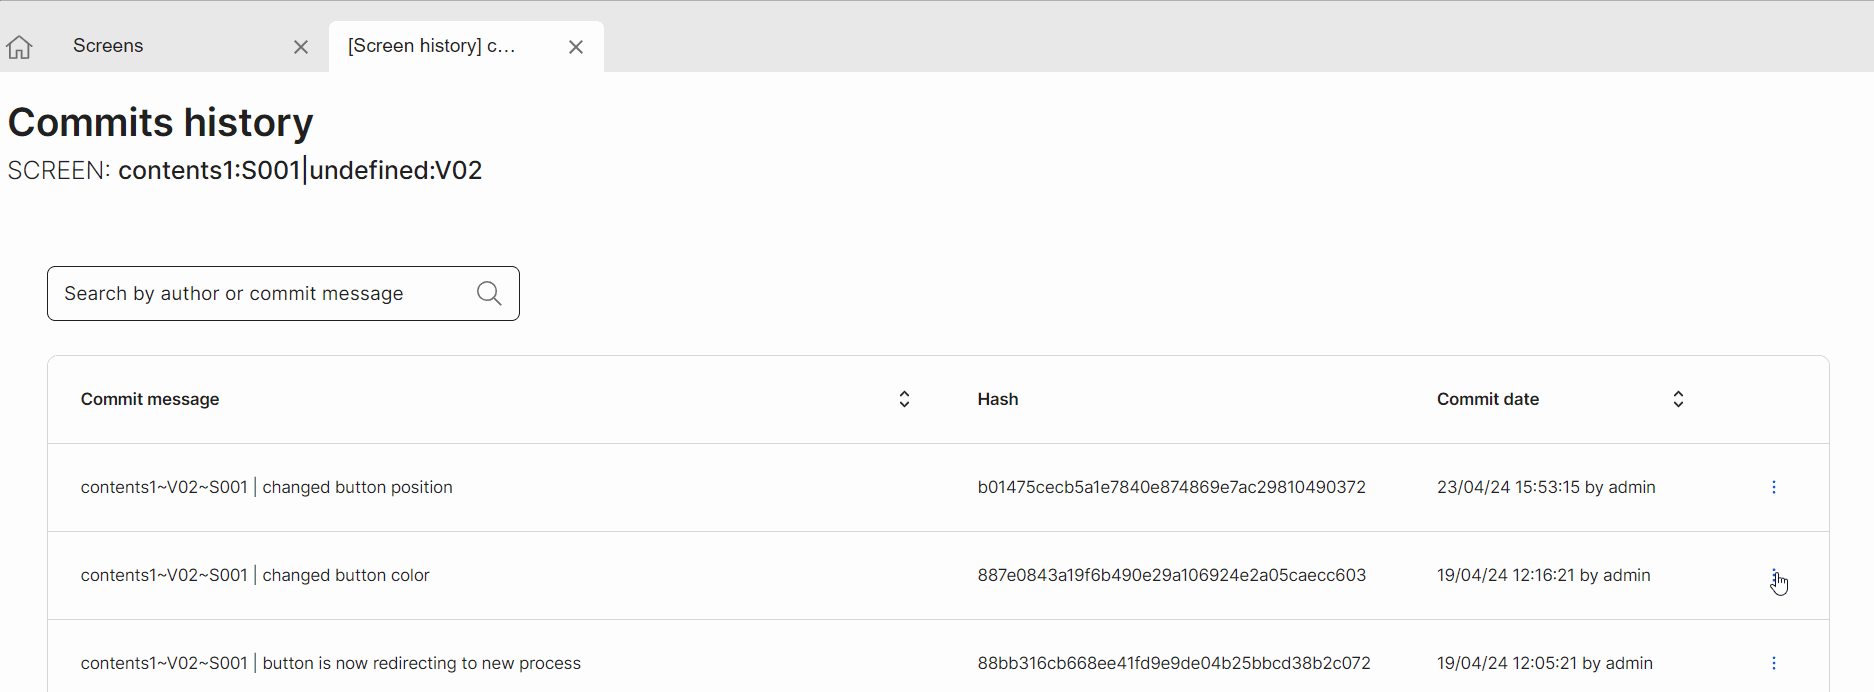
In the Commits history page, you see a list of all commits sent to the repository with the following information:
Commit message: The message that explains the updates applied in this commit.
Hash: Unique commit's GIT internal identifier. This ID is allows you to search for the commit within GitLab.
Commit date: Date the commit was sent to the repository, and the author.
You can sort commits by name (in alphabetical order) or by number by clicking the sorting arrow icons. You can also search for a commit by typing the name or author in the search bar.
To inspect changes applied to an entity under a specific commit, click the vertical three-dot icon next to the commit and click Download. This will download an .xml file to your device, where you can analyze the entity and see the updates applied.
How to Roll Back to a Previous Commit
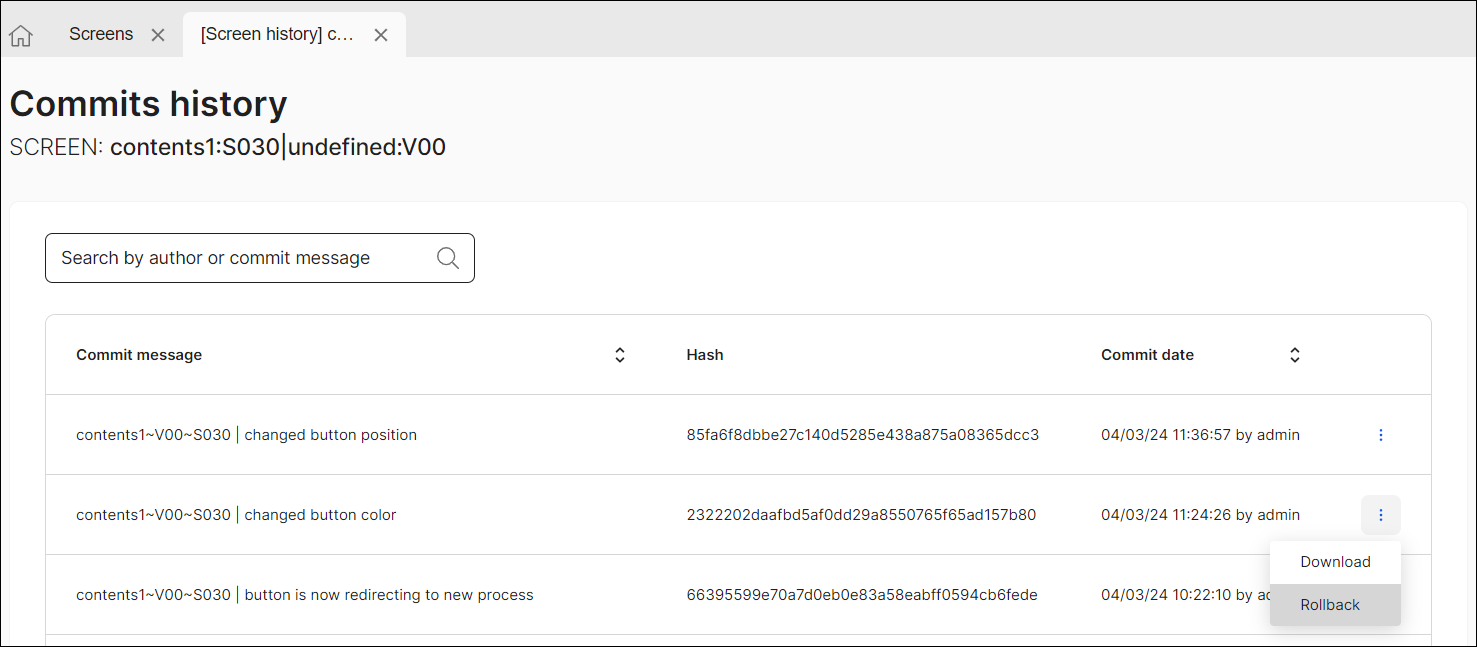
You might need to roll back an entity (a screen, process, transaction or test) to a previous version because such changes introduced an error to your app, or because you want to analyze the entity in a previous version. To do this, go to the entity's Commit History page. Search for the commit you want to restore the entity to, click the vertical three-dot icon next to the commit and select Rollback.
In the example below, the user needs to roll back a screen to a previous commit to discard a modification in the position of a button. To do this, the user clicks Rollback in a previous commit that introduced a new color to the button, but this component remains in its original position.
Once the user confirms the rollback, a new commit appears at the top of the list indicating that the entity went back to a previous version, and which versions are affected, as shown below.
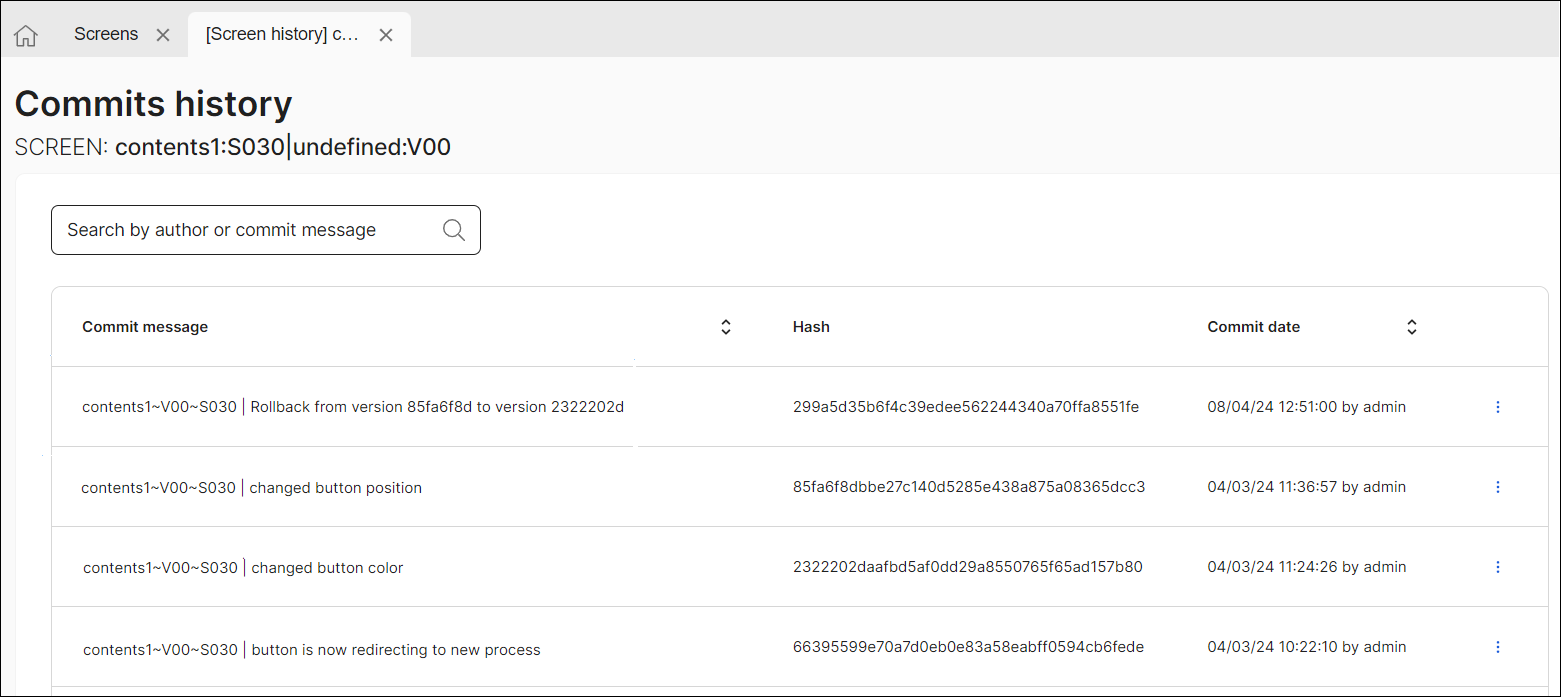
The name of the new commit, that is, the result of the rollback, contains the name of the entity, the selected commit's hash (the first 8 alphanumeric characters), and the restored version commit's hash (the first 8 alphanumeric characters), as in the example above: "Entity [entity's name] Rollback from version [8-characters hash] to version [8-characters hash].
After the rollback, the user can navigate to the screen that contains the affected button and visualize that the component went back to its previous position.
Important
If you try to roll back an entity to a previous version, and that entity contains an element that has been deleted, you might get a rollback error.
If the element has been deleted from Studio but still persists in GIT, the rollback won't be affected.
If the element has been deleted from GIT, the rollback will fail.
Recover Deleted Entities
Warning
Once an entity is deleted from Studio, it can only be recovered via Gitlab. Proceed with caution to avoid accidentally deleting relevant entities.