Functions
Functions are the logic executed within the steps of a process. While Processes can contain any number of steps, each step contains only one function. For a process to run successfully, the function that corresponds to each step must be executed successfully as well.
To learn how to work with functions, read Add or Edit a Function.
The configuration of a function depends on the type of function selected. Refer to Function Type Configuration for information about specific function types and how to apply them to your processes.
Functions saved to be reused are stored in the Functions Library.
Add or Edit a Function
You can add or edit functions from the process editor by clicking the icons in the Actions column of each step.
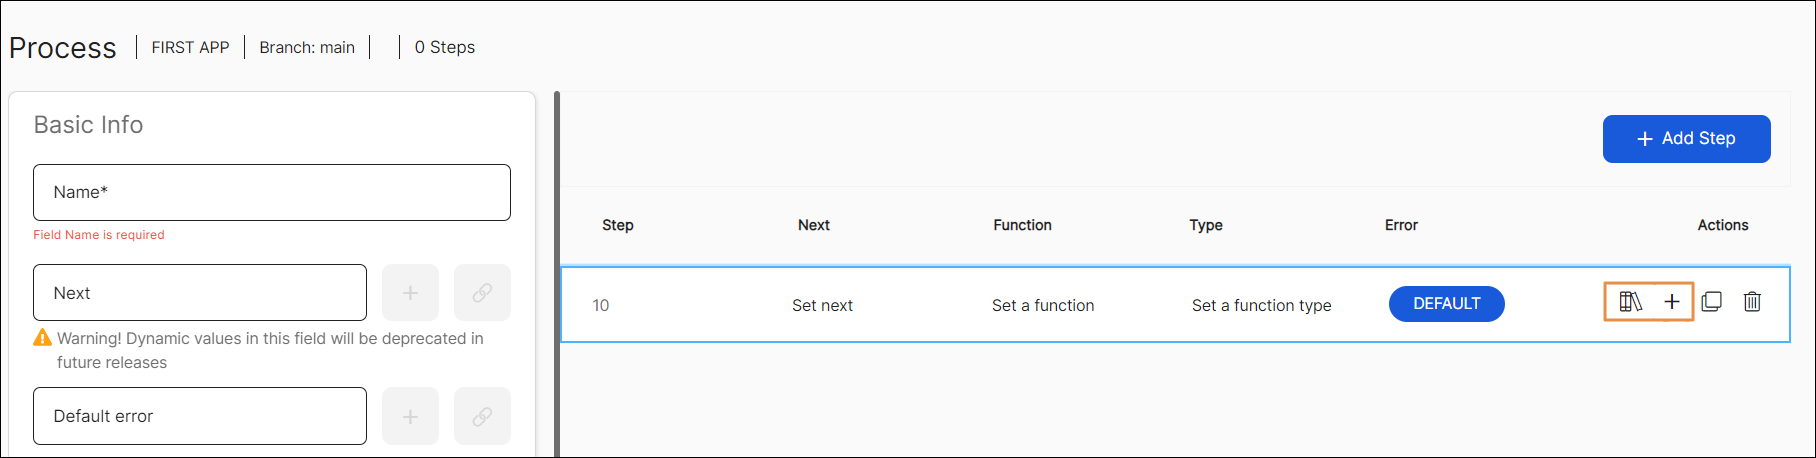
Read the sections below to learn more.
Add a Function
To add a function to a new step, you can either use a function from the Functions Library or create a new function.
Use a Function from the Functions Library
The Functions Library contains functions that were previously created and saved for reuse. Using these functions in your processes can help you save time, since you don't need to configure them.
Click Search function library (book icon). A view of the Functions Library opens. Find the desired function using the search bar and double click it. The function and type field will appear completed and a blue dot will appear next to the book icon.
Note
The configuration of functions in the Functions Library cannot be edited from the process editor.
Create a Function
To create a function, click Add (+ icon) and complete the required fields. Refer to the table below to learn more.
Function Name | Name of the new function. Enter a name to identify your function. ImportantThe function's name cannot be edited once created. Choose the name carefully. |
Function Type | Choose an option from the drop-down menu. Once you choose the function type, new fields appear. Read Function Type Configuration to learn how to complete the configuration for each type of function. |
Click Save to save changes and go back to the process editor. Click Cancel to discard changes.
Edit a Function
To edit the function of a step already configured, you can either edit the configuration of your function or replace it with a function from the Functions Library
Edit the Configuration of your Function
Click Edit (pencil icon) and make any required changes to the function name, type and configuration.
Click Save to save changes and go back to the process editor. Click Cancel to discard changes.
Use a Function from the Functions Library
Important
If you replace a function you had configured earlier with a function from the Library, the replaced function is deleted and can't be recovered. The Edit action (pencil icon) is replaced with the Add action (+ icon). To create a function again, click +.
To replace a step's function with a function from the Library, click Search function library (book icon). A view of the Functions Library opens. Find the function using the search bar and double click it. The function and type fields appear completed and a blue dot appears next to the book icon.
Function Type Configuration
When you configure a function and select the function type, a new set of configuration opens, which apply only to that specific type of function.
Read the articles in this section to learn more about the different types of functions available and how to configure each of them.
Note
Once you finish configuring your function, click Save. To go back, click Cancel.
VT_ARRAY
The VT_ARRAY function allows you to perform different actions using arrays or data matrices. Click + Add to add a new array call. Select an option from the drop-down menu in the Method field and configure the parameters applicable for that method. You can add as many array calls as you need.
Note
Note: In VT_ARRAY functions, you don’t have to complete the Output variable
There are nine methods available for VT_ARRAY functions. For any method, click Delete (trashcan icon to the right) to delete a specific array call, click Save to save changes, or click Cancel to go back to the process editor page.
Read the subsections below to learn more about each method and how to configure its parameters.
addRow
The addRow method allows you to add a row at the end of an array.
addRow | Array method selected. |
arrayId | Enter the id of the array where the row will be added. |
clone
The clone method allows you to duplicate an array. Only the structure and content of the array will be copied.
clone | Method selected. |
arrayIdDest | Enter the id of the array in which the information of the origin array will be copied. If it already contains data, that information will be replaced. |
arrayIdOrigin | Enter the id of the array to be duplicated. |
concat
The concat method allows you to concatenate two arrays. Both arrays must have the same number of columns and each column must have the same id number (for example, both arrays must have 10 columns numbered from 1 to 10). No rows are selected for the resulting array.
concat | Array method selected. |
arrayIdDest | Enter the id of the array in which the array resulting from the concatenation will be copied. You can specify one of the arrays as destination. If it already contains data, that information will be replaced. |
arrayIdOrigin1 | Enter the id of the first array to be considered for the concatenation. |
arrayIdOrigin2 | Enter the id of the second array to be considered for the concatenation. |
create
The create method allows you to create a new array.
create | Array method selected. |
arrayId | Enter an id to identify array to be created. |
Columns | Enter the number of columns to be added to the array. |
deleteRow
The deleteRow method allows you to delete a row in a specific array.
DeleteRow | Array method selected. |
arrayId | Enter the id of the array in which the row will be deleted. |
rowNumber | Enter the number of the row to be deleted. |
selectRow
The selectRow method allows you to select a row in a specific array.
arrayId | Enter the id of the array in which a row will be selected. |
rowNumber | Enter the number of the row to be selected. |
deltaToSelect | Displacement from the selected row. Complete with the respective number. |
sort
The sort method allows you to organize the rows in an array applying a sorting criterion to one or several columns.
arrayId | Enter Id that identifies the array to be sorted. |
columnsToSort | Enter the sorting criterion to be applied to a column. If you want to apply a criterion for more than one column, criteria shall be separated using the character "|". |
unselectRow
The unselectRow method allows you to deselect a row in a specific array. You must complete the arrayId parameter. Enter the id that identifies the array in which a row will be deselected.
updateRow
The updateRow method allows you to update the information in a row within a specific array.
arrayId | Enter the id that identifies the array in which a row will be updated. |
rowNumber | Enter the number of the row to be updated. |
delimiter | Enter the delimiting character that separates the data you want to split. |
columnsToUpdate | Enter the number of columns to be updated that are separated by the delimiter. |
values | Enter the values to be updated in each column, separated by the delimiter. |
VT_BRANCH
The VT_BRANCH function allows you to generate branches within the process which lead to different behaviors (such as skipping steps within the process). VT_BRANCH functions require setting input parameters, output parameters, a default value and a set of conditions. Refer to the annotated image below to learn more.
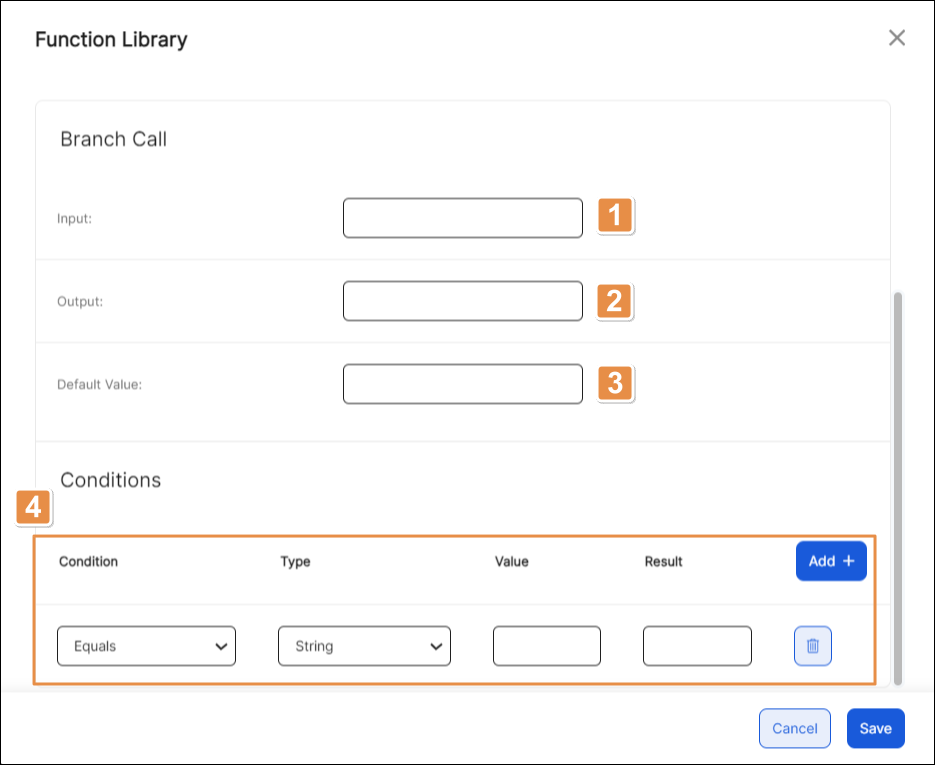
Input. Complete with the value of the variable to be assessed. It may be a register or a field in an array.
Output. Complete with the register in which the validation result with be kept.
Default Value. Complete with the step to be executed by default if conditions are not met.
Conditions. Conditions that, if met, generate a branch within the process.
Condition
Logic operation to be executed. Select an option from the drop-down menu: Equals, Not equal, Less than, Greater than, Less equal, Greater equal, Contains (applicable to String type only).
Type
Type of data to be assessed. Select an option from the drop-down menu: Numeric or String.
Value
Complete with the value to be compared with the input parameter set previously.
Result
Complete with the value to be saved in the output if the condition is met.
Note
Click Add + to add a condition and complete the respective fields. You can add as many conditions as you need. Click Delete (trashcan icon to the right) to delete a condition.
VT_CACHE
The VT_CACHE function allows you to perform different actions involving cache on a mobile device. Click Add + to add a new cache call. Then, select an option from the drop-down menu in the Method field and complete the fields applicable for that method. You can add as many cache calls as desired. Click Delete (trashcan icon to the right) to delete a cache call already created.
There are six methods available for VT_CACHE functions. Learn more about each method in the sections below.
Tip
In VT_CACHE functions, you don’t have to complete the Output variable.
clearAll
The clearAll method allows you to delete all the values saved in the cache, both registers and arrays. No parameters need to be configured.
getArray
The getArray method allows you to obtain the value of an array saved in the cache of a mobile device.
Id | Complete with the id of the item to be obtained from the cache. |
arrayIdDest | Array where the item or array obtained from the cache will be saved. |
getRegister
The getRegister method allows you to obtain the value of a register saved in the cache of a mobile device.
Id | Complete with the id of the item in the cache. |
RegisterIdDest | Register where the item obtained from the cache will be saved. |
insertArray
The insertArray method allows you to insert an array in the cache of a mobile device.
Id | Complete with the id of the item in the cache. |
arrayId | Complete with the id of the array to be saved in the cache. |
TTL | Time To Live. Indicate for how long the item lives in the cache. You can complete with one of the following options: SESSION: Enter the word “” or “0”: Enter Numeric value: complete with the desired time in seconds. |
insertRegister
The insertRegister method allows to you insert a register in the cache of a mobile device.
Id | Complete with the id of the item in the cache. |
registerId | Complete with the id of the register to be saved in the cache. |
TTL | Time To Live. Indicate for how long the item lives in the cache. You can complete with one of the following options: SESSION: Enter the word “” or “0”: Enter Numeric value: complete with the desired time in seconds. |
removeRegister
The removeRegister method allows to to delete the value of a register previously saved in the cache of a mobile device.
The only parameter to be configured is the id. Complete with the id of the item in the cache to be removed.
VT_CALL_API
The VT_CALL_API function allows you to perform actions using APIs to extend yor app's functionality. An API is an interface that contains input parameters, which must be configured, and provides output parameters where the API delivers the outcome of the action performed.
Refer to the table below to learn how to configure this function type's parameters.
API | Select an API from the drop-down menu. Each API contains a different set of API functions. |
API Function | Select a function from the drop-down menu. |
Input Parameters | Enter the values of the parameters applicable to the API function selected. |
Output Parameters | This section displays the output parameters of the API function selected. |
VT_CLEAN_STORAGE
The VT_CLEAN_STORAGE function allows you to delete the content of registers or arrays. Click the corresponding radio button for the method you want to apply and configure its parameters (if applicable). Read the sections below to learn more about the methods and how to configure them.
Clean Registers/Arrays
The Clean Registers/Arrays method allows you to delete the values of specified registers or arrays, or to select the registers and arrays whose values will remain intact while all others are deleted.
Click Add + to add new rows where you can enter registers or arrays as corresponding to each section. Click Delete (trashcan icon to the right) to remove any of the rows you added.
Click the Include radio buttons if you want to delete only the values of the registers or arrays you entered.
Click the Exclude radio buttons to delete the values of all registers or arrays except for the ones you entered. Persistent values (id>900) and session special values are not deleted.
Clean Session
The Clean Session method allows you to delete all the values of registers or arrays except for persistent values (id>900).
New Session
The New Session method allows you to generate a new session and keep the values of registers and arrays already set.
Clean Images
The Clean Images method allows you to delete all persistent images.
VT_DUMP_STORAGE
The VT_DUMP_STORAGE function allows you to invoke events or screens and set values to registers. It also allows you to clean the content of an array or delete an image from the cache on an individual basis. Click Add + to add a new dump call. Refer to the table below to learn how to set the parameters.
Input | Value to be assigned to the variable. |
Output | Variable where the value will be stored. |
Clean | Select Yes or No from the drop-down menu to determine whether the variable's content is deleted or not. |
Array | Enter the id of the array whose content you want to clean. |
Image | Enter the id of the image you want to delete. |
Click Delete (trashcan icon to the right) to delete a dump call already created.
VT_MATH
The VT_MATH function allows you to calculate a mathematical expression and assign the result to a register or variable. This function requires the following parameters:
Expression | Mathematical expression to be calculated. |
Output | Register where the result will be stored. |
VT_STRING
The VT_STRING function allows you to apply different methods to use or obtain information from strings. Click Add + to add a new string call. Refer to the table below to learn how to configure this function type.
Method | Select an option from the drop-down menu. Once you select a method, the parameters applicable to that method are displayed. |
Output | Enter the output values. |
Params | Parameters vary according to the method selected. Enter the values of the parameters applicable in each case. If you need assistance, contact your admin. |
Click Delete (trashcan icon to the right) to delete a string call with its respective parameters.
VT_TRACKING
The VT_TRACKING function allows you to define or invoke events to be registered for the different platforms or tools integrated by VTU App. You can choose one of the two methods explained in the sections below.
Register
The register method allows you to define different id numbers (tracking ids) that can then be referenced by different components. You can define as many tracking ids as required. Your app will save the tracking ids in a dictionary, and they will be available to be invoked in the future.
Each tracking id contains a set of references to platforms integrated by VTU App. You can indicate as many platforms as required. Refer to the annotated image below to learn more about the register method configuration.

Add tracking +. Click to add a new tracking.
Tracking ID. Enter the id to identify your tracking.
+ Add platform. Click to add a new platform.
Platform. Select one of the platforms available in the drop-down menu.
Delete Tracking. Click to delete the tracking. The tracking will be automatically deleted.
Important
Note: if you remove a tracking, the platform and parameters configuration will also be deleted.
+ Add parameters. Click to add new parameters for a platform.
Delete platform. Click to eliminate a platform. The platform and its configured parameters will be automatically deleted.
Parameter configuration. Refer to the table below to learn more.
Key
Enter a key to identify the action required.
Value
Enter the value of that action.
Delete parameters. Click to eliminate the parameters configured for a specific platform. Parameters will be automatically deleted.
Track
The track method allows you to invoke an event so that it is recorded in the registered platforms. The track method will tell the VTU app to invoke the tracking API defined for the tracking id specified. Hence, the tracking id is the only parameter to be configured. Complete with the tracking id required.
Note
You can only add one track method for the VT_TRACKING function.
VT_TRANSACTION
The VT_TRANSACTION function type allows you to access the transactions available in the environment. Refer to the table below to learn how to configure this function type.
Transaction | Select one of the transactions from the drop-down menu. Once you select a transaction, the input and output parameters applicable to that transaction are displayed. |
Async | Click the Async checkbox if you want the transaction to be processed asynchronously (requests and replies are transmitted on different sessions). |
Async Next | Enter the action to be performed once the transaction is executed. |
Input Parameters | Enter the values of the parameters applicable to the transaction previously selected. |
Output Parameters | This section displays the output parameters of the transaction previously selected. |
Functions Library
The functions library contains all the functions that were saved for reuse, and allows you to create new reusable functions, duplicate and edit them.
Warning
Editing the configuration of a function saved in the Functions Library will modify that function for all processes containing it. Apply extreme caution.
To access the functions library, click Global Logic > Function library. Refer to the annotated image below to learn more.
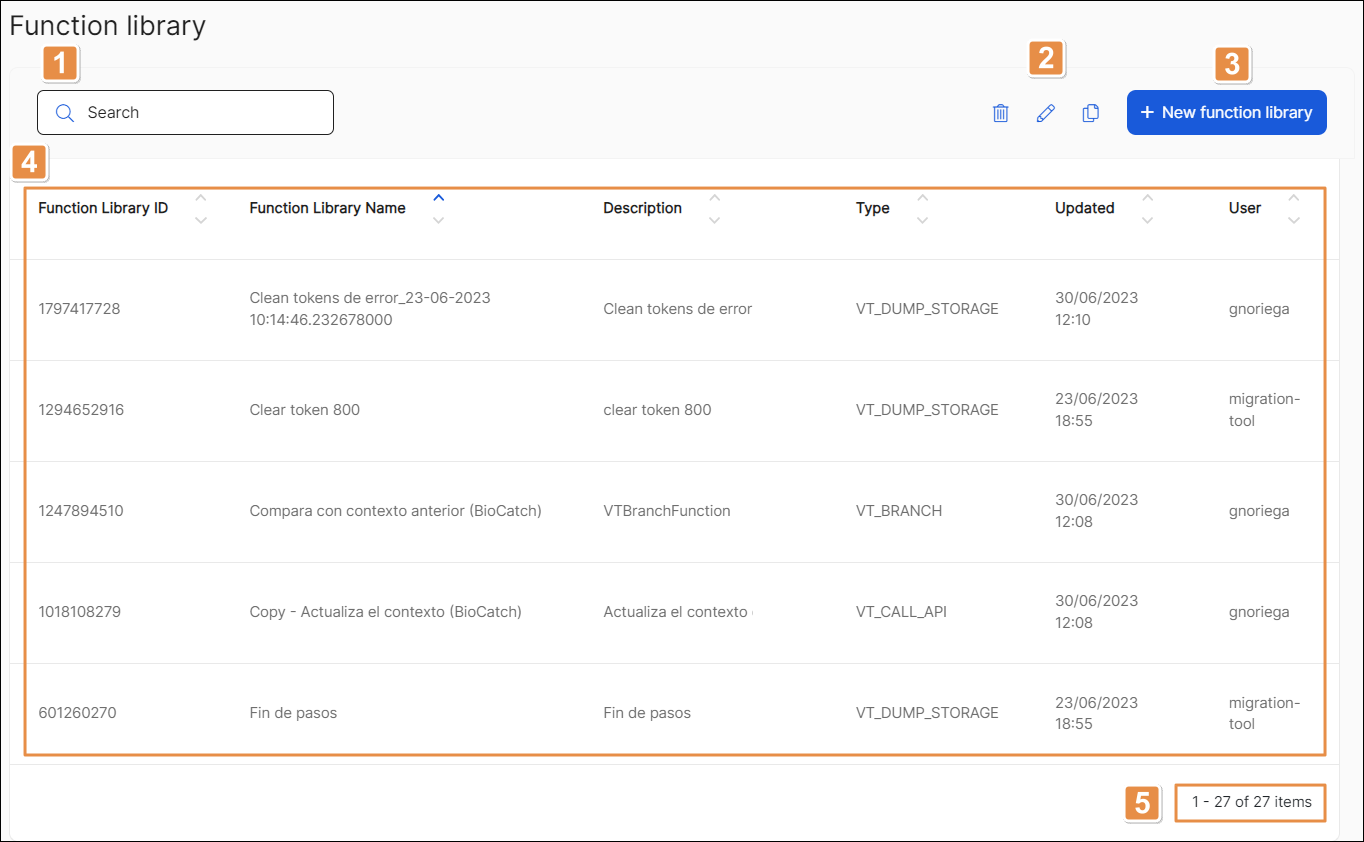
Search bar. Find a function by ID, name, description or type.
Actions. Select a function from the list to enable the icons displayed. If actions appear grayed out, either no function is selected or more than one function is selected. Each icon is explained in order of appearance in the table below.
Delete
Delete the selected function.
Edit
Edit the selected function.
Duplicate
Duplicate the selected function.
+ New function library. Click to add a new function.
List of reusable functions displayed in a table. Each column is explained in order of appearance in the table below.
Function Library ID
A unique ID, which the system generates automatically when a function is created.
Function Library Name
Name of the function. This field cannot be edited.
Description
Description of the function.
Type
Type of function.
Updated
Date of last update.
User
User who last updated the function.
Pagination. Click the arrows, if available, to navigate through the pages of the list.