Configuration Management
On the Configurations page, you can create a configuration to link the views you are building in Studio with a binary. You can also publish a configuration and see a version history.
First, select the product you want to edit from the products drop-down menu, then click User Application > Configuration Management. The Configuration Management page opens, showing a list of every configuration created in the environment for the selected product. See the annotated image below to learn more about this page.
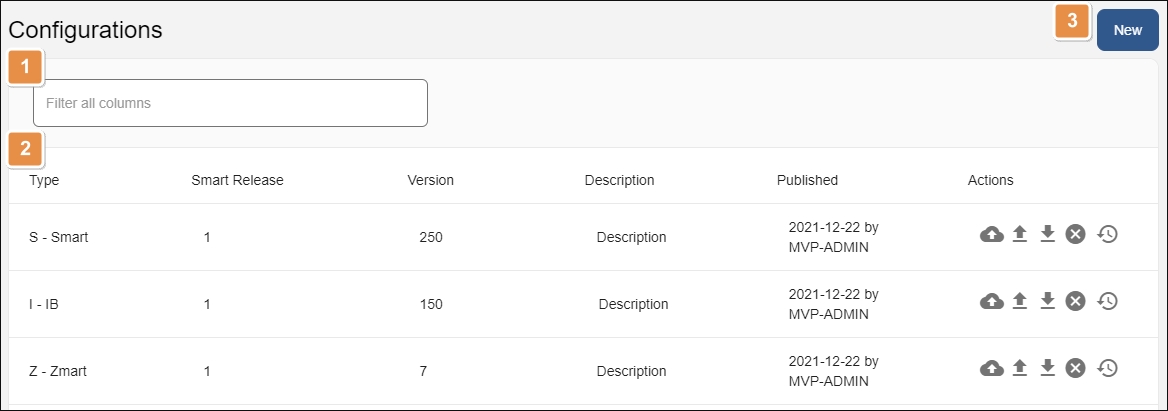
Search bar. Type a keyword to search configurations.
Configurations list. List of every configuration created on the environment for the selected product, with information divided into the following columns:
Type
Configuration type selected during the creation process. Configuration types allow you to have several configurations for different devices within the same binary.
Smart release
Number of configurations imported. The new imported file should have an increased version number.
Version
The configuration's version increases each time a configuration is published.
Description
Description to identify the configuration.
Published
Date the configuration was last published.
Actions
Publish Configuration
Click to publish the configuration to visualize the app on a device. This action publishes the data on the core server in three formats: FAT, DELTA and DELTA2. Read Publish Configuration by Format to learn how to publish your configuration in less formats.
Import Configuration
Click to import a configuration file (.xml) obtained from Studio. This step is required after you create a new configuration so the system can retrieve your app's data.
In the Import Configuration window, select a file from your device. Click Import to start the process.
Export Configuration
Click to export the configuration file. This downloads a .zip folder to your device.
Cancel Configuration
Click to go back to the previously imported configuration file. This removes the current configuration data and rolls back to the previous configuration.
Show History
Click to display a version history. Read Show History to learn more.
New. Click to create a new configuration for the selected product.
Show History
Click Show History to see a history of versions imported for a configuration.
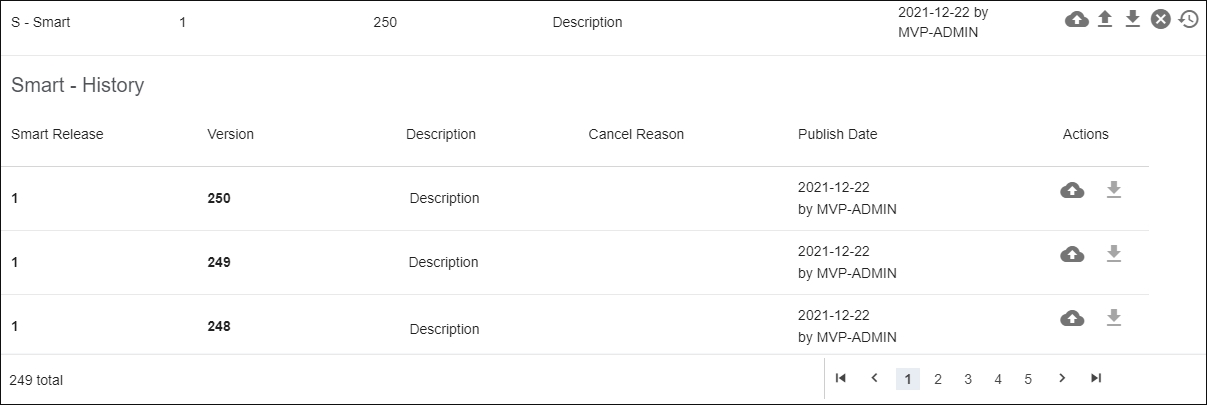
The Smart - History section shows every version imported, their descriptions, publish date and the reasons for canceling the corresponding entries. In the Actions column, you have the option to export the configuration that was imported or uploaded to your own device or republish an older version.
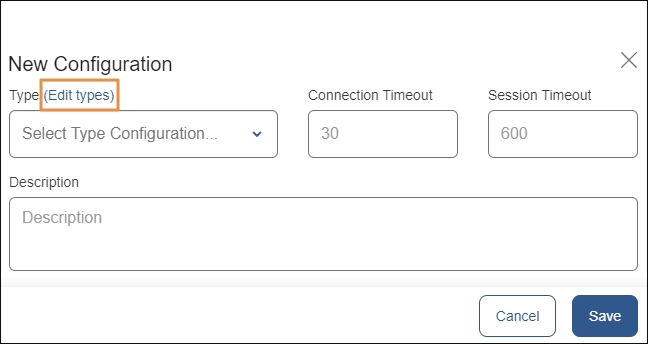
Create a Configuration
To create a new configuration for a product, select the product from the products drop-down menu, then click User Application > Configuration Management. In the Configuration Management page, click New.
In the New Configuration modal window that opens, click the drop-down menu to see all pre-configured configuration types available. Select the configuration type that represents the configuration you are going to import. Note that you can only have one configuration per type of configuration for each app. You can also create a new configuration type to add to the list.
Add a connection timeout and session timeout time in seconds. It is recommended to keep the default values recommended by the system.
Optionally, add a description.
Click Save to create your new configuration for the product selected on the drop-down menu.
The configuration will appear on the Configurations list without any data. Next, you need to import your app's .xml file to pull in the configuration's data. To do this, find the configuration you just created in the Configuration Management page and click Import Configuration ( ). In the window that opens, select a file from your device and click Import to start the process.
Important
After creating and importing a new configuration, you need to restart processes on the VT-Net platform so that it detects and applies the new updates. To learn how to do this, go to Restart Processes.
Create a Custom Configuration Type
To create a new, custom configuration type to add to the configuration type's list, click Edit Types in the New Configuration modal window.
In the List Configuration Types window that opens, you can edit available configuration types and create new ones.
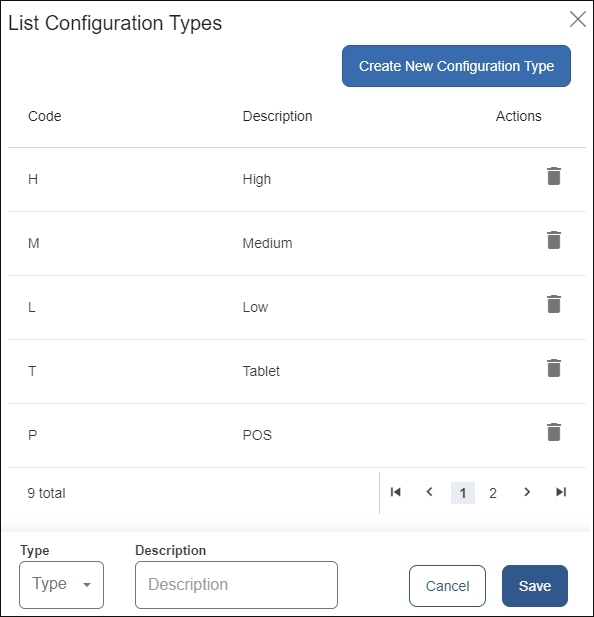
You can see the list of configuration types created, with their code and description. Click Delete in the Actions column to delete any configuration type in the list.
Click Create New Configuration Type to create a new entry. This displays a section at the bottom of the window (shown in the screenshot above) where you can assign a type (represented by a character) available from the drop-down menu, and enter a description. Then, click Save to save the new configuration type.
Important
After creating and importing a new configuration, you need to restart processes on the VT-Net platform so that it detects and applies the new updates. To learn how to do this, go to Restart Processes.
Publish Configuration by Format
Configurations published on the Configurations page (Product> User Application > Configuration Management), are published by default in three formats: FAT, DELTA (COMPACT) and DELTA2.
If you do not need to publish in one or more formats, you can disable them and publish your configuration in the desired formats only.
Important
This process impacts one or more configuration types in the selected product only. Repeat the process described below for the different products you need to update, as necessary.
To update the publication formats for a specific configuration type, you first need to select the product you are working on on the Products drop-down menu. Then, go to Product > Processes > Parameters and create a new business parameter on the Catalog, if it is not created already. Fill in the values as shown below:
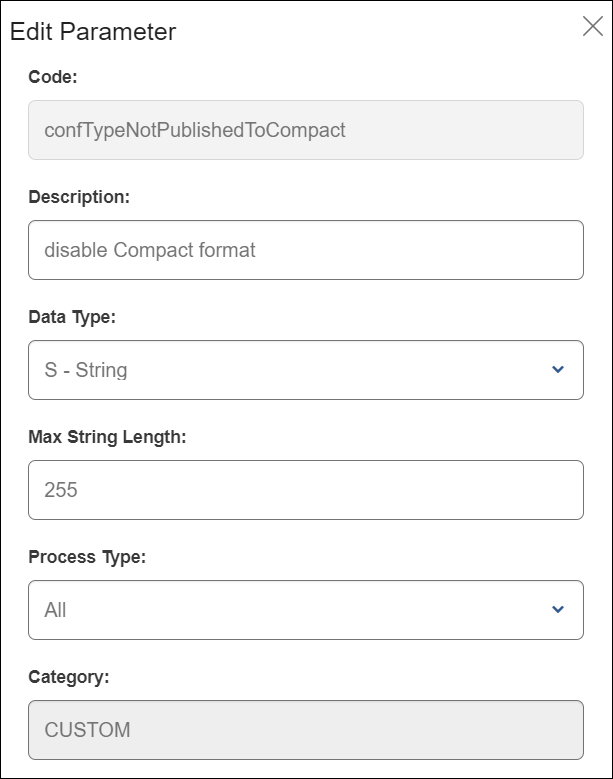
Code | Add confTypeNotPublishedToCompact (if you want to disable DELTA format), confTypeNotPublishedToDelta2 (if you want to disable DELTA2 format), or confTypeNotPublishedToFat (if you want to disable FAT format). |
Description | Add a description that allows you to recognize the business parameter and its function. |
Data type | Select String. |
Max String Length | Add any number. Value will be filled in with one or more configuration types in the next step. |
Process Type | Select All. |
Category | Leave as is. |
After creating the business parameter on the catalog, you need to assign a value to it. Click Values to exit the catalog and then New Business Param. A modal window appears. For more detailed information about this whole process, refer to Configure a Parameter's Value. Read below to learn how to complete your parameter's information.
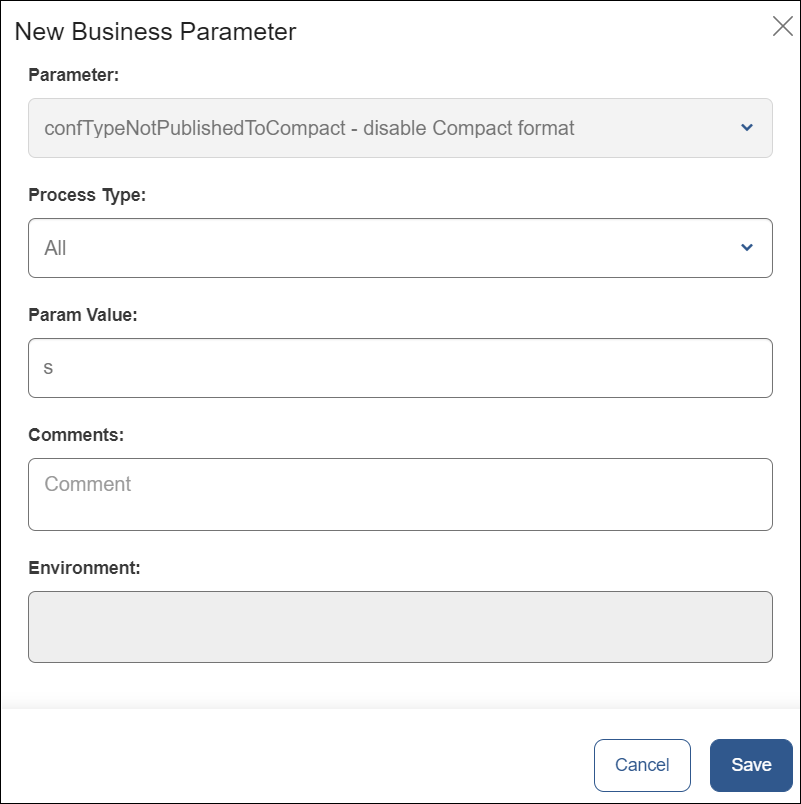
Parameter | Select the new parameter from the catalog by clicking the down arrow. In the example above, this parameter disables the Compact (DELTA) format. |
Process Type | Select All as shown in the example image. |
Param Value | In this field, add the configuration type(s) where you wish to disable the publishing format. If you want to add more than one configuration types, separate them with commas. NoteIn the example above, the S configuration type will not be published in the COMPACT format, so only DELTA2 and FAT formats are going to be published. |
Comments | Complete if necessary. |
Environment | This field is blocked and cannot be edited. |
Click Save to confirm updates. Next time you publish the affected configuration type, it will not be published in the format specified on the business parameter and will be published in the desired ones, which will also reduce publishing time.