Create or Edit an Application
To create an app, go to the Applications page and click + Create Application. The Create application page opens. Refer to the annotated image and sections below to learn more about the information required to create your app.
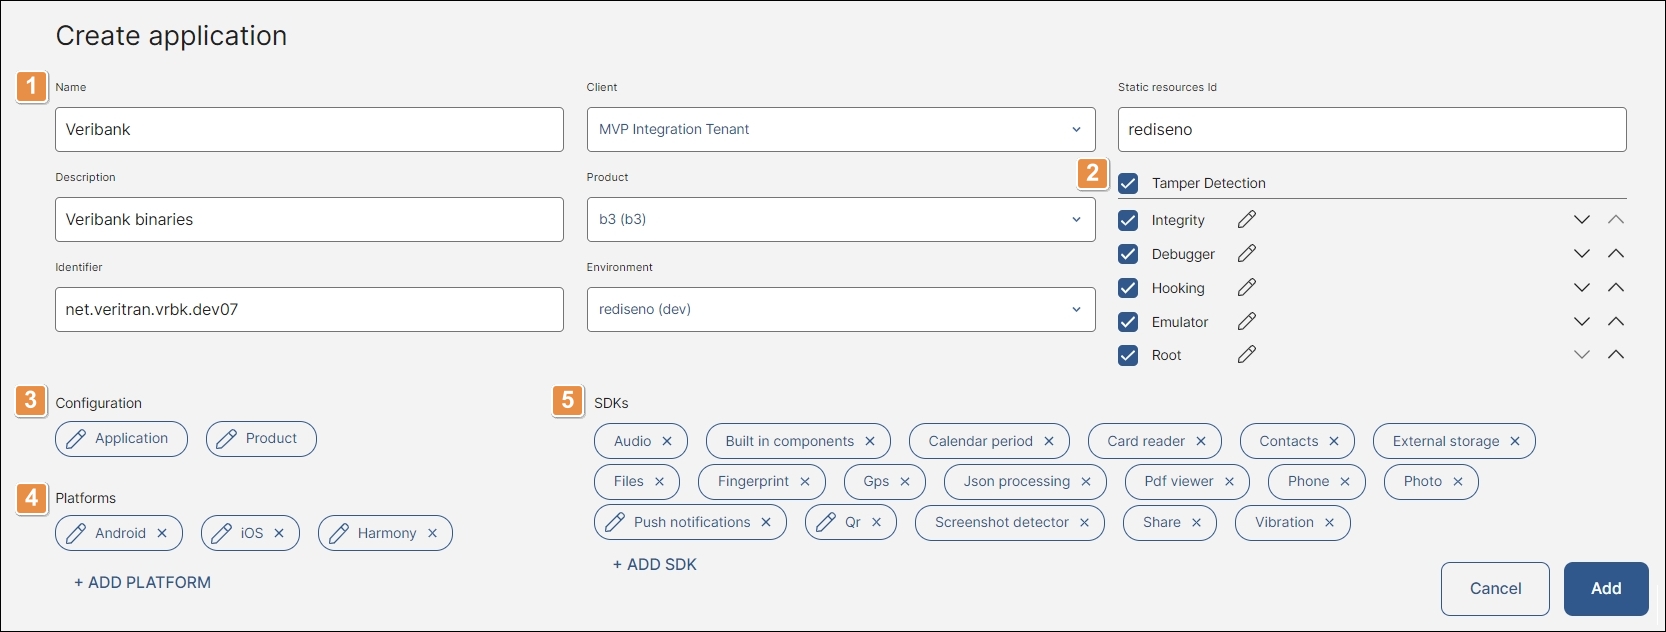
Basic info. Complete with your app's basic information. This information is mandatory, except for the static resources ID.
Tamper Detection. Configure preventive measures to avoid any attempt to tamper with your app without your consent.
Configuration. Configure the parameters for your app and product.
Important
These parameters are set by default, but you can edit the app or product configuration from this section.
Platforms. Add the platforms that will be enabled to generate a binary for the app. This information is mandatory.
SDKs. Add the SDKs that you want to include in your app.
Click Add to confirm the creation process. You are redirected to the Applications page, and a pop-up message appears confirming that the app was successfully created.
To edit an existing app, find the desired app in the list. Click the vertical three-dot icon and then click Edit. The Edit application page opens, where you can edit the parameters configured during the creation process or add new ones. Once you make the necessary changes, click Save. You are redirected to the Applications page, and a pop-up message appears confirming that the app was successfully updated.
Refer to the table below to learn how to complete the basic info section:
Name | Click the field and enter a name to identify the app. This field is mandatory. |
Description | Click the field and enter a short text to describe the app. This field is mandatory. |
Identifier | Click the field and enter an ID for the package used to install the app in a device. This information is necessary to publish the app on any store. An example of an ID's structure is: net.veritran.vrbk.s.dev. This field is mandatory. WarningIdentifiers are unique and cannot be reused for other apps. |
Client | Click the arrow and select a client from the drop-down menu. This field is mandatory. ImportantThe Client field is only available for partner users. |
Product | Click the arrow and select a product from the drop-down menu, where you can see each product's description and its name between brackets. You must first create the product in the Products page. This field is mandatory. |
Environment | Click the arrow and select an environment from the drop-down menu, where you can see each environment's name and its variant between brackets. You must first create the environment in the Environments page. This field is mandatory. |
Static resources ID | Click the field and enter the path to the static resources repository generated for the app in your Gitlab project. For example: git-group-example/git-sub-group-example/git-project-example. ImportantIf you have any questions on how to generate or obtain the static resources repository, contact your admin. |
To activate tamper detectors for your app, find the detector in the list and click the the checkbox to the left. By default, all detectors are enabled except for the Integrity detector. To activate all the tamper detectors, click the Tamper Detection checkbox at the top of the list.
To change the order in which detectors will be run, click the up and down arrows located to the right of each detector. Refer to the table below to learn more about each tamper detector.
Debugger | Prevents the debugging of your app. The mode suggested for this detector is "soft". |
Hooking | Verifies the system function calls. The mode suggested for this detector is "hard". |
Root | Prevents the use of the app on a rooted device. The mode suggested for this detector is "hard". |
Emulator | Prevents the use of the application on an emulator. The mode suggested for this detector is "hard". |
Integrity | Verifies the integrity of the application by validating its certificates. |
You can also edit the configuration of each tamper detector. Refer to the section below to learn more.
Edit a Tamper Detector
To edit a tamper detector, find it in the list and click the pencil icon. A panel opens, where you can edit its settings. Refer to the table below to learn more.
Mode | Mode in which the detector will be run. Click the field and select and option from the drop-down menu menu. Click soft if you only want the detector to warn you about any attempt to tamper with your application. Click hard if you want the detector to block any further action if any attempt to tamper with your application is detected. |
Interval | Interval in which the detector will be run. Click the field and enter the interval in numbers. |
Checks | Checks performed by the detector. By default, each detector includes different checks. Click the remove icon (x) of any check if you don't want to include it in your detection process. To add more checks, click the arrow and select them from the drop-down menu or click the Include all checks toggle switch to include all checks. |
Packages | Information used to check that the emulator has been stopped. Click the field and select the package or packages from the drop-down menu. This field only appears in the Emulator tamper detector configuration. |
Click Save to save the changes.
Hover over each chip to see the application and product configurations. These parameters are set by default, but you can edit the application or product configuration from this section.
Edit Application Configuration
To edit the application configuration, click the pencil icon in the Application chip. A panel opens, where you can edit the following information:
Device type | Click the arrow and select one of the device types from the drop-down menu: phone, tablet or both. |
Screen orientation | Click the arrow and select one of the screen orientation from the drop-down menu: portrait, landscape or both. |
Wearable | Switch the toggle to make your app available for smart watches. |
Test automation enabled | Switch the toggle to enable the use of automated testing tools. |
Certificate pinning | Click the field and enter the domain and the hash (or hashes) required to restrict which certificates are considered valid for your application. Then click + ADD CERTIFICATE to finish the process. Once each certificate is added, click the pencil icon to edit it or the trash icon to delete it. |
CA Certificates | Click the field and enter the CA digital certificates used to verify the SSL certificates signed by each certificate authority. Then click + ADD CA CERTIFICATE to finish the process. Once each certificate is added, click the pencil icon to edit it or the trash icon to delete it. |
Important
If you need to complete any of these fields but you don't have the necessary information, contact your admin.
Click Save to save the changes.
Edit Product Configuration
To edit the product configuration, click the pencil icon on the Product chip. A panel opens, where you can edit the following information:
Mstm version | Click the field and enter the desired MSTM (internal messaging) protocol version. The option suggested is "2". You can also use the arrows to the right to set the number. |
Delta version | Click the field and enter the desired delta configuration version: "0" activates the fat version, "1" activates the split version, "2" activates the full delta version. You can also use the arrows to the right to set the number. |
Crc header type | Click the field and enter "0" to keep end-to-end encryption deactivated or "1" to activate end-to-end encryption. You can also use the arrows to the right to set the number. |
Repo encryption version (only available for Android) | Click the field and enter the desired repository encryption version: "0" keeps repository encryption deactivated, "1" activates encryption for the information about the app extracted from Android's repository. You can also use the arrows to the right to set the number. |
Veritran secret code | Click the field and enter the secret code defined for your application. The secret code is used to access the app's configuration information from a device while initializing the app. |
Working key type | Click the field and enter the type of end-to-end encryption desired: "0" to use Diffie Hellman end-to-end encryption or "1" to use PKI end-to-end encryption. You can also use the arrows to the right to set the number. ImportantThe CRC header type needs to be activated to use one of these options. |
Working key persisted | Click the toggle switch to deactivate this option. By default, the toggle is activated. TipThis option should be activated when using Diffie Hellman end-to-end encryption and deactivated when using PKI end-to-end encryption. |
Device handler certificate | Click the field and enter the Device Handler certificate used to secure communication with end-to-end encryption. This certificate needs to be the same as the one created in the platform's middleware for the product selected. |
Certificate pinning | Click the field and enter the hash (or hashes) obtained from the VT-Gateway required to restrict which certificates are considered valid for your product. Then click + ADD CERTIFICATE HASH to finish the process. Once added, you have the option to delete (trash icon to the right) each hash. |
Important
If you need to complete any of these fields but you don't have the necessary information, contact your admin.
Click Save to save the changes.
Click + Add Platform to add a new platform for the app. Platforms added will be enabled to generate a binary for the app. Refer to the Add Platform section below to learn more.
Hover over each chip to see the details of the platforms added. Click the remove icon (x) in any platform chip to delete it. To edit a platform, click the pencil icon in that platform's chip. You can edit all fields except for the platform name. Click Save at the bottom of the panel to implement the changes.
Add Platform
To add a new platform for your app, click + Add Platform in the Platforms section. A panel opens on the right side of the screen. You must first select a platform from the drop-down menu (iOS, Android or Harmony). Then, the following parameters appear. Refer to the table below to learn more about how to set them.
Version | Click the arrow and select a version from the drop-down menu. Refer to the Versions page to see a list of the existing versions with their current statuses. This field is mandatory. | ||||||||||||
Name | Click the field and enter a name to identify the platform. | ||||||||||||
Identifier | Click the field and enter an ID for the package used to install the application in a device. This information is necessary to add the application to any store. An example of an ID's structure is: net.veritran.vrbk.s.dev. You can enter a different ID for each platform and overwrite the one entered in the Basic Info section when creating the application. WarningIdentifiers are unique and cannot be reused for other applications. | ||||||||||||
Min. SDK version | Click the field and enter the minimum SDK version. This field only appears in the configuration for Android and Harmony. | ||||||||||||
Universal Domains | Fill in the fields in this section to set the URLs that will open the app when it is downloaded on the device.
Then click + ADD UNIVERSAL DOMAIN to finish the process. Once each domain is added, click the pencil icon to edit it or the trash icon to delete it. |
Click Add to finish the process.
To add a new SDK to your app, click + Add SDK in the SDKs section. A panel opens. Select an SDK from the drop-down menu and review the platforms selected (Android, iOS or Harmony) . By default, all the platforms configured for your app at the moment of adding the SDK are selected and you can unselect the ones where you do not want to include the SDK. Make sure to have the selected platforms added in the Platforms section to avoid issues when generating the app.
Then, fill in the parameters required to enable that SDK. Hover over the question mark icon to the right of each field to get additional information about the SDK configuration. Click Add to finish.
Important
Each SDK requires you to fill in different parameters for its configuration. If you have questions about how to complete these parameters, contact your admin.
Click the remove icon (x) in any SDK chip to remove it from your application.
To edit an SDK, click the pencil icon in that SDK's chip. Only the SDKs with configurable parameters can be edited. You can edit all fields except for the SDK name. Click Save to finish.