Create or Edit a User
To create a new user, go to the Users page and click + Create New User. In the Create user page that opens, complete the required fields. Refer to the sections below to learn more.
Important
To create or edit users, your Workspace user must have the Create User and Update User permissions assigned, respectively.
Basic Info
In this section, you complete the user's basic settings. Refer to the table below to learn more.
Username | Username credential to access Workspace. Enter a unique name for the user (max. 60 characters). This field is mandatory. |
Display Name | Name that identifies the user in Workspace. Enter a name for the user (max. 60 characters). This field is mandatory. |
Active | Toggle to set the status of the user. By default, the status is Active (blue-colored toggle). Click the toggle to change the status to Inactive (grey-colored toggle) and deactivate the user. |
Email account of the user (max. 60 characters). This field is optional. | |
Clients | Client to which the user is associated. Click the arrow and select a client from the drop-down menu. To select more than one client, click the arrow again and select another client. To remove a client selected, click the x icon to the right of that client's name. ImportantThe Clients field is only available for partner and superadmin users. |
After completing the Basic Info section, you must complete the Permissions Groups section.
Permissions Groups
In this section, you determine the permissions to be granted to the user by selecting permission groups. Each permissions group is classified under a client and the environment or environments within that client. The permission groups displayed in this section depend on the client or clients selected in the Basic Info section. Therefore, all the permission groups of the client or clients you select will appear available. You can select as many permission groups as you need.
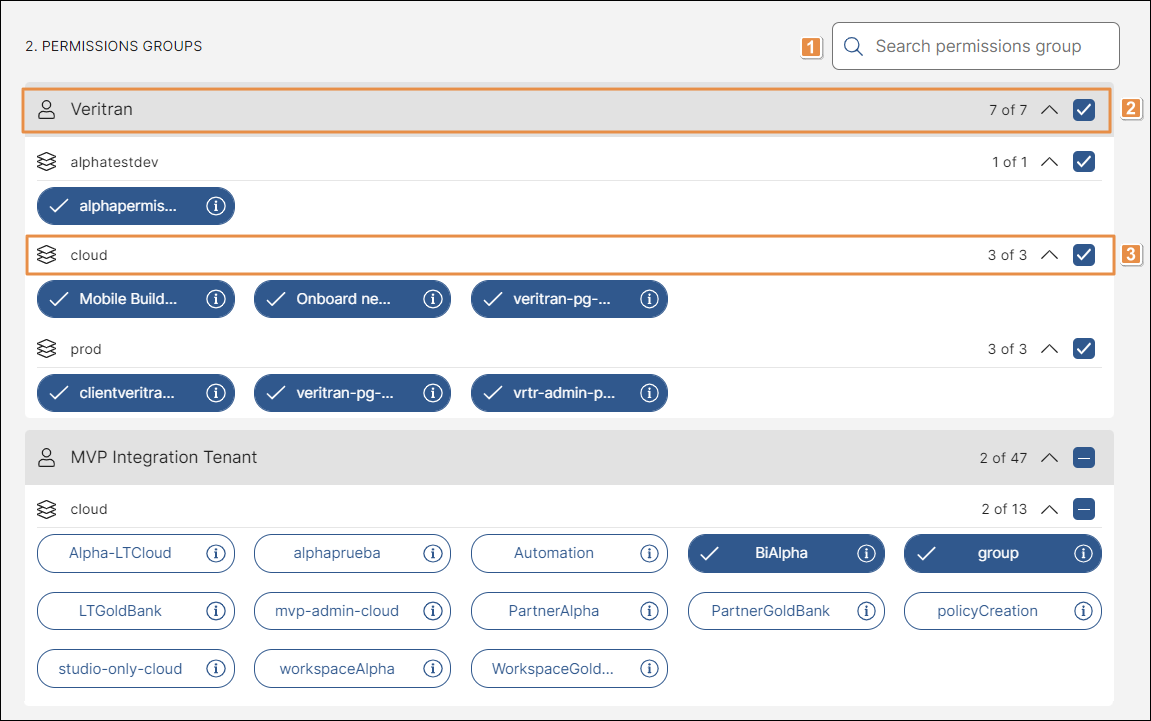
Search bar. To find a permissions group, click the search bar and type its name.
Permissions group per client. Click the checkbox to select all the permissions set for every environment of that client. The number located to the left of the checkbox reflects the number of permissions groups selected for that client (blue-colored chips).
Permissions group per environment. Click the checkbox to select all the permissions groups within one environment in bulk. To select permissions groups individually, click on each group. The number located to the left of the checkbox reflects the number of permissions groups selected for that environment (blue-colored chips).
Tip
Client permissions groups are identified with a person icon located to the left of the group's name. Environment permissions groups are identified with a stack icon located to the left of the group's name.
Permission group details. Click the information icon located to the right of the permission group to see or edit the permission's settings. A panel opens, which contains the details on the client, environment and permissions granted. Click Go Back to go back to the user's settings. Click Edit to go to the permission group's settings and make any changes you may need.
Once you complete all the fields, click Create. A panel opens, which includes a link for you to copy and share with the respective user so that they can set a new password. Click Copy Link and Close to copy the link and close the panel. You are then redirected to the Users page.
Note
The user that sets the new password must consider the criteria specified in the password settings page. Once the new password is saved, the user is allowed to work in Workspace Accounts & Environments.
To edit a user from the Users page, find it in the list, click the vertical three-dot icon to the right and then click Edit. The Edit user page opens, where you can modify the user's basic info and permissions groups. The edit page allows you to modify the same fields you completed when creating the user. Click Save to confirm changes. A popup message appears, confirming that the user was successfully updated.