Screens
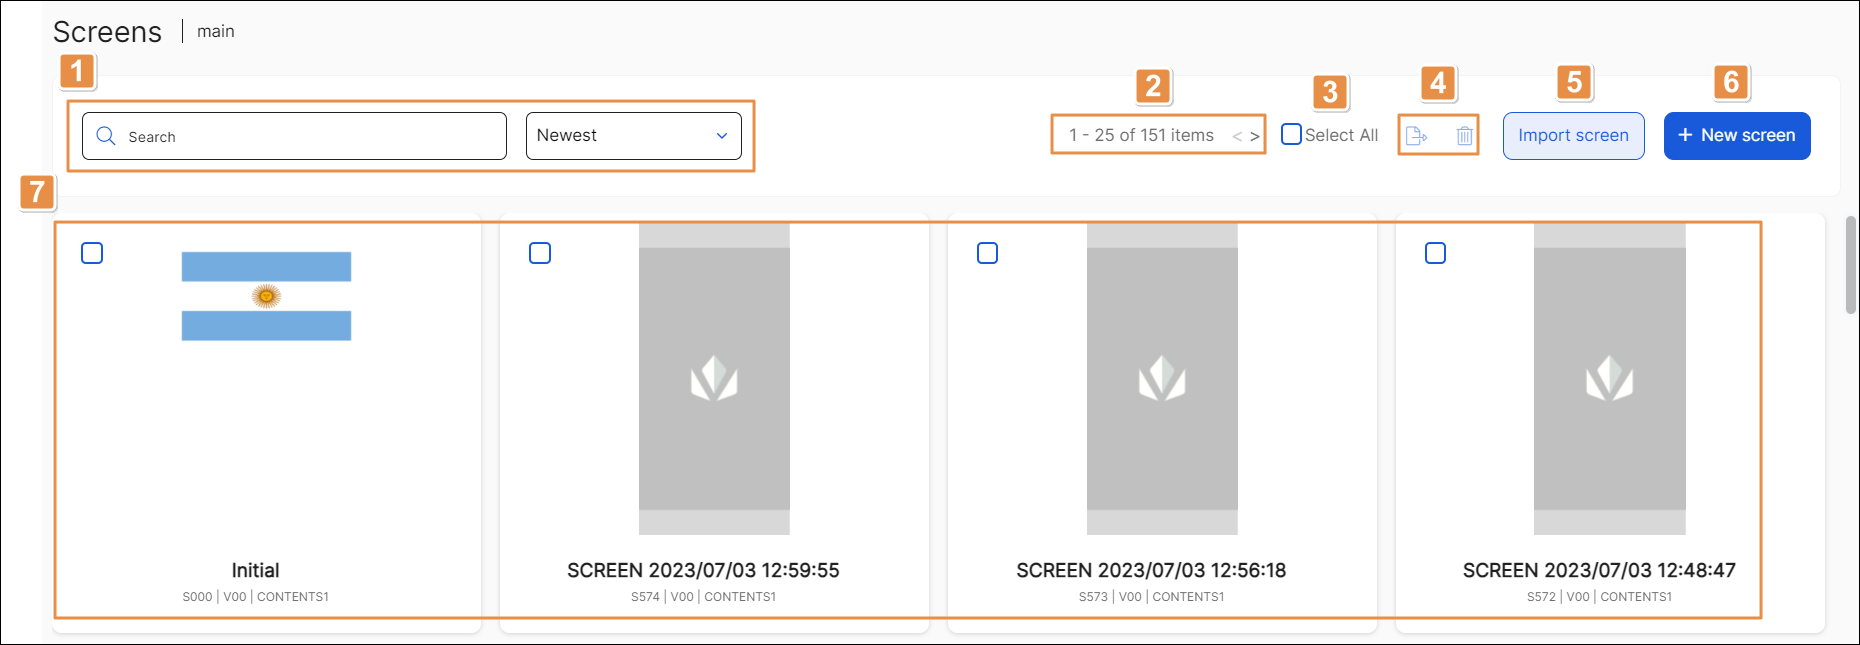
The Screens page shows all the screens of your context organized in a list. To access the list of screens of your context (app or module and branch), navigate to your context and click Screens on the Overview, or go to Branch Design > Screens. Refer to the annotated image below to learn more.

Search bar and sorting criteria. Search screens by name, screen group or tag. To define the organization of assets displayed, click the arrow in first drop-down menu and select one of the options available: Newest, Oldest, A-Z, Z-A.
Pagination. Number of screens displayed on screen. Click the arrows to move forwards or backwards in the list of screens.
Select all. Click the checkbox to select all the screens on the page.
Actions. Refer to the table below to learn more.
Note
Actions only appear available after you select one or more screens by clicking the checkbox in each screen card or clicking the Select all checkbox.
Export
Click to export the screen or screens selected. The file will be downloaded to your device.
Delete
Click to delete the screen or screens selected. A panel opens, asking you to confirm the elimination. Click Confirm to proceed.
Import screen. Click to import a screen to Studio. Once the file browser opens, select the .xml file to import, configure the settings of the imported screen and save it. The screen settings can also be edited from the Settings tab in the left panel of the Visual Builder.
+ New screen. Click to create a new screen. The Visual Builder opens, where you configure the look and feel of your app.
Screens. Screens displayed in card view. Read the section below to learn more.
Card View

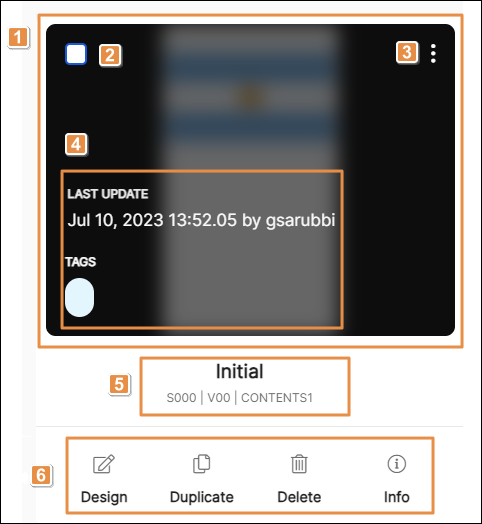
Thumbnail. Small image that represents the look and feel of the screen. To learn how to choose a thumbnail for your screen, refer to the Edit Screen Thumbnail section below.
Select this card. Click to select the screen. Export and Delete actions only become available once you select one or more screens.
More options. Click the vertical three-dot icon to see the list of actions available. Refer to the table below to learn more.
Export
Click to export the screen. It will be downloaded to your device in .xml format.
Click to open the Compare Screen page, where you can compare the screen in this branch to the same screen on another branch.
Thumbnail
Click to set or modify the screen thumbnail. Read Edit Screen Thumbnail below to learn more.
Set as default editing screen
Click to set the selected screen as the start screen of your context.
Basic information. The card shows basic details about the screen including the last update time and date and user who updated it and tags that identify the screen, if any.
Screen details. Screen name, its sequence number, and site view and visual area where it is included.
Actions. Refer to the table below to learn more about the actions available.
Design
Click to open the screen in the Visual Builder.
Duplicate
Click to make a copy of the screen. The new screen will appear listed in the Screens page.
Delete
Click to delete the screen. A modal opens, asking you to confirm the elimination. Click Confirm to proceed.
Info
Click to see information about the screen. A modal opens, which includes the screen name, the view area in which it is included and its sequence number and where you can edit the screen description and add any tags you may need. Click Save to confirm the changes.
Important
The screen's name, sequence and view area cannot be edited.
You can also see this information in the Settings tab located in the left panel of the Visual Builder .
Edit Screen Thumbnail
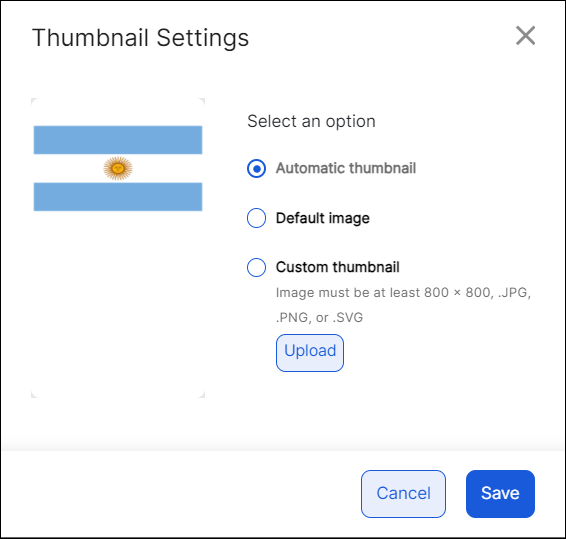
In the screen card, click the vertical three-dot icon and then click Thumbnail. The Thumbnail Settings modal appears, where you can configure it. Choose the radio button to the left of the option you want to apply (see image below).
You can automatically save a thumbnail of your screen's last version, set a default image as thumbnail or to upload a custom thumbnail.
To upload a custom thumbnail, click Upload and select a file from your device. The supported formats are .jpg, .png and .svg, and images must be under 800 pixels in width and height.

Click Save to save the new settings, or Cancel to go back to the previous screen without making any changes.