Users
In the Users page, you can create new users or edit the settings of existing ones. For each user, you can set permissions according to the products available for each client and the environments to which the client has access. Refer to the annotated image below to learn more.
Important
To create or edit users, your Workspace user must have the Create User and Update User permissions assigned, respectively.
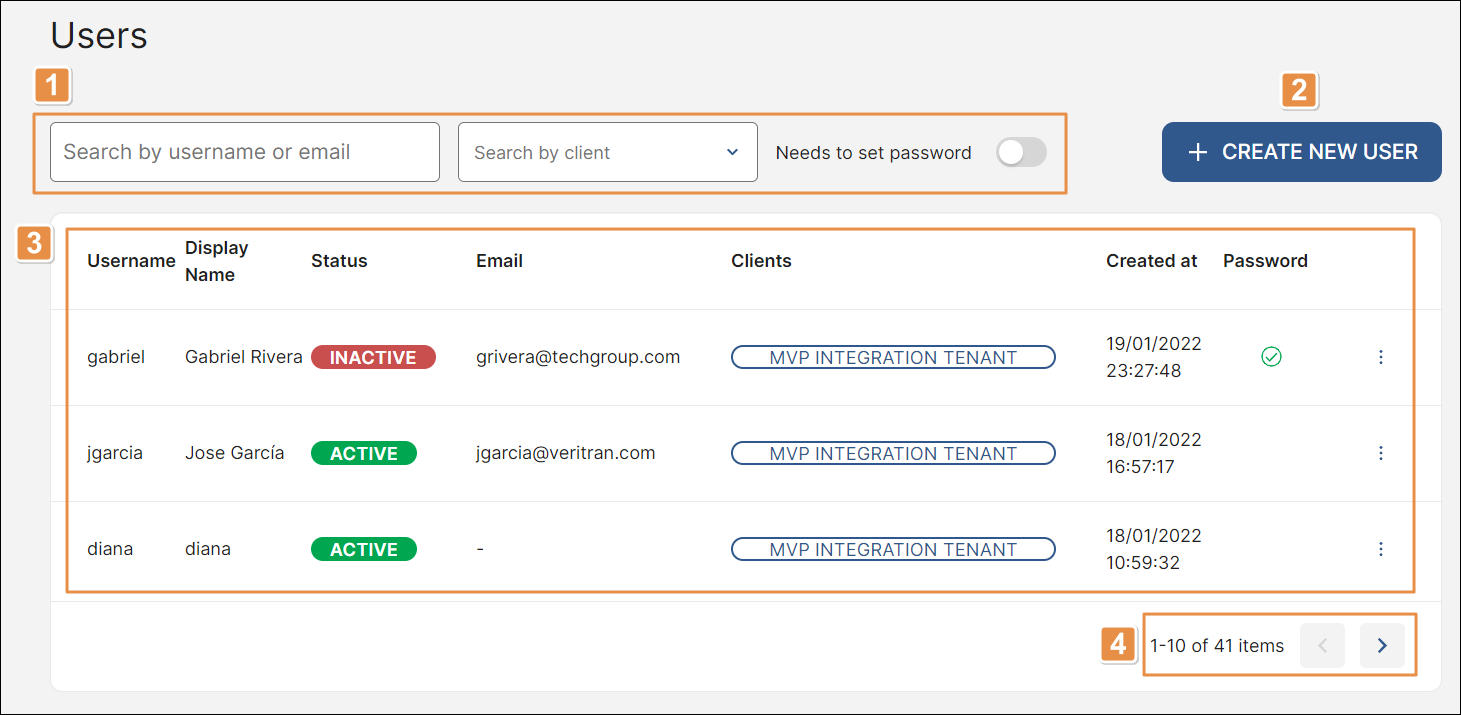
Search bar and filters. To find a user, click the search bar and type the username or email set upon creation. To narrow down the list of users by client, click the arrow and select a client. To narrow down the list and see the users that have no password set yet, click the Needs to set password toggle.
+ Create New User. Click to create a new user. To learn more, read Create or Edit a User.
List of users. Refer to the table below to learn more about the information provided.
Username
Name of the user in Workspace.
Display Name
Name displayed in Workspace when the user logs in.
Status
Current status of the user. Refer to the table below to learn more about the statuses available.
Active
Users whose accounts are activated and can operate in Workspace (green label).
Inactive
Users whose accounts have been deactivated and cannot log in to Workspace, which means that they are not allowed to work on the platform (red label).
Email
Email account used to create the user profile in Workspace.
Clients
Client or clients to which the user has access.
Important
The Clients column is only available for partner and superadmin users.
Created at
Date and time the user was created.
Password
Check icon indicating that the user has set its password. If the user has not set a password yet, this field appears empty.
More options
Click the vertical three-dot icon and then click any of the options available. Refer to the table below to learn more.
Edit
Click to edit the user settings. To learn more, read Create or Edit a User.
Manage Sessions
Click to see the active sessions of a specific user. The page includes a list of devices used to log into the user's account. You can revoke any sessions that you don't recognize.
To revoke a session, click Revoke. A modal appears, informing you that revoking the session disables user access to all associated products. Click Revoke again to confirm. To revoke all sessions, click revoke all other sessions. A modal appears, informing you that revoking the sessions disables user access to all associated products. Click Revoke again to confirm.
If there are no active sessions, the message No Active Sessions appears on screen.
Generate link set password
Click to generate a link so that the user can set a new password. Once the Link to set password window opens, click Copy Link and Close to copy the link and share it with the user. Once the window closes, you will be redirected to the Users page and you won’t have access to that link anymore.
Rows per page and pagination. Number of rows displayed on screen. Click the arrows to move forwards or backwards in the list of users.
The options to create or edit users depend on the user type and permissions granted to the user working on Workspace Accounts & Environments. Superadmin users can create or edit users for all the clients within the platform. Partner users can create or edit users for the clients they have been granted permissions for. Client users can only create or edit their own users.
To learn more about how to create or edit a user, read Create or Edit a User.