Create or Edit a Point of Interest
To create a new point of interest for your product, go to the Points of Interest page, and click Create POI. You are redirected to the Create Point of Interest page, where you define the settings of the POI. Read the sections below to learn more.
Basic Info
In this section, you define the basic settings to identify the POI you are configuring. Refer to the table below to learn more.
Name | Enter a name for the POI (max. 250 characters). This field is mandatory. |
Short Name | Enter a short name for the POI (max. 70 characters) to identify the POI in the list and on the map view. This field is mandatory. |
Description | Enter a description for the POI. This field is optional. |
Status | Status of the POI. By default, the status is Active (blue-colored toggle switch). Click the toggle to change the status to Inactive (grey-colored toggle switch). |
Address and Location
In this section, you establish where the POI is located. Once created, the POI will be displayed on a map. Refer to the table below to learn more.
Address | Enter the street address of the POI. |
Postal Code | Enter the postal code for the street address of the POI. |
Latitude and Longitude Coordinates | The system completes these fields based on the address and postal code defined. If the Google Maps integration isn't configured in your environment, you can add the latitude and longitude coordinates manually. |
Map Preview | The map shows the address set based on the latitude and longitude values. |
Note
If you have problems accessing the map preview, contact your admin for assistance.
Marker
In the Marker section, you customize how your POI marker will be displayed on the map. You can choose an existing image from the library or upload a new one, but the image requirement is mandatory. Refer to the table below to learn more.
Choose from library | By default, the Choose from library tab is selected. To use an existing image, click the desired image. |
Upload file | To upload an image, click Upload file. Drag and drop a file or click select a file and select a file from your device. Then, click the check icon to confirm the upload or click the reset icon to upload a different file. A popup message opens to confirm the upload was successful. To delete an image, click the trashcan icon and follow the instructions again. |
Tip
Any image uploaded in the Marker section will be saved in the library, even if it's not used or if the POI's settings are not saved.
Types and Attributes
In this section, you can set the POI type and its attributes. You can either use an existing type of POI or create a new type. Refer to the annotated image below to learn more.
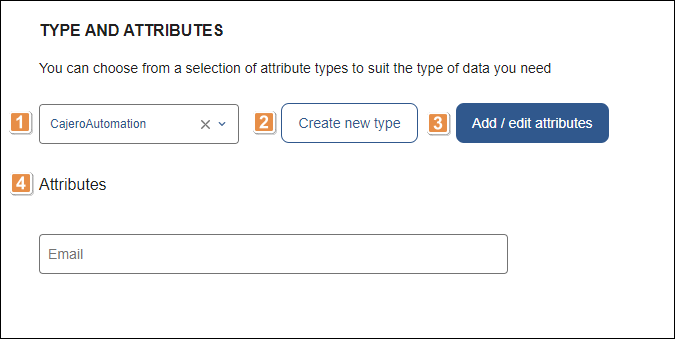
POI type. Click the arrow and select a POI type from the drop-down menu. Once selected, the Attributes section is displayed, where you can define values for the attributes of the selected type.
As you type the attribute name, more options appear. Click the arrow and select Text or Image to choose the attribute format. Click the Mandatory toggle switch if you want it to be mandatory to complete the attribute information—by default, the toggle switch is off. Then, click add to add more attributes.
Click the pencil icon to edit the attribute's information or click the trashcan icon to delete the attribute created. When you finish completing all the necessary fields, click Save.
Create new type. Click to create a new POI type if you need to add a new type that doesn't appear in the drop-down menu. The Add a type modal opens. Complete the new type name (max. 15 characters) and description (max. 50 characters) and click Save to save changes. The name and the description must be as self-explanatory and clear as possible since they will help users to visualize the POI on the map.
Important
Type names must have a unique value. If you attempt to create a new type with a name already used, you won't be able to save the changes.
Once the POI type is successfully created, a new panel opens, where you can set the attributes for the type created. You can set attributes in the same way as you do if you select an existing type.
Add/edit attributes. Click to add new attributes to the selected type or edit existing attributes. To add a new attribute, complete the attribute name (max. 50 characters) and follow the instructions given above to add attributes to an existing POI type. To edit the settings of an attribute, click the pencil icon, make any changes you need and click add. Then, click Save to save the changes made.
Note
The Add/edit attributes button is available only after you select a POI type. If you don't select a type, the button appears grayed-out.
You can also create and edit types and attributes from the Types and Attributes page. Read Create or Edit Types and Attributes to learn more.
Attributes. Attributes displayed in this section depend on the those set for the specific POI type selected. If the attribute's format is text, enter the attribute value. If the attribute's format is image, click the arrow and select an image from the drop-down menu or click Add image to upload a file from your device.
To edit a POI from the Points of Interest page, navigate to the POI you want to edit and click the pencil icon. The Edit Point of Interest page opens, where you can modify the POI's basic information, address and location, markers, and types and attributes. The edit page contains the same fields that must be completed when creating a new rule.