Monitoring
In the Monitoring section, you can keep track of and analyze data related to specific actions performed by users. You have access the User Status and User operation history pages. Refer to the table below to learn more about each subsection and their pages.
In this subsection, you can look for information related to a specific user, including data about the user's password, confidence level and authentication attempts, and data related to the token associated to that user. | |
In this subsection, you can look for information related to transactions performed by an app user within a specific time frame. This allows you to identify operating methods and generate fraud alert patterns for that specific user. |
User Status
On the User Status page (Monitoring > User Status), you can analyze the general status of a user and its associated token. Refer to the instructions below to learn how to find information.
1. Go to the User Status page (Monitoring > User Status).
In the Domain field, click the arrow and select a domain from the drop-down menu.
In the User ID field, click the field and enter the app user ID whose data you want to retrieve.
Note
All the fields in this section are mandatory.
Click Confirm. To clear all the fields and start again, click Clear all.
If the system identifies the user ID and the domain, two new sections will be displayed. Refer to User and Token to learn more.
In this section, you can see information related to the user, its confidence level and authentication attempts. Refer to the table below to learn more.

Password | Time and date of the last password update. | ||||||
Authentication | Authentication attempts performed by the user and their results. Refer to the table below to learn more.
| ||||||
Confidence level | Security model that defines the operations that can be performed based on the authentication methods applied for the user. For example, certain operations require the app user to have a level of confidence that is only reached by having more than one authentication method (i.e. credentials password and facial biometrics).
|
In this section, you can see information related to the user's token, its related seed, its creation and elimination status and its activation reference number. Refer to the table below to learn more.
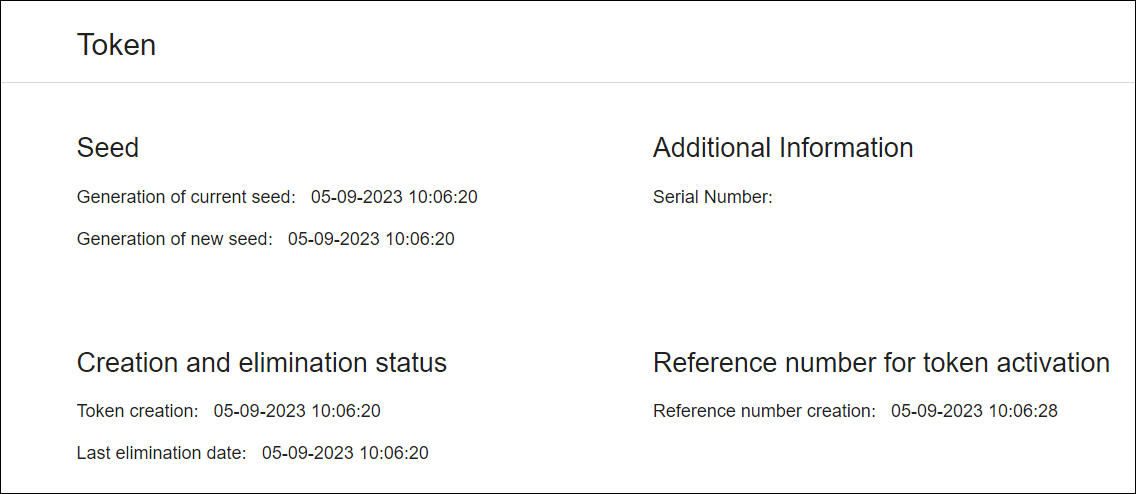
Seed | Cryptographic data related to the token status that is shared between the device where the app is used and the platform.
| ||||
Additional Information | Serial number data used to identify the token and is used for internal support. | ||||
Creation and elimination status | Token status information.
| ||||
Reference number for token activation | Time and date when the reference number was created. The reference number is generated upon the creation of the token and is sent to the app user to continue with the token setting process. |
User Operation History
On the User operation history page (Monitoring > User operation history), you can obtain information about the operations performed by a user within a specific time frame. You can find information using eight different filters, that can all be combined to find data for a user through a period of time and, optionally, under the specified conditions. Refer to the instructions below to learn how to use the filters available.
Important
The Start Date and Time and End Date and Time are the only mandatory fields. If the time difference between the start and end dates is longer than 10 days, the User ID also becomes mandatory.
Go to the User operation history page (Monitoring > User operation history) and use the filters you need as explained in the table below.
Operation
Transaction performed by the user. Click the arrow and select an operation from the drop-down menu.
Operation response
Response resulting from the operation performed by the user. The list includes messages related to successful transactions, failed attempts to execute a transaction, errors, failed validations, among other messages. Click the arrow and select a response from the drop-down menu.
Domain
Click the arrow and select a domain from the drop-down menu.
User Status
Status of the user or the user's password when the transaction was executed. Click the arrow and select a status from the drop-down menu. Refer to the table below to learn more about the options available.
Not password set
New or unblocked active user that has not set the password yet.
Password set forced to change
Active user that must change the password to be able to operate in the app.
Password set active
Active user that has a valid password and is allowed to use it to operate in the app.
Blocked
Blocked user that cannot operate in the app.
Disabled
Disabled user that cannot operate in the app.
Deleted
Deleted user.
To learn more about users and the actions available in AS, read Users.
Start Date and Time
Time and date when the operation or operations started. To set it, click the calendar icon and select a time and a date. Click Clear to unselect the date and time. Click Today to select the exact time and date on which you are configuring the field. You can also click the field and enter the time and date manually.
End Date and Time
Time and date when the operation or operations ended. To set it, click the calendar icon and select a time and a date. Click Clear to unselect the date and time. Click Today to select the exact time at and date on which you are configuring the field. You can also click the field and enter the time and date manually.
User ID
Click the field and enter the user ID whose data you want to analyze.
This field is not mandatory. However, if the time difference between the Start Date and Time and End Date and Time fields is longer than 10 days, the User ID becomes mandatory.
Token Status
Status of the token associated to the user or users whose data you want to analyze.
Not assigned
The user does not have a token associated yet.
Pending Activation
The user has a token associated but it has not been activated yet.
Active - Pending use
The user has an active token associated but it was not used yet.
Active - In use
The user has an active token associated and is using it.
Request New OTP
A new OTP was requested.
Hard Sync Pending
The token associated to the user is disabled and requires a hard resynchronization to be reset.
Soft Sync Pending
The token associated to the user is disabled and requires a soft resynchronization to be reset.
To learn more about users and the actions available in AS, read Token.
Important
If you don't select an option for the non-mandatory fields, the system will retrieve the information about any operations performed by the user within the time frame defined.
Click Confirm.
If the system obtains any results, the page shows a list of the operations performed under the specified conditions. Read the table below to learn more about the information available in this list.
Timestamp
Time and date of the transaction executed by the user.
Domain
Domain under which the user executed the transaction.
Operation
Name of the transaction executed by the user.
Operation Response
Response code and message resulting from the transaction. To learn more about the transaction response codes and messages available, read Transaction Resp. Code.
User Operation Details
Click the eye icon to go to the User Operation Details page and see further details on the selected operation.