Configuration
In the Configuration section, you have access to the Versions, Rules, Domains, Transaction Resp. Code and Business Parameters pages. In these pages, you have different actions that allow you to work on and edit the rules in different versions, activate the versions so that their rules have effect on the app, and see the parameters applied to the AS console operation, among other tasks. Refer to the table below to learn more about each page.
Versions are mechanisms that allow you to identify a specific configuration of rules - each version corresponds to a set of rules applied to an app. They allow you to configure and deploy rules in bulk, without affecting the system's stability. In addition, if you identify errors in production derived from the rules in the activated version, you can roll back to a previous version. In this page, you can create, edit or activate a version. | |
Rules are specifications that define parameters related to users, tokens, sessions and OTCs and define how users operate on the app. They allow you to define conditions for the creation, validation and authentication of users, their passwords and associated tokens. In this page, you can search the rules associated to a specific domain and version, organized under specific categories and subcategories and review their content. | |
Domains allow you to segment users according to their security profile and apply a set of rules for each segment. In this page, you can create or edit domains, and assign them to sets of rules. | |
Transaction response codes translate the responses given by the AS service into response codes for the transaction executed. In this page, you can search for transaction responses and see their details, and edit the messages that might be shown to users when the transaction is executed. | |
Business parameters are configuration sets that define the business environment you are working on. In this page, you can search for business parameters, see their details, and edit their values. |
Versions
Versions are mechanisms that allow you to identify a specific configuration of rules, and are created whenever changes to rules are required or in the case of app security issues. Versions can be used for two purposes:
Modify one or more authentication rules applied to an app under a domain and keep track of the changes made to such rules. You can only modify the rules of the latest version created, and you cannot modify rules within an active version.
Test the rules and roll back to the previous version of those rules. For example, if you identify errors in a rule within a development environment, you can roll back to the previous version of that rule.
Note
When you create a version, it inherits the rules applied to the last version created.
On the Versions page (Configuration > Versions), you can see the details of all the versions created in the environment you are working on. In addition, you can activate existing versions, create new ones or edit the details of inactive versions.
Navigate the Versions page
By default, all the versions created are displayed. Each version shows the version number, that is automatically set by the system when the version is created, a description that identifies it, whether it is active or inactive and the time and date of the last changes made to the version.
Note
Only the latest activated version appears listed as Active. If you activate a version, the latest version active is automatically deactivated.
Create a Version
Create a new version if you need to make changes to specific rules. Refer to the instructions below to learn how to create a version.
Important
You will only be able to create a new version if the last version created is set as Active.
Go to the Versions page (Configurations > Versions).
The Create Version page opens, where you configure the settings of the new version.
The Version Number field appears completed by default. The AS assigns an automatic number to identify the version, which cannot be edited. The number is assigned by order of creation.
In the Status field, define the version status. The system sets the status of the new version as Inactive. An inactive version can only be activated if the last version created is already active.
In the Description field, enter a short text to describe the version (min. 10 characters, max. 200 characters).
In the Comments field, enter any comments that you consider necessary about the version for you or your team to identify why you are creating it (min. 10 characters, max. 200 characters).
Click Save.
A modal opens, informing you that the new version includes the configuration of the currently active version. Click Confirm to go back to the Versions page, where a message pops up confirming that the new version was successfully created.
The new version must be activated to apply the authentication rules to the associated app. To learn more, read the Activate a Version section.
Edit a Version
Edit an inactive version only if you need o make changes to the description or the comments, for example, if they are not descriptive enough to understand why the version was created. Refer to the instructions below to learn how to edit a version.
Note
The version set as Active cannot be edited.
Go to the Versions page (Configurations > Versions).
Navigate through the list of versions to find the one you want to edit and click the vertical three-dot icon to the right.
Click Edit.
The Edit Version page opens, where you can only edit the Description and Comments fields.
Click Save.
A modal opens, informing you that you are editing an existing version. Click Confirm to go back to the Versions page, where a message pops up confirming that the version was successfully updated.
Activate a Version
Activate a version so that the changes made to the rules under this version are applied to the app.
Versions can only be activated if they are inactive. Regardless of whether the version was previously activated or not, another version must be active at the moment and the version you want to activate must be listed as Inactive. Refer to the instructions below to learn how to activate a version.
Go to the Versions page (Configurations > Versions).
Navigate through the list of versions to find the one you want to activate and click the vertical three-dot icon to the right.
Click Activate.
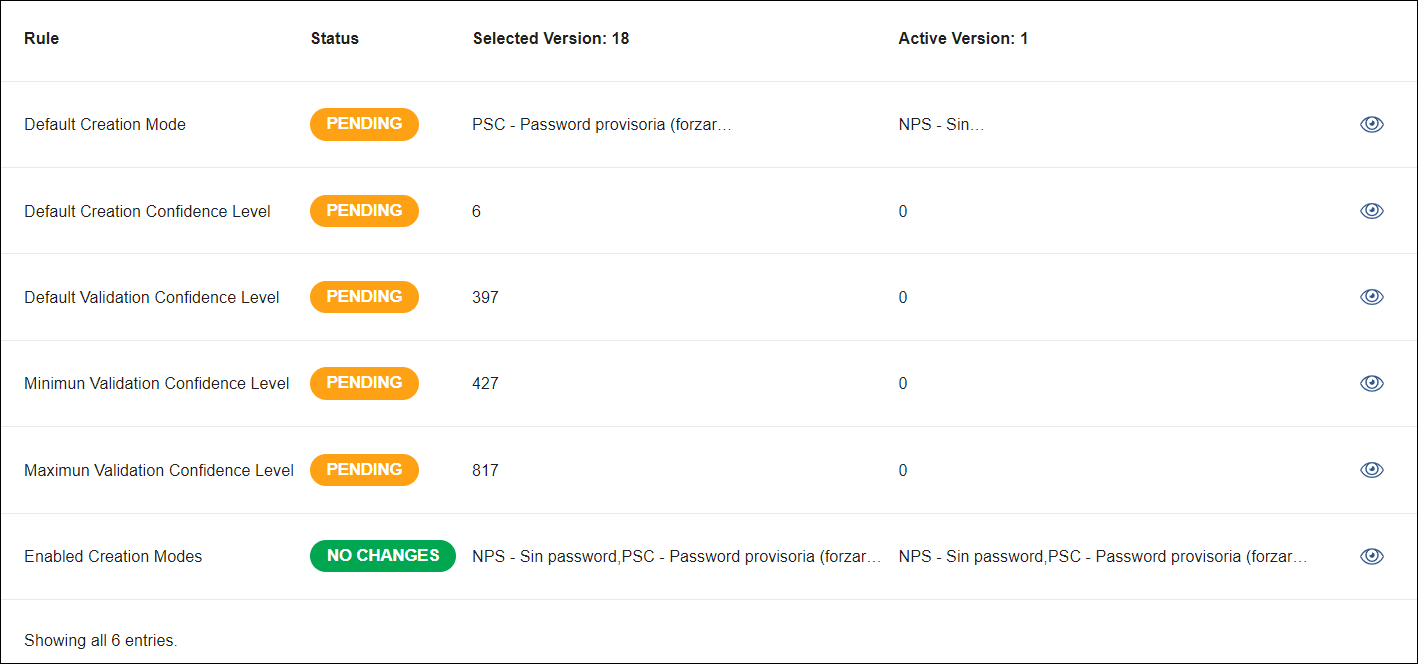
The Activate Version page opens, where you can see a summary of the rules that were modified in this version. They are not applied until you confirm the activation. The summary contains the following information:
Domain
Domain associated to each rule included in the version.
Rule
Rule that was modified in the version. Only rules that have changes in the version—when compared with the active version—will appear listed.
Tip
Changes will not have effect in the app until the version including those modified rules is activated.
Selected Version
Version to be activated.
Active Version
Currently active version. Once the activation is confirmed, this version will be deactivated and its status will turn to Inactive.
Click Save. By activating a new version, you deactivate the latest version active.
Best Practice
Activate versions during offline hours to avoid affecting the use of the app.
A message informing that the version is being activated appears on screen. Then, you are redirected to the Versions page and a pop-up message appears confirming that the selected version was successfully activated.
Rules
Rules are specifications that define parameters related to the users, tokens, sessions and OTCs and define how users operate on the app. These rules are preconfigured in the console. For example, rules can determine a threshold of failed password or OTPs attempts, number of visible digits for credit cards, or available characters in a password.
On the Rules page (Configuration > Rules), you can see and manage the set of authentication rules applied to an app.
Navigate the Rules page
To see the set of rules available, first select a domain and a version from the respective drop-down menus. Then, click Search.
Note
You can see the rules in both the active and inactive versions. The active version contains the word ACTIVE in the versions drop-down for you to easily identify it.
You will see the rule categories available under that domain and version. First, click the rule category you want to edit. The categories are: Users, Sessions, Tokens and OTCs. Then, select the subcategory that contains the rule or rules you want to see or edit. Each subcategory comprises a different set of rules.
The number (orange sign) to the right of a rule category or subcategory represents the number of rules that have changes and are pending activation. This means that those changes to the rules won't be applied to the app until the version that contains such changes is activated.
Once you select the rule subcategory, you will see the set of rules included in it. You can also compare the rule under the current active version and the version selected in the first step.
The rules list contains each rule included in that subcategory. Each rule listed shows the rule name together with additional information. The Status column specifies whether the rule is pending or if there are no changes. If the rule has a Pending status, it means that the rule has changes but its version has not been activated; if the rule has a No changes status, it means that it has not been modified, and there are no differences between the configuration of the rule in the selected version and the currently active version.
Note
To apply the Pending rules to the app, activate the version.
In addition, the list shows the value defined for the rule in the selected version and in the currently active version.
Important
If you selected the ACTIVE version in the first step, this column will not appear on screen and the values of the active version will appear on the Selected Version column.
Lastly, you can click the eye icon to access the rule details. Read View Rule Details below to learn more.
Important
If you selected the last created inactive version in the first step, the Edit option (pencil icon) appears here. Instead of viewing its details, you will be able to modify the rule values.
In this page, you can see the basic details of the rule and the comparison between the values in the selected version and the current version. Refer to the table below to learn more about the information available in this page.
Rule Description | Short text that describes the rule. |
Current value | Settings of the selected version. In this section you can see the value of the rule under the selected version, the version number and the domain under which the rule is set. |
Active value | Settings of the active version. In this section you can see the value of the rule under the currently active version, the version number and the domain under which the rule is set. |
If you selected the active version in the first step, you won't be able to modify the rules within such version. You can only edit the rule details of the inactive version that was last created. Refer to Edit a Rule to learn more.
Edit a Rule
Edit a rule whenever you need to make a change in its value, so that it applies to the version and domain in which it is included. Refer to the instructions below to learn how to edit rule values.
Important
Rules must always be modified in the AS console and not through the database.
Create the version where the modified rules will be applied. Read Versions to learn more.
Go to the Rules page (Configuration > Rules).
Find the rule you want to edit, as explained above. For this example:
Select 0 - Default Domain and 2- New Version - November changes from the Domains and Versions drop-down menus.
Select the Tokens category.
Select Time OTP subcategory.
Click the pencil icon to the right of the rule you want to modify. For this example, edit the Right Interval rule. You are redirected to the rule configuration page.
Go to the Add New Values section, and complete the new settings of the rule selected. Depending on the type of rule, you will have to either select an option from a drop-down menu or enter a new rule value, and enter relevant comments for your team regarding the changes made. For this example, enter 33.
Note
At the bottom of the page, you can see the value of the rule you are editing in the currently active version.
Click Confirm.
A panel opens, informing you on which domain and version the rule changes will have effect and that you must activate the version to apply those changes to the app. Click Confirm again to finish the editing process.
Important
Changes made to a rule in a specific domain only affect the domain and version selected but changes made to rules in Domain 0 affect all other domains associated to it.
Now, the rule will appear with Pending status. In addition, the category and subcategory of the rule will have a number to the right indicating the number of rules with changes. This means that the rule will only have effect if you activate the version in which it is included. For this example, you must activate the version 2- New Version - November changes so that the rule impacts on the app. Read Versions to learn more.
Note
Once you activate the version, the number to the right of the category and subcategory disappears.
Domains
Domains allow you to segment users according to their security profile and apply a set of rules for each segment, based on a default set (part of the default domain). For example, different domains can be used if the project involves a wallet with two products: personal banking and business banking. In that case, for the same app, two domains will be created, so different authentication rules are applied for profiles with the same ID: one with authentication rules for profiles in personal banking and one with authentication rules for profiles with business banking.
You can create a domain to define that the rules in the authentication process are applied to a specific segment of users. As a result, once the domain is associated to an app and is then activated, the authentication rules it contains are applied to that app.
By default, the AS has a domain installed (Domain 0), which contains preconfigured sets of rules. Changes to rules in Domain 0 affect all domains associated to it. This means that, if you make changes to a rule associated to Domain 0, those changes will also impact on the rule values of the domain that inherited the Domain 0's rules.
Tip
The default domain is identified in the domains list with a 0 at the beginning of its name. This domain cannot be modified.
On the Domains page (Configuration > Domains), you can see the list of created domains and edit them or create a new domain. You can edit the details of a domain or create a new one to then make changes to the rules in that domain.
Navigate the Domains page
The Domains page shows all the domains created for the environment you are working on. In the list, each domain contains an alphanumeric code that identifies the domain and is associated to the app in Studio, a name that identifies it, comments and the date and time when the domain was created or last modified.
Create a Domain
Create a domain if you need to modify the values of its rules. As a result, if a user is associated to a specific domain, the AS console will search for the rule value configured for that domain. If no value is defined, the console will look for the value set in the default domain. Refer to the instructions below to learn how to create a domain.
Go to the Domains page (Configuration > Domains).
The Create Domain page opens, where you configure the settings of the new domain.
In the Code field, enter an alphanumeric code for the new domain (min. 1 character, max. 16 characters with no spaces or special characters). For this example, enter BB.
In the Name field, enter a name to identify the domain internally It may have spaces and special characters (min. 10 characters, max. 29 characters). For this example, enter Business Banking.
In the Comments field, enter any comments about the domain that you consider necessary. For example, explain why you are creating the domain or which rules it will group. The text may have spaces, line breaks and special characters (min. 10 characters, max. 200 characters). For this example, enter New domain for Business Banking segment..
Click Save.
A modal opens, informing you that the new domain includes the rules of the last active or inactive version under the default domain. Click Confirm to be redirected to the Domains page, where a pop-up message appears confirming that the new domain was successfully created.
Note
All the fields on this page are mandatory.
Edit a Domain
Edit a domain if you need to make changes to the name or comments, for example, if they are not descriptive enough to understand why the domain was created. Refer to the instructions below to learn how to edit a domain.
Go to the Domains page (Configuration > Domains).
Navigate through the list of domains in the Domains page to find the one you want to edit, click the vertical three-dot icon.
Click Edit.
The Edit Domain page opens, where you can only edit the Name and Comments fields.
Click Save.
A modal opens, informing you that you are editing an existing domain and that the system won't reboot after you save the changes. Click Confirm.
You are redirected to the domains page and a message pops up confirming that the domain was successfully updated.
Notice
The Code field cannot be edited.
Transaction Response Codes
When the user or any other client system invoking the AS API attempts to execute a transaction, an AS service is executed and provides a response (with its respective code) as a result. For apps built by Veritran, transaction response codes might translate the responses given by the AS service into response codes for the transaction executed.
On the Transaction Response Codes page (Configurations > Transaction Resp. Codes), you can find transaction responses and their details, including their codes and messages. You can also edit the client message of each response (see below).
Navigate the Transaction Response Codes page
First, find the transaction response you want to see or edit. Click the search bar and type the transaction response code or any relevant keywords (min. 3 characters). Then, press Enter or click Search. If you search the transaction response by code, the page shows the transaction response identified with that code. If you search by keywords, the page shows the list of transaction responses that include those keywords in their technical or client messages. Once the results appear, you can see the message's details and edit the client message. Refer to the table below to learn more about the information you will find in this page.
Code | Code associated to the transaction response. Codes can be numeric or alphanumeric. |
Tech Message | Transaction response message that includes a technical description for internal use. |
Client Message | Client-oriented transaction response message provided by the AS. Depending on the channel invoking this message, it may be shown to the user when they execute the transaction. To learn how to edit the client message, read Edit a Transaction Response. |
Edit | Click the pencil icon to edit the transaction response code message's details. Read Edit a Transaction Response to learn more. |
Edit a Transaction Response
Refer to the instructions below to learn how to edit the client message in a transaction response.
Go to the Transaction Response Codes page (Configuration > Transaction Resp. Code).
Find the transaction you want to edit, as explained in the section above.
Click the pencil icon to the right of each transaction response.
In the Edit Transaction Response Code page that opens, edit the Client Message as required.
Click Save and then click Confirm in the modal that appears.
The system takes you back to the Transaction Response Codes page, where a message appears, informing you that the transaction response was successfully updated.
Transaction Response Codes
See below a list of the transaction response codes available and the technical message associated to each response.
Code | Transaction Response Name - Technical Message |
|---|---|
000 | OK The operation was successfully completed. |
001 | OK_RESET The operation was successfully completed and the preexisting Token was restarted. |
002 | OK_ADD The operation was successfully completed and a a preexisting token was assigned to a user. |
003 | OK_ADD_CHANGE_PSW The operation was successfully completed and a preexisting token was assigned to a user. |
010 | OK_ALREADY_ACTIVED The coordinate card is already active and associated to the user. |
020 | OK_USER_CREATE The operation was successfully completed and a successful User was created. Successful operation. |
030 | 030 OK_PRODUCT_UPDATED The operation was successfully completed and the product register was updated. |
031 | OK_NO_ PRODUCTS_REMAINING The operation was successfully completed and there are no products linked to the user. |
999 | Successful operation. Response code by default. |
A01 | DOMAIN_USER_NOT_FOUND Domain/User not found. |
A02 | INVALID_TOKEN_STATUS_NOACTIVATED The token is not activated. |
A03 | INVALID_CHALLENGE_MODE Invalid challenge generation mode. |
A04 | CHALLENGE_NOT_FOUND There is no challenge for the reported token. |
A05 | CHALLENGE_EXPIRED The challenge use time expired. |
A06 | INVALID_OTP Invalid OTP. |
A07 | BACKSEARCH An attempt was made to reuse a previously generated OTP. |
A08 | BACKSEARCH_TOKEN_WAS_DESTROYED An attempt was made to reuse a previously generated OTP and the token was destroyed. The user must request the token again. |
A09 | INVALID_TOKEN_REFERENCE Invalid token activation reference. |
A10 | TOKEN_REFERENCE_EXPIRED The time limit for token activation was exceeded. |
A11 | INVALID_TOKEN_STATUS_INUSE The user already has an active token in use. |
A12 | WRONG_REFERENCE_THRESHOLD_REACHED The maximum number of token activation attempts was exceeded. A new reference must be generated. |
A13 | USER_PSW_NOT_SET The user does not have a password defined. |
A14 | TOKEN_NOT_FOUND The specified token does not exist. |
A15 | The reported OCRA Suite is invalid. |
A16 | The challenge ID was not reported and it is mandatory. |
A17 | TRX_DATA_NOT_SET The transaction data field was not reported and it is mandatory. |
A18 | Invalid token destruction mode. |
A19 | The reported OCRA Suite is not enabled for the user. |
A20 | An invalid value was specified in the userPasswordMode parameter. |
A21 | OCRASUITE_NOT_SUPPORTED The reported OCRA Suite is not supported for this feature. |
A22 | WARNING_LEVEL_REACHED The WARNING level of erroneous OTPs entered was reached. |
A23 | CRITICAL_LEVEL_REACHED The CRITICAL level of erroneous OTPs entered was reached. |
A24 | TOKEN_WAS_DISABLED The DISABLE level of erroneous OTPs entered was reached. The token was disabled. The user must resynchronize the token. |
A25 | TOKEN_WAS_DESTROYED The DESTROY level of erroneous OTPs entered was reached. The token was destroyed. You must request it again. |
A26 | MULTIUSER_TOKEN_NOT_ADMITTED The token you want to activate is associated to another user. |
A27 | BACKSEARCH_AND_WARNING_LEVEL_REACHED An attempt was made to reuse a previously generated OTP and the WARNING level of erroneous OTPs entered was reached. |
A28 | BACKSEARCH_AND_CRITICAL_LEVEL_REACHED An attempt was made to reuse a previously generated OTP and the CRITICAL level of erroneous OTPs entered was reached. |
A29 | BACKSEARCH_TOKEN_WAS_DISABLED An attempt was made to reuse a previously generated OTP and the DISABLE level of erroneous OTPs entered was reached. The user must resync the token. |
A30 | USR_PSW_MODE_NOT_ENABLED The value specified in the userPasswordMode parameter is not enabled for the user. |
A31 | USER_EXIST_WITH_DIFF_GROUP The user already exists, but for a different group of parameters. |
A32 | USER_WITH_NO_TKN The user has no token assigned. |
A33 | INVALID_TOKEN_TIME_VALUE The information in the time field is invalid. |
A34 | INVALID_TOKEN_TIME_DRIFT The time DRIFT calculated for the token differs by more than 72 hours with the server time. |
A35 | TOKEN_SOFT_RESYNC_NEEDED Soft Resync of the token is required. |
A36 | TOKEN_HARD_RESYNC_NEEDED Hard Resync of the token is required. |
A37 | TOKEN_INVALID_DISABLE_STATUS The status indicated to disable the Token is invalid. |
A38 | TOTP_VALID_IN_OTHER_TIME_ZONE TOTP was validated but in a different time zone than the server time zone. |
A39 | RESYNC_DATA_NEEDED The required information for the OCRA Suite used in the resynchronization was not provided. |
A40 | USER_CREATION_MODE_NOT_ENABLED The value of the userCreationMode parameter is not enabled for the user. |
A41 | INVALID_USER_PSW_FORMAT The value of the new password does not comply with the defined format rules. |
A42 | USER_ALREADY_EXISTS The user you are trying to create already exists. |
A43 | REPEATED_USER_PSW The value of the new password has already been used. |
A44 | PSW_SET_MODE_NOT_ENABLED The value of the pswSetMode parameter is not enabled for the user. |
A45 | USER_PSW_CONFIRM_FAIL The confirmation of the new password failed. |
A46 | INVALID_USER_STATUS_BLOCKED The operation is not allowed for the user's current state: blocked. |
A47 | INVALID_USER_STATUS_DISABLED The operation is not allowed for the user's current state: disabled. |
A48 | CURR_PSW_VALIDATION_FAIL The validation of the User's current password failed. |
A49 | BLOCK_PSW_LIFETIME_REACHED The user was blocked because the password age limit was reached. |
A50 | BLOCK_PSW_TRIES_REACHED The user was blocked because it reached the limit of failed password validation attempts. |
A51 | BAD_PSW_WARNING_LEVEL_REACHED The WARNING level of failed password validations was reached. |
A52 | PSW_VALIDATION_FAIL The validation of the User's password failed. |
A53 | USER_UNBLOCK_MODE_NOT_ENABLED The value of the unblockMode parameter is not enabled for the user. |
A54 | INVALID_USER_STATUS The operation is not allowed for the user's current state. |
A55 | TEMP_PSW_EXPIRED The temporary password expired. |
A56 | OFFLINE_RESYNC_FAIL The TOTP was validated but in a different time zone than the server time zone. |
A57 | TOKEN_REFERENCE_NOT_SET The User has no activation reference assigned. |
A58 | NO_HISTORY_FOUND No historical information could be found under the parameters entered. |
A59 | DOMAIN_GROUP_NOT_FOUND The Domain and Group specified could not be found. |
A60 | WRONG_USER_UNBLOCK_MODE The value of the unblockMode parameter is invalid for the user's previous status. |
A61 | TOTP_LEFT_INTERVAL_NOT_ALLOWED The value of the totpLeftInterval parameter is not allowed. |
A62 | USER_CONFIDENCE_NOT_ENABLED The value of the userConfidenceLevel parameter is not allowed. |
A63 | USER_CONFIDENCE_INVALID The value of the userConfidenceLevel parameter is invalid. |
A64 | USER_CONFIDENCE_SET_MODE_INVALID The value of the userConfidenceSetMode parameter is invalid. |
A65 | USER_CONFIDENCE_VALIDATION_FAIL User trust level validation failed. |
A68 | GRIDC_USE_LIMIT_REACHED The maximum number of coordinate card uses was reached. |
A69 | GRIDC_TRY_LIMIT_REACHED The maximum number of attempts for the coordinates card was reached. |
A70 | VALIDITY_DAYS_NOT_ENABLED The value of the validityDays parameter is not allowed for the user. |
A71 | INVALID_GRIDC_SERIAL_NUMBER The serial number is invalid. Invalid coordinate card. |
A72 | GRIDC_NOT_FOUND The required coordinate card does not exist. |
A73 | GRIDC_ACTIVATED_FOR_OTHER_USER The card specified has been activated by another user. |
A74 | GRIDC_ACTIVATE_PERIOD_EXPIRED The card activation period expired. |
A75 | INVALID_GRIDC_REFS_MODE The value in the refsMode parameter is invalid. |
A76 | GRIDC_REFS_MODE_NOT_ENABLED The value of the refsMode parameter is not allowed for the user. |
A77 | USER_WITH_NO_GRID_CARD The user does not have a coordinate card. |
A78 | GRIDC_EXPIRED The coordinate card expired. |
A79 | REFERENCES_NOT_FOUND The reported references do not exist. |
A80 | REFERENCES_EXPIRED The requested references expired. |
A81 | REFERENCES_MISMATCHED The reported references do not match the references requested. |
A82 | GRIDC_WAS_DESTROYED The DESTROY level of failed coordinate card validations was reached. The card has been disabled. The user must request the card again. |
A83 | GRIDC_CRITICAL_LEVEL_REACHED The CRITICAL level of erroneous card validations was reached. |
A84 | GRIDC_WARNING_LEVEL_REACHED The WARNING level of erroneous card validations was reached. |
A85 | INVALID_GRIDC_VALUES Coordinate card validation failed. |
A86 | GRIDC_DOMAIN_GROUP_MISTMATCH The user's domain and group do not match the domain and group of the card you want to enable. |
A87 | CNT_USES_LIMIT_NOT_ENABLED The value of the cntUsesLimit parameter is not allowed for the user. |
A88 | CNT_TRIES_LIMIT_NOT_ENABLED The value of the cntTriesLimit parameter is not allowed for the user. |
A89 | INVALID_CARD_TYPE The value of the cardType parameter is invalid. |
A90 | REQUEST_NEW_TOKEN The OTP validation was successful, but a new OTP is required. |
A91 | USER_PSW_MUST_CHANGE The user must modify the password. |
A92 | REQUEST_TOKEN A successful token validation is required. |
A93 | REQUEST_NEW_REFS The validation of the coordinate card was successful, but a new validation is required. |
A94 | GCARD_NOT_PRINTED Operation not allowed because the card has not been printed. |
A95 | GCARD_CANCELED Operation not allowed because the card is canceled. |
B01 | ESERVER Internal error. Application error. |
B02 | EDATABASE Internal error. Database error. |
B03 | EOBJECT_NOT_FOUND Internal error. Data inconsistency. |
C01 | FAULTSOAP_PARSE Parsing of input message failed. |
C02 | FAULTSOAP_NULL_BODY The input message is not reported. |
C03 | FAULTSOAP_EMPTY_BODY Empty input message. |
C04 | FAULTSOAP_OPERATION_UNDEF Undefined operation. |
C05 | FAULTSOAP_OPERATION_ERROR A fatal error occurred (no memory, etc.) while processing the operation. |
C06 | FAULTSOAP_REQUIERED_DATA A required field was not reported in the message. |
C07 | FAULTSOAP_INVALID_DATA The value in the in the input message has an invalid format. |
C08 | FAULTSOAP_INVALID_HEADER The value in the header of the input message has an invalid format. |
D01 | ADMIN_USER_NOT_FOUND The administrative user requesting the operation does not exist. |
D02 | ACTIVATION_DAYS_NOT_ENABLED The value of the activationDaysLimit parameter is not allowed. |
D03 | ACTIVATION_DAYS_ERROR The value of the activationDaysLimit parameter cannot exceed that value of the validityDays parameter. |
D04 | CNT_BATCH_CARDS_ERROR The value of the cntBatchCards parameter must be greater than 0. |
D05 | CARD_BATCH_NOT_FOUND The batch of cards with the reported id could not be found. |
D06 | INVALID_NEW_STATUS_CODE The value of the batchNewStatus field is invalid. |
D07 | NEW_STATUS_NOT_ENABLED Given the current batch status, the value of the batchNewStatus field is not allowed. |
D08 | BATCH_NOT_CONFIRMED The card batch was not confirmed. |
D09 | INVALID_BATCH_DELETE_MODE The value of the batchDeleteMode field is invalid. |
D10 | BATCH_WITH_ASSIGNED_CARDS The lot has cards assigned. T |
D11 | CARD_NOT_FOUND The card could not be found. |
D12 | CARD_NOT_PRINTED The card was not printed. |
D13 | CARD_ALREADY_CANCELED The card has already been canceled. |
D14 | CARD_ASIGNED The card is assigned. |
E01 | INVALID_OTCSUITE The reported OTC Suite is invalid. |
E02 | OTCSUITE_NOT_ENABLED The reported OTC Suite is not enabled for the user. |
E03 | OTC_VALUE_NOT_SET The OTC value was not entered and it is mandatory. |
E04 | INVALID_EXT_OTC_VALUE The value of the externally generated OTC is invalid. The value does not comply with the OTCSuite defined. |
E05 | INVALID_FUNCION_KEY_LEN The length of the Key Function parameter is invalid. |
E06 | INVALID_OTC_DESTINATION The OTC destination is invalid. |
E07 | INVALID_OTC_DEST_DOM The OTC destination domain is invalid. |
E08 | DOMAIN_DESTINATION_NOT_FOUND The OTC destination does not exist in the database. |
E09 | DESTINATION_USER_NOT_SET The OTC destination field and the User field were not completed, and one of the two is mandatory. |
E10 | OTC_VALUE_NOT_PROPERLY_SET The OTC field was not completed or it has an invalid format. |
E11 | OTC_RECORD_NOT_FOUND The OTC does not exist in the Database. |
E12 | OTC_EXPIRED The OTC expired. The OTC has expired. |
E13 | ORIG_OTCSUITE_MISMATCH The OTCSuite in the validation differs from the generation value |
E14 | INVALID_OTC Invalid OTC. |
E15 | INVALID_OTC_TRX_DATA Invalid OTC due to failure in transaction data. |
E16 | INVALID_OTC_ONE_TRY Invalid OTC. You only have one attempt left. |
E17 | INVALID_OTC_TRX_DATA_ONE_TRY Invalid OTC due to failure in transaction data. You only have one attempt left. |
E18 | INVALID_OTC_LAST_TRY Invalid OTC. There are no further attempts left. |
E19 | INVALID_OTC_TRX_DATA_LAST_TRY Invalid OTC due to failure in transaction data. There are no further attempts left. |
F01 | PRODUCT_ID_NOT_SET Product identifier was not completed: account number or card number. |
F02 | PRODUCT_ALREADY_EXISTS The User-Product relationship already exists. |
F03 | NO_REMAINING_PRODUCTS There are no products linked to the user. |
F04 | NVALID_INPUT_FIELD_COMBINATION The combination of input parameters is invalid. |
F05 | PRODUCT_NOT_FOUND The user does not have the product linked. |
F06 | INVALID_POTCSUITE The POTC Suite is invalid. |
F07 | POTCSUITE_NOT_ENABLED The POTC Suite is not enabled for the user. |
F08 | PRODUCT_NOT_EXIST The product does not exist. |
F09 | PRODUCT_NOT_ACTIVATED The product status is not Active. |
F10 | INVALID_POTC Invalid POTC. POTC validation failed. |
F11 | ORIG_POTCSUITE_MISMATCH The POTCSuite in the validation differs from the generation value. |
F12 | POTC_EXPIRED The POTC expired. |
F13 | PRODUCT_CATALOG_CAN_NOT_CHANGE The field indicating the catalog cannot differ from the existing field. |
F14 | ERROR_ON_CARD_NUMBER Error in card number field. |
F15 | ERROR_ON_CARD_EXPIRATION_DATE Error in the expiration date field. |
F16 | INVALID_PRODUCT_CATALOG The value of the productCatalog field is invalid. |
F17 | NVALID_PRODUCT_TYPE The value of the productType field is invalid. |
F18 | INVALID_PRODUCT_SOURCE The productSource field is invalid. |
F19 | PRODUCT_EXPIRED The retrieved product expired. |
F20 | INVALID_TOKEN_REQUESTOR The Requestor Token is invalid for the TSP. |
F21 | CARD_BIN_RANGE_NOT_FOUND The card number could not be found in the Bin Ranges table. |
F22 | NVALID_REQUEST_ASSURANCE_LEVEL The security level is invalid. |
F23 | INVALID_TOKEN_LOCATION The tokenLocation field is invalid. |
F24 | MAX_GROUP_CONCURRENT_POTC_REACHED The maximum number of concurrent POTCs defined for the group was reached. |
F25 | PRODUCT_ALREADY_DELETED The product was previously deleted. |
G01 | INVALID_PAYMENT_TOKEN The Payment Token is invalid. |
G02 | PAYMENT_TOKEN_EXPIRED The Payment Token expired. |
G03 | DOMAIN_RESTRICTION_UNVERIFIED Verification of Token Requestor domain restrictions failed. |
G04 | DE-TOKENIZED_CARD_EXPIRED The detokenized card expired. |
G05 | TOKEN_REQUESTOR_MISTMATCH The Requestor Token differs from that used in the generation of the Payment Token. |
G06 | INVALID_TRACK2_DATA Track2 information is invalid. |
G07 | INVALID_CRYPTOGRAM_VERSION_NUMBER The cryptogram version is invalid. |
G08 | CRYPTO_DATA_VALIDATION_FAIL Validation of the cryptogram failed. |
G09 | PAYMENT_EXPIRITY_MISTMATCH The expiration date differs from that assigned to the Payment Token. |
G10 | INVALID_CRYPTOGRAPHY_METHOD Cryptogram validation method. |
G11 | INVALID CRYPTOGRAM VALIDATION TICKET The Cryptogram Validation Ticket is invalid or expired. |
G12 | TOKEN_REQUESTOR_NOT_SET - Token Requestors have not loaded. |
G13 | OKEN_OPERATION_NOT_ALLOWED - The operation is not allowed. |
ZZZ | The request could not be processed, response code by default. |
Business Parameters
Business parameters are default configuration sets that allow you to define the business environment you are working on. For example, they define conditions for timeouts and feature flags. These parameters refer to how the AS operates and not to the authentication rules it includes. Business parameters are defined in the AS model within a database separate from the Middleware database.
In the Business Parameters page (Configuration > Business Parameters) you can see a list of all the parameters configured for the environment you are working on.
Note
Each Veritran platform component has a specific type of business parameters. AS business parameters are identified with a T at the beginning of the parameter name and are set in a specific database.
Navigate the Business Parameters page
By default, all the parameters are displayed. To filter the parameters one by one, go to the Parameters field, click the arrow and select a parameter from the drop-down menu. Then, press Enter in your keyboard or click Search to filter the parameter.
In both cases, you can see the name given to the parameter when created, its value and the last time and date when the parameter was modified. If you need to make changes to the parameter value, you can edit it.
See below for a table of all the parameters available in the Authentication Server, a description and their accepted values:
Parameter | Description | Accepted Values |
|---|---|---|
TUseWSA | Flag indicating if WSA should be used in AS services. (0-OFF and 1-ON) | 0 (OFF), 1 (ON) |
MDestinationParamName | Name of the client station for communicating with the Auth Server. | String |
MXSOAResponseTimeOut | Time (in seconds) to wait for a response from the Auth Server. | Integer (seconds) |
TknSttlExecIntervalDays | Number of days between each execution of the settlement process when generating partial reports. | Integer (days) |
TknSttlHistoRetentionMonths | Number of months the information will be retained in the VT-Token history table. | Integer (months) |
TknSttlHistoDumpPath | Directory path where the exported records from the VT-Token history table will be stored. | String (directory path) |
TknSttlSummRptPath | Directory path where the VT-Token usage reports will be stored. | String (directory path) |
TknSttlBillRptPath | Directory path where the VT-Token billing reports will be stored. | String (directory path) |
TknSttlUnusedInfoRetMonths | Number of months obsolete information will be retained in the system tables. NoteThis depuration can be disabled with theDisableUnusedDataDepuration parameter | Integer (months) |
TknSttlPartSummRetMonths | Number of months partial usage reports will be stored in the summarization tables. | Integer (months) |
TknSttlActiveScopeMonths | Number of months from the last token usage to consider it active in the system. | Integer (months) |
TQueueTimeOut | Maximum time (in seconds) a message remains in queue before being discarded. | Integer (seconds), 0 (disabled) |
TExplicitNSInResponse | Flag indicating whether the namespace should be explicitly included in the response. | 0 (OFF), 1 (ON) |
TknActivLogOutput | Parameter that pecifies whether to save activity logs to the database, file, or both. | DB, File, Both |
DisableHistoryExport | Parameter that indicates whether the historical information export is disabled. | true, false |
DisableHistoryDepuration | Parameter that indicates whether the historical information cleanup is disabled. | true, false |
DisableUnusedDataDepuration | Parameter that indicates whether the cleanup of unused data/information is disabled. | true, false |
Note
Business parameters are used and modified by the ITCD team.
Edit a Business Parameter
Since business parameters are not created in the AS console, you can only edit specific values within each one. Refer to the instructions below to learn how to edit a business parameter.
Find the parameter in the Business Parameters list.
Click the pencil icon to the right of the parameter you want to modify.
The Edit Business Parameter page opens, where you can only edit the Value and Comments fields.
Click the Value field and modify it. Refer to the table below to read about accepted values for each parameter.
Click the Comments field and modify or add the comments description to inform platform users about the purpose of the parameter and the changes made to the value (if applicable).