Transactions Editor
The Transactions Editor is a visual tool that allows you to build a configurable transaction's flow and add functionalities by dragging and dropping actions from the building menu on the left. Some of these functionalities include connecting with processes, executing mathematical operations and invoking external services.
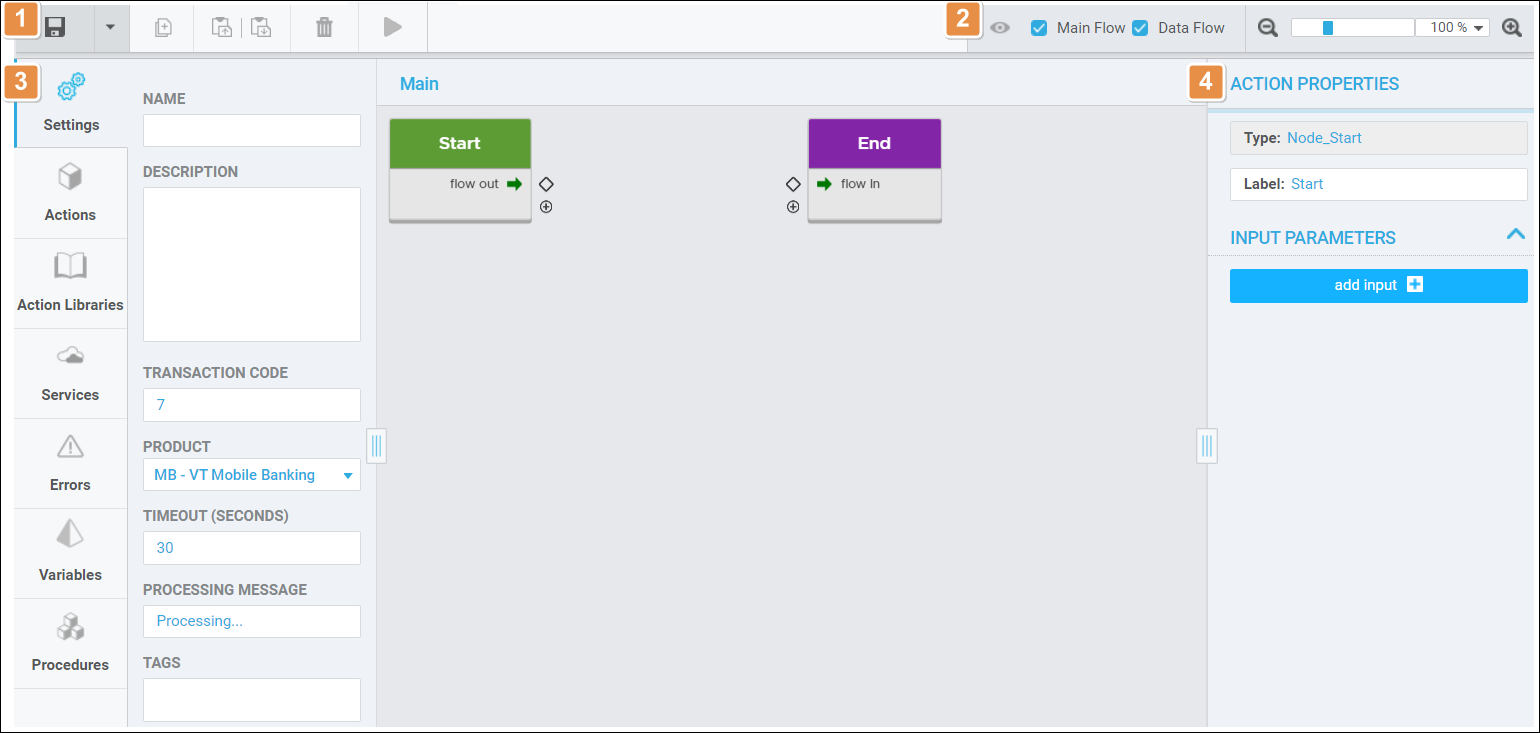
To access the Transactions Editor and create a new transaction, go to Resources > Transactions and click New Transaction. The Settings tab opens by default and the Start and End boxes are automatically added to the canvas.
Refer to the annotated image below to learn more about the Transactions Editor and its user interface.
Tools (explained in order of appearance):
Save & Close
Click to save all changes and close the transaction. Click the arrow to display more options in a drop-down menu:
Save & Continue
Saves changes without closing the editor. Always save your transaction before publishing it.
Publish
Publishes the transaction. This internal publishing option shows a message if there is an error in the transaction flow and prevents you from publishing it. Refer to Errors to learn more about error management.
Close without saving
Closes the editor and does not save updates.
Duplicate
Click to duplicate the selected action box. This option is disabled for the Start and End boxes.
Copy
Click to copy the selected action box. Copied transactions can be pasted within the original transaction or into a new one. This option is disabled for the Start and End boxes.
Paste
Click to paste a copied action box within the original transaction or into a new one. This option is disabled for the Start and End boxes.
Delete
Click to delete the selected action box.
Run Transaction
Click here to test the transaction flow created. Learn more about this feature in Run Transaction.
Viewing options. Check to select the type of flow that appears on the canvas. Main Flow displays the Flow In and Out connections, whereas Data Flow displays every data connection. Manage the zoom level by dragging the slider left or right, typing a zoom value or selecting a zoom value from the drop-down menu.
Building menu and canvas. The building menu contains several tabs with settings and functions: Actions, Action Libraries, Services, Errors, Variables and Procedures. The canvas shows the transaction flow represented with boxes.
Action properties. Click an action box to edit its parameters. You can edit an action’s properties, like the name or label, and add input and output parameters to the Start and End boxes. To learn more, refer to Input and Output Parameters.