Instancing a Screen-type Module
By instancing a screen-type module, you can redirect the app user from any screen or process of an app to the screen of a module by linking it through the actions available for a specific component.
To invoke screen interfaces of modules from the Visual Builder, you must first link the module to the app in the app dependencies. By enabling dependencies, you will be able to use the module’s content in the Visual Builder for the app selected. To learn more about how to enable dependencies, read App Settings.
Once dependencies are activated, open the Visual Builder in the screen you want to edit. Then, click the component through which you want to redirect the app user to the module's screen interface. Click the Actions tab in the right panel and, in the Events & Actions section, find the action you want to use as trigger and click the vertical three-dot icon. In the Create new link window that opens, click the down arrow and select Module Screen from the drop-down menu.
The Link to Module window opens and all the modules containing screen interfaces that were linked to the app as dependencies appear listed. Click the module's screen interface you want to instance and complete the parameters available. The tabs include basic information about the module, input and output values, messages and events configured for each of the module's screen interfaces, and information on the screen flow to be followed. Refer to the Target, Inputs & Outputs, and On Next sections below to learn more.
Target
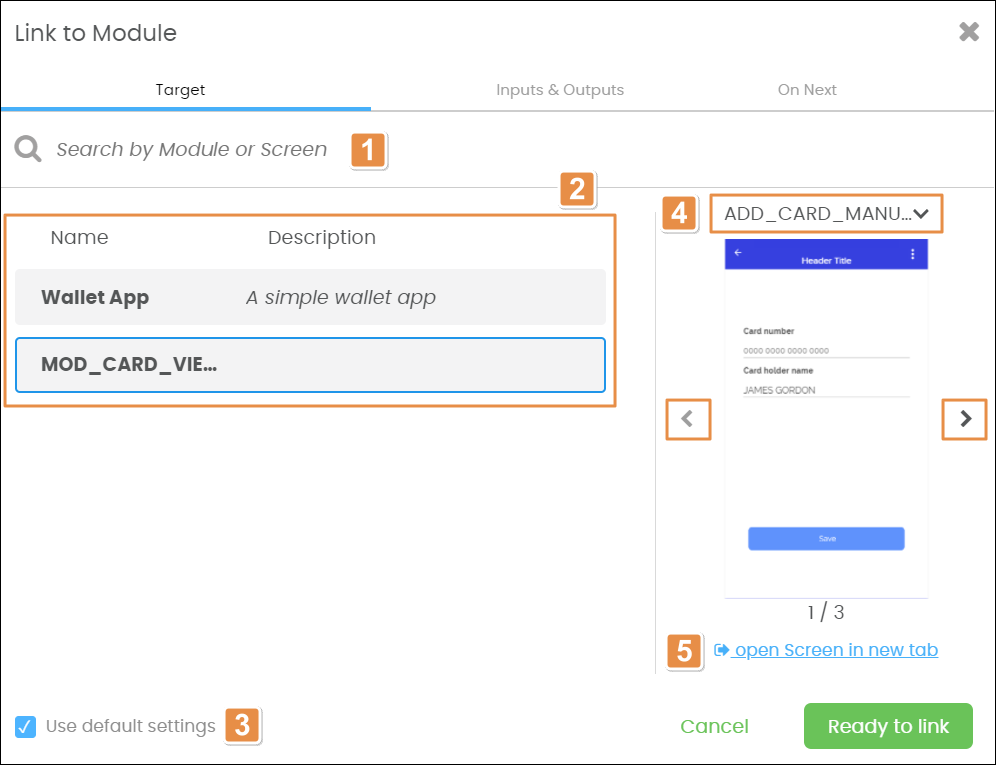
The Link to Module window opens in the Target tab. In this tab, you can select the module to be instanced and set its basic parameters. Refer to the image below to learn more about the parameters to be configured.
Important
The Inputs & Outputs tab and the On Next tab will appear enabled for configuration only if you don’t use the default settings.

Search bar. Enter the module name or interface screen to be linked to the component.
Modules. List of modules activated in the app dependencies. Select the desired module.
Use default settings. Uncheck the checkbox if you want the Inputs & Outputs tab and the On Next tab to appear enabled for configuration.
Screen preview. Preview of the screen interfaces created within the module. Click the interface screen name or the down arrow to select a screen-type interface from the drop-down menu to be linked to the component. You can also click the Previous or Next navigation buttons to choose the screen interface.
Open Screen in new tab. Click to edit the module's screen interface separately in the Visual Builder.
Caution
If you click Open Screen in new tab, you are redirected to that screen interface. Therefore, the Link to Module window closes and any data you entered in the parameters configuration is not saved.
Inputs & Outputs
The Inputs & Outputs tab contains the Inputs, Outputs, Events and Messages parameters configured for the specific screen interface of the module selected in the Target tab. This means that it reflects the configuration established when the screen-type interface was created. To learn more about how to configure interfaces parameters, read Create or Edit Interfaces.
Note
Any parameters that have not been configured in the Interfaces section of the module will not appear listed in the subsections of this tab.
Click the Inputs, Outputs, Events or Messages tab, depending on which parameters you want to edit, and modify the values as desired. In all cases, you will be able to edit the parameter mapping values, but parameter name fields will appear disabled.
On Next
In the On Next tab, you can configure the step that should be executed after the app user gets to the module's screen-type interface and the screen flow is completed. Use the radio buttons to select an option from the list:
Back to Start | Default option that involves no further actions. The app user will be redirected to the app linking screen. |
Custom | Enter the id of the process or view to be executed or redirected, respectively. |
Once you set all the parameters, click Ready to Link to link the module's screen-type interface with the component in the app screen or click Cancel to go back to the Visual Builder.