Transactions
Configuring transactions is the first step to be carried out in BRM, before creating the business rules. Then, when you configure business rules, you can determine which of the existing transactions will be evaluated and then approved or rejected based on that business rule.
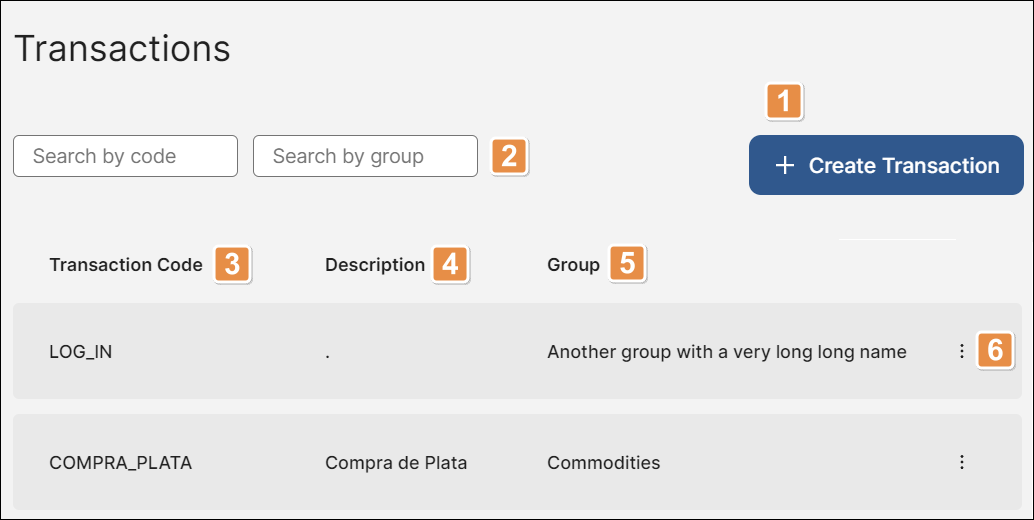
The Transactions page shows all the transactions created or edited by all BRM users, and allows you to create or edit transactions. You can create as many transactions as required. Refer to the annotated image below to learn more.

+ Create Transaction. Click to create a new transaction.
Search bars. To find a transaction, enter its code or the group in which it is included in the corresponding search bar.
Transaction Code. Name that identifies the transaction.
Description. Short text describing the transaction.
Group. Group of transactions or category within which the transaction is included.
Edit. Click the vertical three-dot icon and then click Edit to edit a transaction.
Create or Edit a Transaction
To create a transaction, click + Create Transaction. The Add New panel opens in the right side of the screen. Refer to the table below to learn more.
Code | Enter a unique ID to identify the transaction. Once you create the transaction, you can't edit this code. ImportantTransaction codes must be unique. If you try to create a transaction using an existing code, a message reading Unknown error appears and the new transaction isn't saved. |
Description | Enter a short description to identify the transaction. |
Group | Transaction group. You can either select an already created group or create a new one. To create a new group, start typing the desired group name. To select an existing one, click on the down arrow and select any of the options available in the drop-down menu. |
All the fields in this panel are mandatory. Once you complete all the fields, the Create button is enabled. Click Create to save the new transaction. To cancel changes, click Close.
To edit an existing transaction, find the desired transaction by using the search bars or going through the list. Then, click the vertical three-dot icon and click Edit to open the Edit panel. You are able to edit all the fields described above except for the code. Once you made all changes required, click Save. To cancel changes, click Close.
Upon saving the new transaction or the changes made, you are redirected to the Transactions page and a confirmation message appears on the top right side of the screen.