Screens
The My Screens page shows all your screens organized in a list.
To access the list of screens of your app, click See my apps on the homepage or go to Global > Applications, find the card for the app you want to work with, hover over it and click Screens. Refer to the annotated image below to learn more.

Search bar and sorting criteria. Search screens by name, screen group or tag, and click the down arrow to choose how screens are sorted. Studio can show newest or oldest screens first, or sort screens alphabetically in either descending or ascending order.
Tools. Each icon and button is explained in order of appearance in the table below.
Pagination
Use the arrows to navigate backwards and forwards through the pages.
Select All
Click the checkbox to select all the screens on the page.
Export
Click to download each selected screen as an .xml file.
For this button to be visible in the toolbar, one or more screens must be selected.
Delete
Click to delete the selected screen or screens.
For this button to be visible in the toolbar, one or more screens must be selected.
Import screen
Click to open the Import screen page, where you can select the .xml file to import, complete the settings of the imported screen and save it.
The screen settings can also be edited from the Settings tab in the left panel of the Visual Builder.
+ New screen
Click to open a new screen in the Visual Builder.
List of your screens in card view. Read the section below to learn more.
Card View
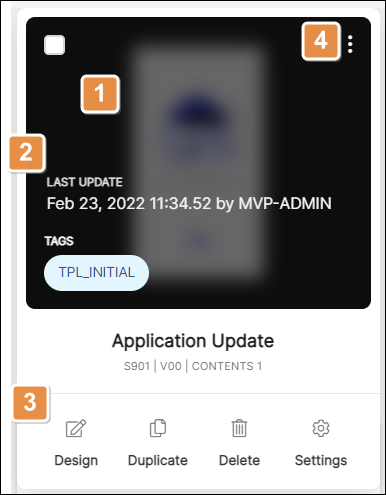
Thumbnail. To learn how to choose a thumbnail for your screen, refer to the Edit Screen Thumbnail section below.
Screen's basic information. The card shows the screens' last update, including the date and the user that made the changes, and tags, followed by the screen name below the thumbnail, its sequence, site view and visual area numbers.
Actions. Each button is explained in order of appearance in the table below.
Design
Opens the screen in the Visual Builder.
Duplicate
Makes a copy of the screen in the same location.
Delete
Opens a confirmation popup. Click Confirm to delete the screen.
Settings
Opens a popup where you can edit the following screen settings: name, sequence, institution, view/area and tags.
These settings can also be edited from the Settings tab in the left panel of the Visual Builder.
More options. Click the vertical three-dot icon to open a list of additional options. Each option is explained in order of appearance in the table below.
Export
Downloads the screen as an .xml file.
Copy to
Opens a popup to make a copy of the screen in a different destination. Read Copy Screen to a Different Destination below to learn more.
Thumbnail
Opens a popup to set a thumbnail for the screen. Read Edit Screen Thumbnail below to learn more.
Set as default editing screen
Sets the selected screen as start screen.
Copy Screen to a Different Destination
A popup appears when you click the Copy to option in your screen's list of additional options. On the left side, you will find the source information of the screen to be copied. On the right side, you will find the fields you need to complete to set the destination where the screen will be copied. These fields include: application, name, sequence, institution and view/area.
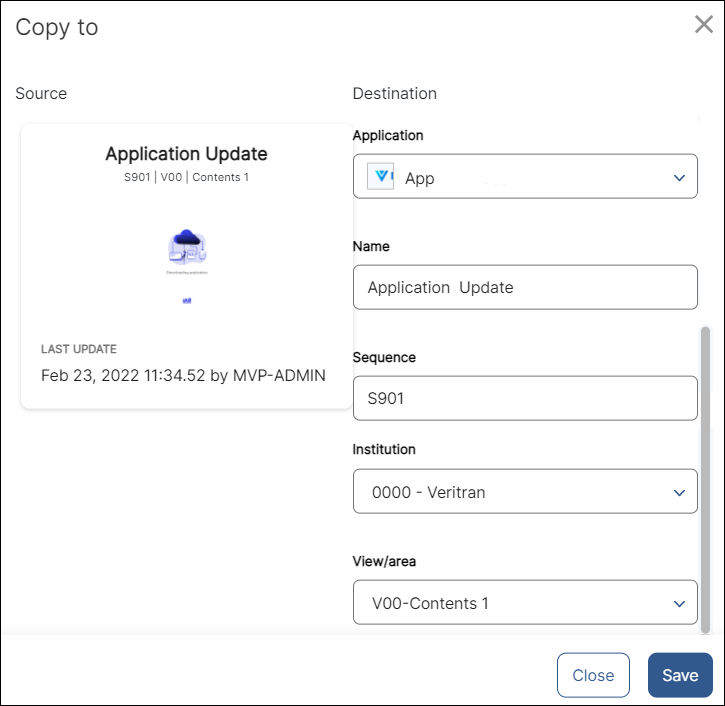
Click Save to create the copy of your screen at the specified destination, or Close to cancel the process and go back to the previous screen.
Edit Screen Thumbnail
A Thumbnail Settings popup appears when you click the Thumbnail option in your screen's list of additional options. You may choose to automatically save a thumbnail of your screen's last version, to set a default image as thumbnail or to upload a custom thumbnail.
To upload a custom thumbnail, click Upload and select a file from your device. The supported formats are .jpg, .png and .svg, and images must be under 800 pixels in width and height.

Click Save to save the new settings, or Cancel to go back to the previous screen without making any changes.