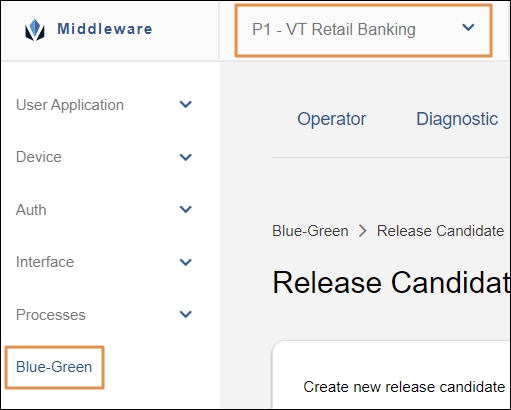
Blue-Green (Product Menu)
This section is part of the Blue-Green feature. From this page, you are able to create a Release Candidate (RC) to run an experiment on a specific product on the platform, known as business experiment.
A business experiment is based on a product, while a system experiment is based on the platform as a whole.
To create a Release Candidate for a business experiment, select the product from the drop-down menu on the left sidebar and then click Blue-Green.
The Create New Release Candidate page opens. The following sections explain each step of the creation process.
Basic Info
Give your experiment a name and a description to identify it. Both fields are mandatory. Click Next to continue.
Load Configuration
The tab shows a list of all the targets that exist for the product you're testing. In this step, you must upload the configurations you want to test in the green node to their corresponding targets.
Note
Business tests allow you to test changes to the configuration of an app, not to the binary or system core. Read Create New System Experiment to learn more.
To upload a new configuration for testing, click the Upload icon in the Actions column of its corresponding target.
You must repeat this process for each configuration you want to include in the test. The targets you don't modify by uploading a new configuration will not be included in the experiment.
Refer to the image and table below to learn more.

Type | The configuration type column includes the name of the target and its given name. For example, a type that reads "Y - Smart Y" means that the target is "Y" and the name is "Smart Y" |
Smart Release | Internal flag to identify the version of a configuration type. |
Version | Auto-incremental version number that is modified every time a new configuration file is registered in the database. |
Description | Information about the configuration type. |
Published | Last time when a configuration file was uploaded to the server for that target, changing the version. |
Actions | Click the upload icon (Import Configuration) to import a configuration file to be tested in the experiment. ImportantIf you don't import any configuration file, the experiment will run based on the existing configurations. |
Click Next to continue.
Switching Criteria
In this step, you must define the transactions associated to the experiment and the characteristics users must have to enter the experiment.
Refer to the annotated image below to learn more.
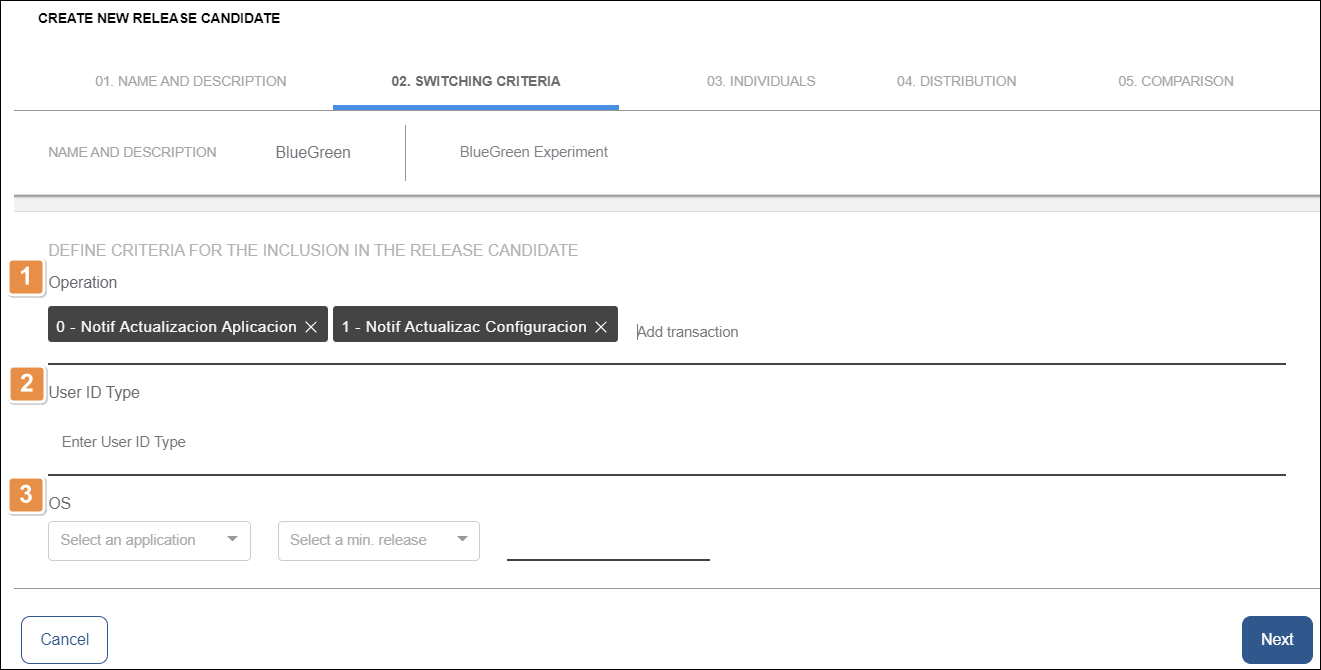
Operation: List of the transactions that will indicate the system to run the calculations needed to place the user in their respective group (blue or green). By default, the list shows the transactions previously defined for your app in Transactions Management.
If you need to add more transactions to the list, click add transaction.
Important
The recommended transactions are app initialization and user login. Associating other transactions may negatively impact user experience.
User ID Type. Enter the name assigned to a project or client when configuring the environment.
OS. Select the type of mobile Operating System and the minimum release of the binary.
Warning
All users that don't have the characteristics you selected in the User ID Type and OS fields will be excluded from the experiment.
Click Next to continue.
Individuals
In this step, you can specify which groups or individual users must go to the blue or green nodes during the test.
Important
If you don't add any groups or users to the lists in this step, you must assign a random distribution in the next step.
Add Individuals or Groups
Define the blue and green users of the experiment. Repeat the procedure for both types (blue and green). The types are identified by their corresponding color.
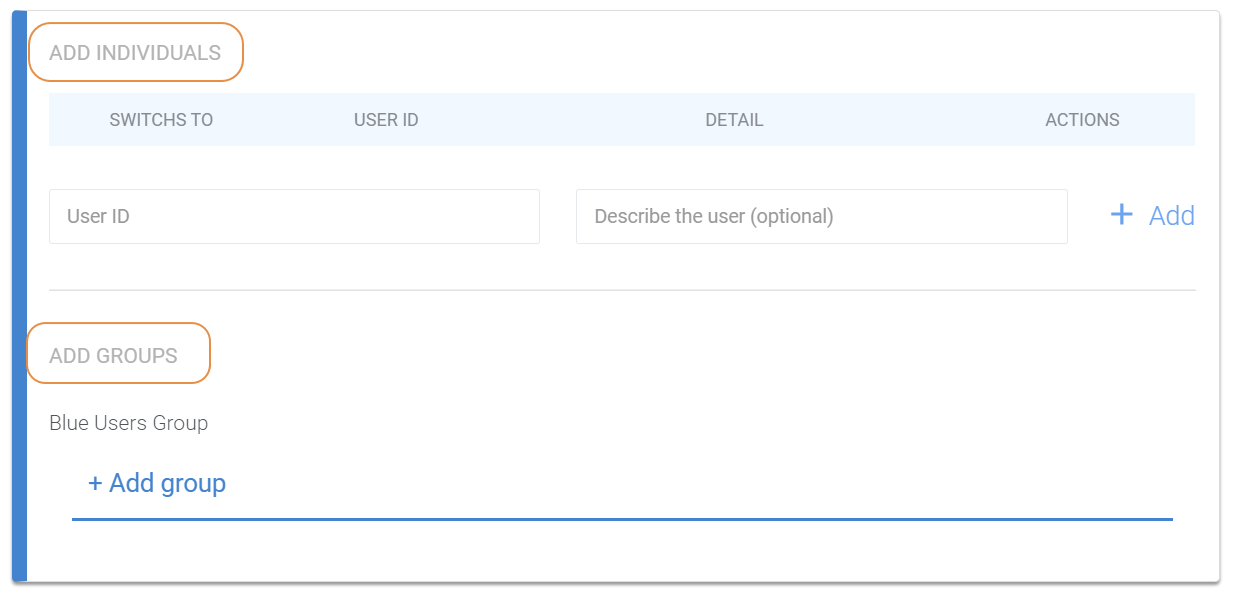
To add individual users, type the user ID (as it appears on the project's database), give a description (optional), and click Add.
To add groups, click Add group and choose groups from those associated to the project. Read Groups Management to learn how to create groups.
As you add users, you can see a preview of the list at the top. The column Switches To shows to which node the individual or group will go during the experiment (blue or green).
You can also add new users or groups once the experiment is running.
Distribution
In this step, you define the percentage of users that will be randomly assigned to the green node during the experiment.
If you specified users and groups in the previous step, adding a random distribution is optional. You can run the test with only the users you specified, or you can add random users to broaden your test.
If you didn't define any users or groups in the previous step, you must define a distribution rate greater than 0% in this step. Refer the image below for reference.

Drag the pointer to change the percentages assigned to each group. For example, if you drag the pointer to 30%, it means that 30% of the random users in the test will go to the green node, and the rest will go to the blue node.

The users limit represents the maximum number of users that can be part of your experiment. It does not represent the total number of active users you may have in the platform. It is the result of the following formula:
Number of active users in the platform in the last three months
Divided by the number of blue nodes of the platform
Click Next to continue.
Comparison
In the last step, you see the comparison of the configurations in production with the configurations you selected for the green node in your experiment.
The table shows kernel versions and processes that are part of the platform.
Check that you are comparing different versions. Click Confirm & Create to start the experiment.
Manage Release Candidates
To view and manage an active experiment, select the product where you are running the test and click Blue-Green in the console's sidebar.
To view closed experiments, see List of Closed Experiments and click View Detail next to the experiment you want to view.
The Blue-Green module shows the details of the experiment for the product you selected. Refer to the annotated image below to learn more.
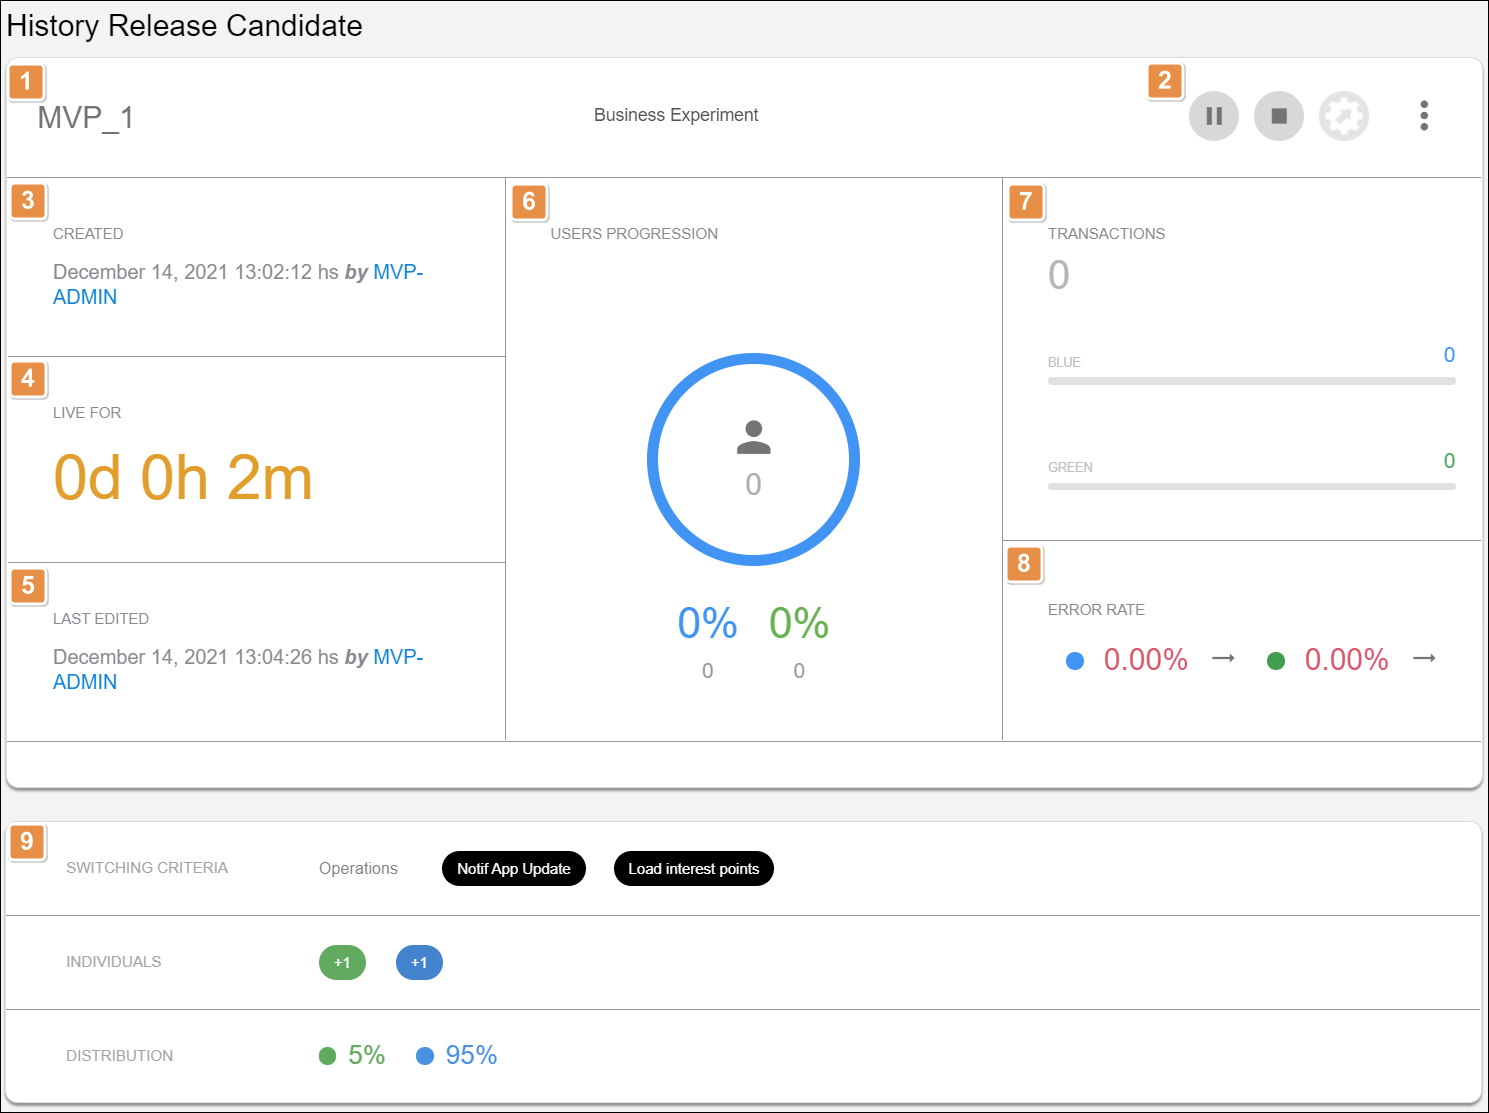
Name of the experiment
Actions. You can only perform actions on active or paused experiments. Each action is explained in order of appearance.
Pause/Play
Click Pause to pause the experiment and Play to resume it.
Stop
Click to stop the experiment.
End & Promotion
Click to end and promote the experiment.
More Options
Click comments to view or add comments to the experiment. Click configuration to add new users and groups to the experiment or to edit the distribution.
Created. Shows when the experiment was created and by whom.
Live For. Shows the total running time of the experiment.
Last Edited. Shows when the experiment was last edited and by whom.
Users Progression. Shows the total universe of users that was defined for the experiment, and the percentage and total number of users who were calculated for the experiment and directed to each of the test groups (blue and green)
Transactions. Shows the total number of transactions that were executed in each group during the experiment.
Error Rate. Shows the rate of errors that happened in each group during the experiment.
Summary and comparison. Shows a summary of the experiment's settings and the comparison between versions.
Experiment States
Experiments can be active, paused, stopped or promoted. Read Manage Release Candidates to learn how to switch an experiment between states.
Active
When an experiment is active, the system is listening for the associated transactions and placing users in their respective groups (blue or green). Once a user is placed in a group, they stay in that group until the experiment is stopped.
While an experiment is active, you can pause it, stop it, or promote it. You can also edit active experiments.
Paused
When an experiment is paused, the system stops placing users in their respective groups, but remembers which users were already calculated and keeps them in their groups.
While an experiment is paused, you can resume it, stop it, or promote it. You can also edit paused experiments.
Stopped
When an experiment is stopped, the system stops placing users in groups and the experiment ceases to exist. Green users are redirected to blue nodes, and blue users stay in blue (production) nodes.
You can't perform any actions for stopped experiments, but you can view a list of closed experiments and consult their results.
Promoted
Promoting an experiment pushes the configuration of the Green node to the Blue node and stops the experiment. You can only promote business experiments where no version changes appear in the comparison.
You can't perform any actions for promoted experiments, but you can view a list of closed experiments and consult their results.
Edit Active or Paused Release Candidate
Open the experiment you want to edit and click More Actions > configuration . This allows you to add new users and groups to the experiment or edit the distribution.
You can edit the transactions for all active experiments at once using the Associated Transactions list.