Input and Output Sockets
Transactions require input and output sockets to transfer data between nodes in the flow. An input socket establishes a connection to another node to receive information. An output socket transfers information to the following node in the transaction.
You can configure these sockets in the transactions editor when creating or editing a transaction. To do this, click a node in the canvas, such as an action, a library, a procedure, or a service. A right panel opens, divided into three tabs: Configuration, Inputs and Outputs.
In the Configuration tab, set a name for the node in the Label field. The name must describe the node's functionality within the transaction. You can also configure additional information that varies depending on the type of element selected. For example, on a Branch action, you can configure the data type and the condition.
From the Inputs tab, you configure the information that the selected node is receiving from the preceding node in the flow. Inputs vary depending on the node selected and the flow you are building. This tab is available for the Start and End nodes, and for every action, except for the Constant.
From the Outputs tab, you configure the information that is traveling from this node to another one in the flow. Outputs vary depending on the node selected. This tab is available for the Start node and for every action.
Add Inputs
There are two different ways to add input sockets to an action. You can add them individually or by bulk.
Adding sockets individually allows you to configure them from scratch.
Adding sockets in bulk allows you to import multiple existing sockets from one source node into a target node.
Add Inputs Individually
To add an input socket individually, follow these steps:
Click a node, and click the Add Input button.
In the modal that opens, complete the Name field with a name for the socket that represents the data that it will receive, such as username. It cannot contain spaces or special characters.
In the Type field, use the drop-down menu to select the type of data of the parameter's value. The options are binary, boolean, date, list, number, object, row, string, and table.
If you are setting an input socket for the End node, complete the External variable and Default value fields next:
In the External variable field, set the register or global variable that stores or retrieves data. For example, set the register 300 to store the result of the transaction in that register.
In the Default value field you can set a default value for the parameter that will override the register value received through the external variable. This field is optional.
You will see a new entry in the Inputs tab with a drop-down list. For example, in this case, you will see a new socket called username. This dropdown displays all the output parameters available in the transaction. Click the drop-down list and select the desired parameter to connect both nodes. For example, if you have a Start node that contains the user and password parameters followed by a script node that will decrypt this information, you can add the user and password input sockets manually in the script action, and select the Start outputs on the dropdown list, as shown below.
Add Inputs in Bulk
You can add inputs in bulk by connecting a node to another node's available output sockets. This way, you receive the information that is travelling from another node without having to add the sockets manually.
To add inputs in bulk, follow these steps:
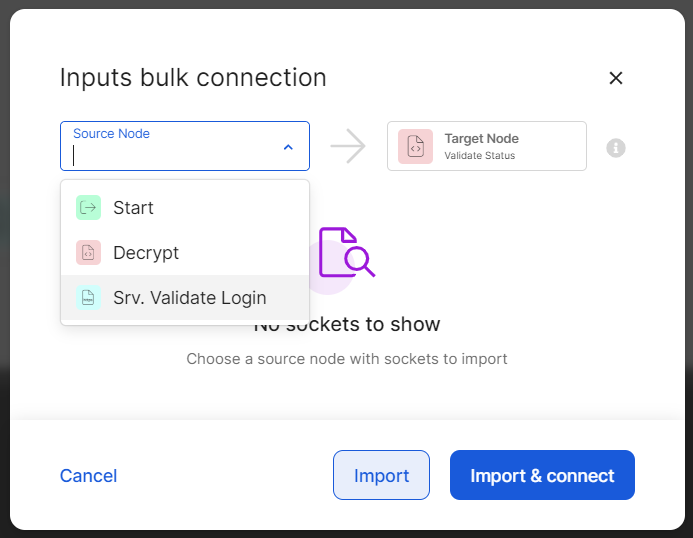
Click a node in the flow and click Inputs Bulk Connection.
Select the source node on the modal that opens. The drop-down list displays all nodes in the flow that have output sockets available to be imported.
Once you select the node, you will see all the sockets available to be imported. Select one or more sockets to import them to the target node.
If you are importing input sockets for the End node, complete the External variable and Default value fields next:
In the External variable field, set the register or global variable that stores or retrieves data. For example, set the register 300 to store the result of the transaction in that register.
In the Default value field you can set a default value for the parameter that will override the register value received through the external variable. This field is optional.
Then, you can import or import and connect the sockets:
Click Import to import the sockets without connecting both nodes (this will create the sockets in the target node but without connecting it to the source node).
Click Import & connect to import the sockets and connect both nodes to transfer data between them.
See below for an example taken from the use case described in Create a Login with Configurable Transactions, where you import the output sockets of the Start node into the first Script action:
Add Outputs
As with input sockets, there are two different ways to add output sockets to an action. You can add them individually or by bulk.
Adding output sockets individually allows you to configure them from scratch.
Adding output sockets in bulk allows you to import multiple existing sockets from one source node into a target node.
Add Outputs Individually
To add an output socket individually, follow these steps:
Click a node, and click the Add Output button.
In the modal that opens, complete the Name field with a name for the socket that represents the data that it will send, such as username. It cannot contain spaces or special characters.
In the Type field, use the drop-down menu to select the type of data of the parameter's value. The options are binary, boolean, date, list, number, object, row, string, and table.
If you are setting an output socket for the Start node, complete the External variable and Default value fields next:
In the External variable field, set the register or global variable that stores or retrieves data. For example, set the register 3 that represents the username information.
In the Default value field you can set a default value for the parameter that will override the register value received through the external variable. This field is optional.
Add Outputs in Bulk
You can add outputs in bulk by connecting a node to another node's input sockets. This way, you receive the information that is travelling from another node without having to add the sockets manually.
To add outputs in bulk, follow these steps:
Click a node in the flow and click Outputs Bulk Connection.
Select the source node on the modal that opens. The drop-down list displays all nodes in the flow that have input sockets available to be imported.
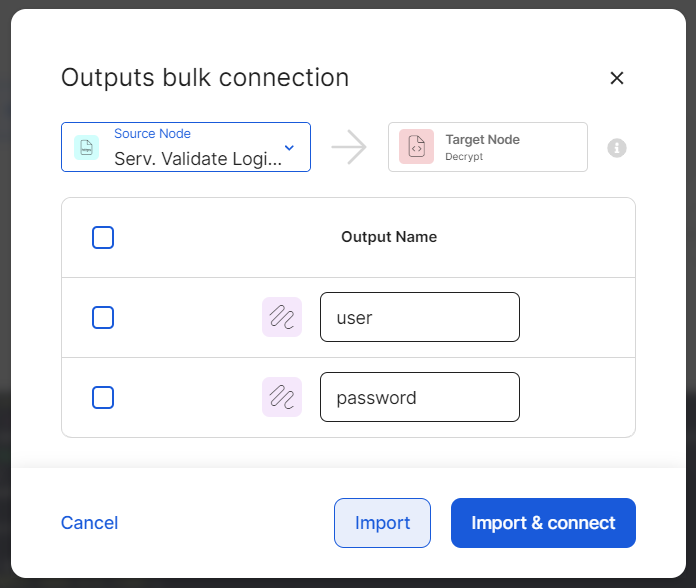
Once you select the node, you will see all the sockets available to be imported. Select one or more sockets to import them to the target node.
If you are importing output sockets for the Start node, complete the External variable and Default value fields next:
In the External variable field, set the register or global variable that stores or retrieves data. For example, set the register 3 that represent the username information.
In the Default value field you can set a default value for the parameter that will override the register value received through the external variable. This field is optional.
Then, you can import or import and connect the sockets:
Click Import to import the sockets without connecting both nodes (this will create the output sockets in the target node but without connecting it to the source node).
Click Import & connect to import the sockets and connect both nodes to transfer data between them.
See below for an example taken from the use case described in Create a Login with Configurable Transactions, where you import the input sockets of the REST service into the first Script action: