Auth Section
In the Auth section, you can find elements of Middleware that need to be handled by the Authorizator process. These elements are Transactions and Financial Institutions. Both need to be already created on the corresponding catalog in the System menu before they can be configured in this section.
Financial Institutions (Product Menu)
In this section, you can authorize and configure the Financial Institutions previously created from the System menu and associate them to a product.
First, select the product you want to work with from the products drop-down menu and then select Auth > Financial Institutions. See the annotated image below to learn more about this page.
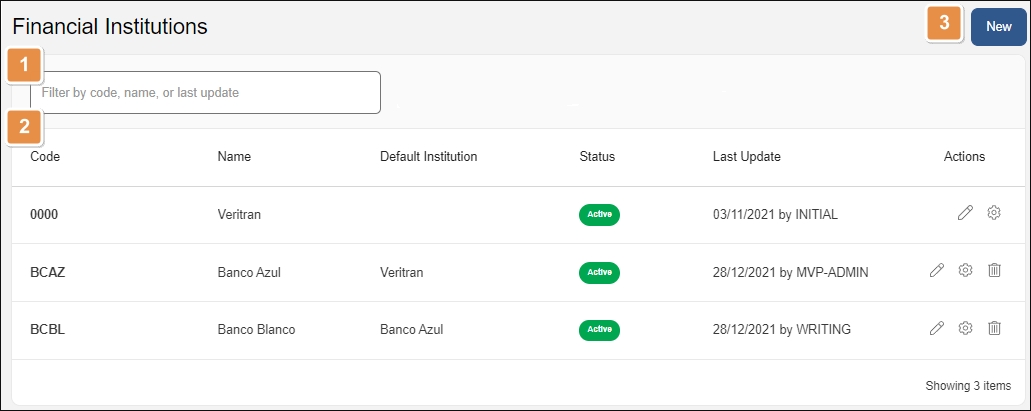
Search bar. Type a keyword to search institutions by code, name and default institution.
List of Institutions. See a list of financial institutions associated to the product selected. The information is divided into the following columns:
Code
Unique code assigned to the institution during its creation on the System menu.
Name
Name of the institution assigned during its creation.
Default Institution
Institution taken as an example for authorization.
Status
Status can be active or inactive. You can change an institution's status while editing its configuration. Note that status changes made from this section only apply to the selected product and do not affect the institution's status in the System menu.
Last Update
Date the institution was updated last.
Actions
Edit
Click to edit a financial institution's configuration.
Authorization Parameters
Click to configure an institution's authorization parameters.
New. Click to configure a financial institution for the selected product.
Configure or Edit a Financial Institution
To configure a Financial Institution for a product, first select the product you want to work with in the Products drop-down menu. In the Product menu, select Auth > Financial Institutions and then click New.
The New Financial Institution window opens. Select the institution from the institutions drop-down menu. This menu automatically retrieves the active institutions created in System > Financial Institutions.
Select a default institution from where the institution you are configuring will copy its authorization parameters. This is helpful if you don't want to set specific authorization parameters for this institution in particular.
In Cut Over Time, set a time when business activities end for the day.
Check Active to activate the financial institution for the product, or leave it unchecked to leave the institution inactive.
Finally, click Save to save your configuration. If you configured the institution without selecting a default institution, you need to set its authorization parameters next.
To edit a financial institution's configuration for a product, select the product you want to work with in the Products drop-down menu. In the Product menu, select Auth > Financial Institutions to find the institution you want to edit, then click Edit in the Actions column. You can deactivate the institution and edit every field of the configuration except for the Financial Institution assigned.
Important
After configuring or editing a financial institution and assigning its authorization parameters, you need to restart processes on the VT-Net platform so that it detects and applies the new updates. Read Restart Processes to learn more.
Authorization Parameters
With Authorization Parameters, you can indicate which parties are in charge of authorizing transactions associated to your financial institutions and the type of host involved. Read the sections below to learn how to configure or edit Authorization parameters.
Important
This information is already pre-configured in the environment and might vary between environments and projects. If you need assistance setting authorization parameters, contact your admin.
Configure New Authorization Parameters
To configure new authorization parameters for an institution, select the product you want to work with in the Products drop-down menu. In the Product menu, select Auth > Financial Institutions to find the institution you want to edit, then click Authorization Parameters (cog icon) in the Actions column.
In the Authorization Parameters modal window that opens, click New. Fill out the required information as explained below.
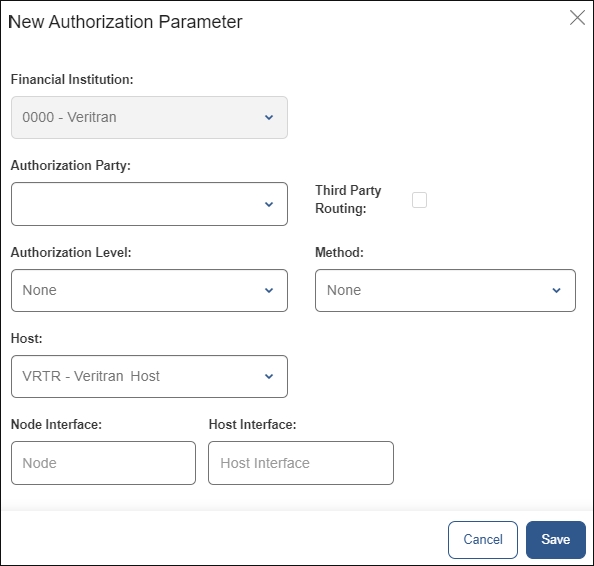
Authorization Party | Select the institution in charge of authorizing transactions. |
Third Party Routing | Check this box if a third party is authorizing the transaction. |
Authorization Level | Select the type of authorization. Online is the default option. |
Method | Select the authorization method. Host Authorization is the default option. |
Host | Select the type of host used for the authorization from the drop-down menu. |
Node Interface | Type the node where transactions for this institution need to be redirected. |
Host Interface | Enter a VTNET process where transactions need to be redirected. |
Edit Authorization Parameters
To edit authorization parameters for an institution, select the product you want to work with in the Products drop-down menu. In the Product menu, select Auth > Financial Institutions to find the institution you want to edit, then click Authorization Parameters (cog icon) in the Actions column.
Note
If the cog icon is missing from certain financial institution, it means you do not have permissions to edit it.
In the Authorization Parameters modal window that opens, click Edit. You can edit every field, except for the institution and the authorization party.
Transactions (Product Menu)
In this page, you can authorize transactions already created in the System menu and associate them to a product. By adding the transaction in this section, the Authorizator process determines the routing of the transaction, sends a response message and stores the transaction's information in the transaction log.
You can also find configurable transactions created and published in Studio. Configurable transactions are already authorized for the product selected in Studio during their creation.
To see authorized transactions for a product or to authorize a new transaction for it, first select the product you want to work with from the Products drop-down menu. Then, click Auth > Transactions. See the image below to learn about this page.
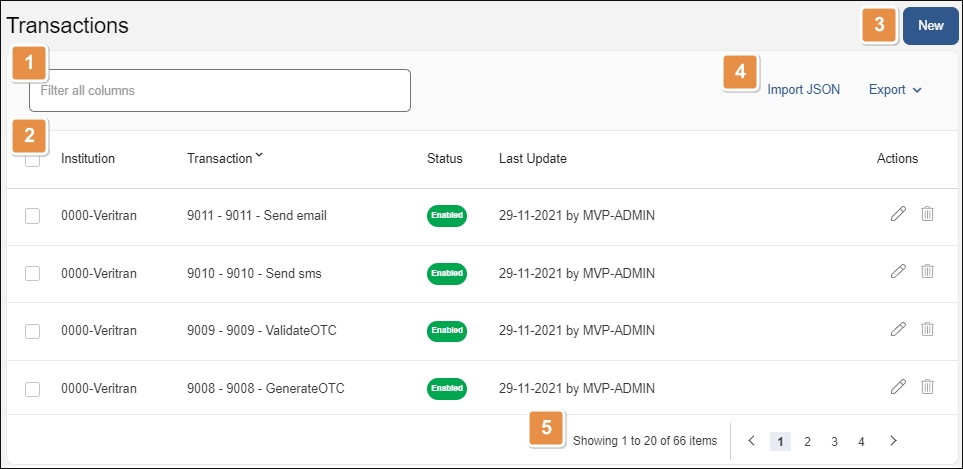
Search bar. Type a keyword to search authorized transactions by institution or transaction name.
Transactions list. Shows transactions authorized in relation to the product selected. The information is divided into the following columns:
Institution
Financial Institution where the transaction is being executed.
Transaction
Code and description of the transaction.
Status
Shows if the transaction is enabled (operating) o disabled.
Last Update
Date when the transaction was last updated.
Actions
Edit
Click to edit the transaction's configuration on the Auth section.
Delete
Click to delete the transaction's authorization and remove it from this list. If this option is grayed out, you don't have the necessary permission to perform this action. This action doesn't delete the transaction from the system.
New. Click to authorize a new transaction. Before you can authorize a native transaction, it must have been created from the System menu.
Tools.
Import JSON
Click to import a JSON file containing a transaction's structure. This option is available to import transactions created with the configurable host.
Export
From this option, you can export one or more transactions which you can then import into another environment. Select one or more transactions and click Export > Export XML or Export JSON. You can also click Export > Export All XML or Export All JSON to export every transaction authorized in the environment for the product selected.
Pagination. Click the arrows or page numbers to navigate through transactions.