Create or Edit a Module
If there are no modules created, or after reviewing the existing modules content you identify that they don't meet your requirements, you can create new ones. Modules can be created from the Modules page (Apps & Modules > Modules).
Click + Create module. The Create Module page opens, where you have to complete three tabs: Basic, Errors and Dependencies.
In the Basic tab, complete the basic settings of the module that include the name, a description and which type of module you are creating. Only the Module's name field is mandatory.
Note
The module name must be unique. If the name you enter already exists, you won't be able to create the module.
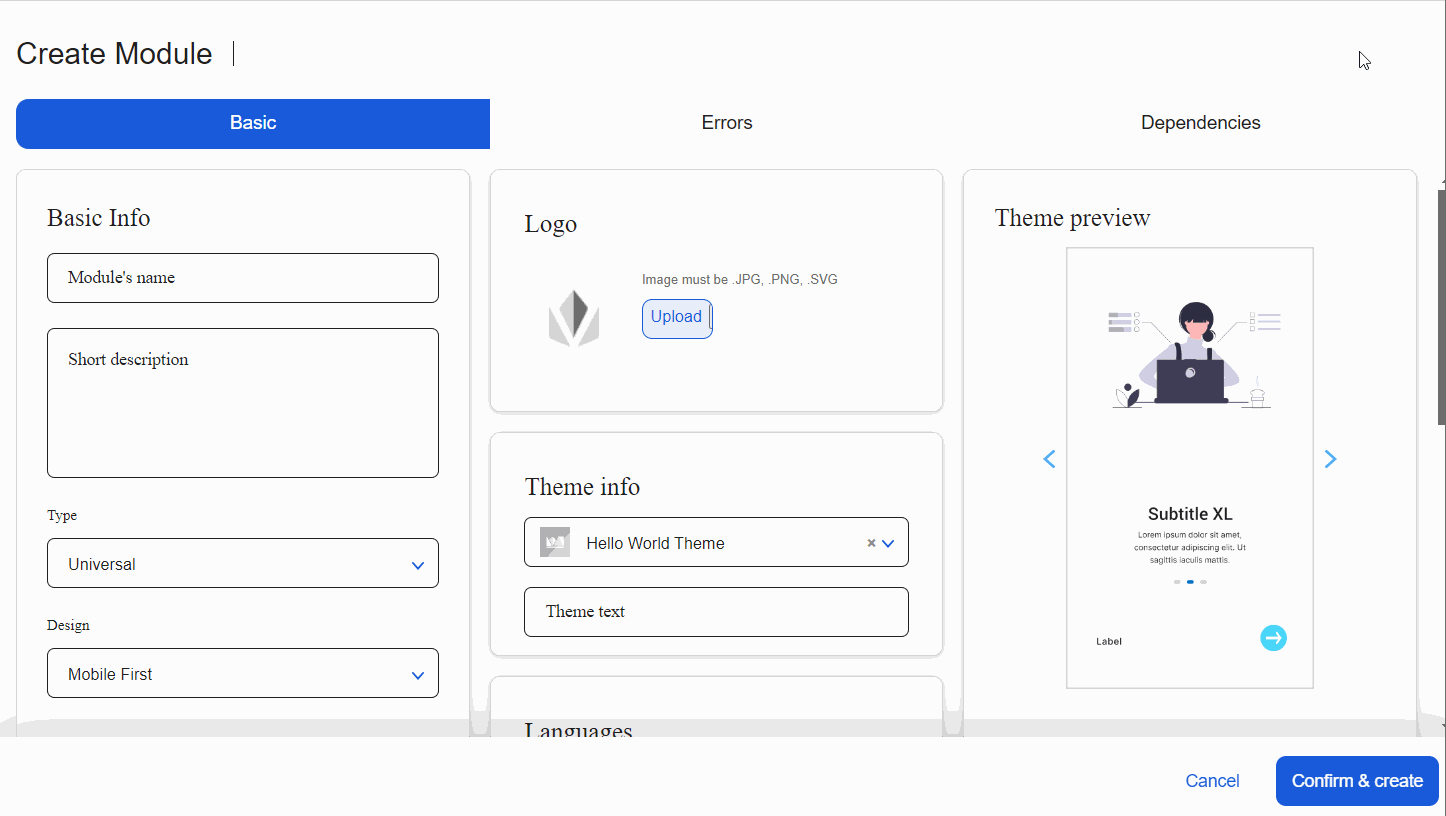
Basic Info.
Module's name. Enter a name that briefly describes its main goal. For this example, enter Onboarding.
Best Practice
The name should include the purpose of the module. For example: for reuse purposes, Reusable transaction labels; for decoupling purposes, Onboarding flow.
Short description. Specify the module content that will be created within it and their purpose. For this example, enter Modules that contain interfaces related to components that appear in onboarding screens.
Type. Click the arrow and select Universal if the module is for mobile apps or Web if it is created for web apps. For this example, leave the option Universal selected.
Important
This field works as in the case of apps. If you choose Universal, when you configure a screen, the screens editor will show the device options. If you choose Web, it shows the breakpoints options. Read Screens Editor Navigation to learn more.
Design. Click the arrow and select Mobile First to define if the module design prioritizes mobile view or Desktop First if it prioritizes web view. If you selected Universal as type, the system disregards the Design field, so you can leave the default configuration. For this example, leave the option Mobile First selected.
Best Practice
As a best practice, use mobile first design.
Theme info. In this section, you can select a theme to set a style to the module and its content. However, if you select an option, it won't have effect in the parent app or module.
Best Practice
Modules should not have themes applied. Instead, once invoked, the module's content (either configured components or screens flows) will inherit the theme applied to the app in which they are included. However, if you select a theme it won't have effect when invoked from the parent app or module.
Languages. In this section, you can select the module languages, which only have effect on the configured components or screens flow it contains. When you invoke configured components or screens flows from the screens editor of an app or another module, the editor allows you to change the languages as selected and add translations to any texts that appear within the component or screen invoked.
Theme Preview. In this section, you can see the appearance of the theme selected for the module. Since you don't have to configure the Theme section, the preview will appear empty.
Click the Errors tab and make changes to the errors configuration or add new errors to be processed by the module. Errors are created and configured in the middleware. Then, in Studio, you invoke them and set action or event they trigger in your module.
In this section, you can set errors that may occur in the parent app or module where the module's content are used and the result they will have. You can also click + New error and configure it according to the information explained below.
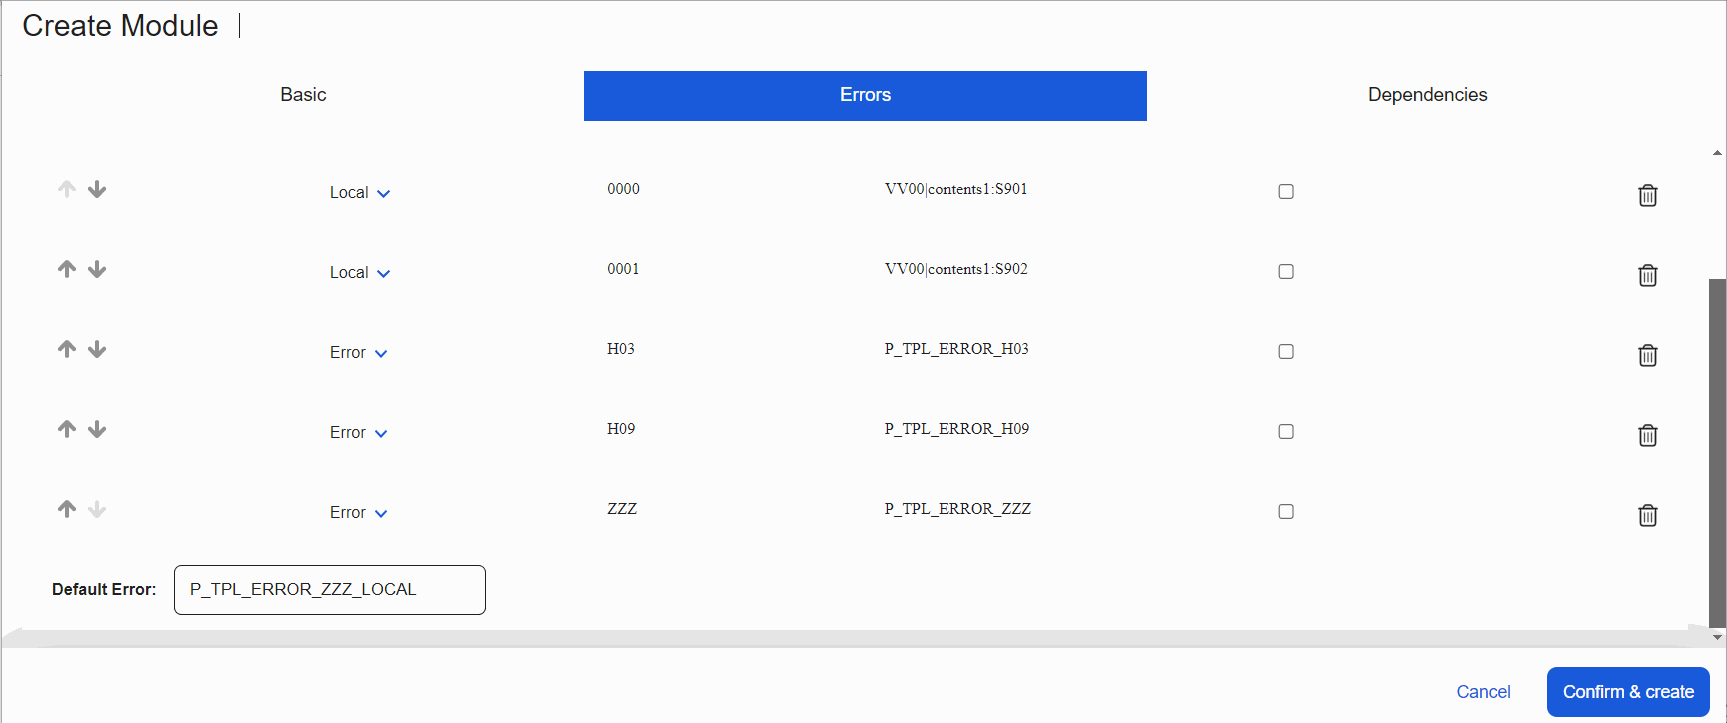
Order
Option that sets the order priority in which the app or module processes the errors.
Change the order, for example, to process the error ZZZ (default error) first. This is a generic error type that groups errors that do not derive from a specific origin. As a result, this error will be applied any time an error occurs in the app and if no other error has been previously defined or is listed after this error in the Errors list.
If you have all different errors, it is not necessary to make order changes. To set the order, click the up or down arrows accordingly and move the error through the list.
Type
Click the arrow to change or set the origin of the Error. Local refers to an error generated within the app or module itself; Error refers to an error that results from a transaction and Event is soon to be deprecated and should not be used. Click the arrow and select the desired option.
Code
Numeric internal code used to identify the error, previously defined in the middleware.
Note
If you are not familiar with the codes and their meaning, contact your lead.
Next
Event or action triggered when the error occurs. Default expressions are examples.
Add any expression, for example, a process, a transaction, or a view. To invoke a specific element, you must write the expression with a specific format: a letter that indicates the element invoked and the element name. Read Expressions Syntax to learn how to write expressions.
Tip
Each expression starts with a specific letter. If you forget to include it in the syntax, the element won't be invoked.
Process Parent First
Click the checkbox so that, if the parent app or module (in which the module is used) has that error configured, it will be processed in place of the module error. However, if the checkbox is selected and that error cannot be found in the parent, the module error will be processed.
Actions
Click Delete Row (trashcan icon) to delete the error. This action cannot be undone.
Default Error
Action or event to be triggered if no errors are configured in the module. To change it, click the field and enter the desired expression representing the event triggered when an error occurs.
Click the Dependencies tab, where you see a list of the modules available in the environment and link them to the module you are creating. If you link a module as a dependency, the configured components or screens flows within them are available for use within that module. To link a module, go through the list and click the toggle switch. Once linked, the modules selected will be available for use within the screens of the module you are creating.
Important
If you want to use the current module in an app or another module, you have to link it as a dependency in the settings of that app or module. Then, you can invoke the configured components or screens flows from the screens of the app or module.
Click Confirm & create to save the settings of the new module.
You are redirected to the Apps and Modules page, and a confirmation message indicates that the module was successfully created. Click the Modules tab and then click the card of the module created to start working on the module.
Note
If you are editing a module with more than one branch, the branches list will appear. Click on the branch you want to work with to be redirected to the Overview.
After you create the module, you have to continue creating different elements that will allow you to connect the module with the parent app or module. Read the instructions below to have an introduction on the steps to be taken after you create the module:
Create the view or views (Branch Edition > Views) that will be required to configure the module's content, which will then be invoked from the screens of the parent app or module. To learn more, read Views.
Tip
Views represent the visual space where the screens of the app will be included. Each view can have a specific layout or view area, which is the visual area within which the content of the screen will be created. Views must be created first to then create and configure the content of the app screens.
Create the screen where you will configure the configured component or screen flow that will become part of the container view in the module interface configuration.
Create the interfaces (Overview > Interfaces or Branch Edition > Interfaces), as required according to the screens flows or configured components that you want to reuse or connect with the parent app or module. To learn more, read Interfaces.
Link the module as a dependency to the parent app or module.
Invoke the configured component or screens flow from the screens of the parent app or module.
Edit a Module
To edit the settings of a module, go to the Modules page (Apps & Modules > Modules) and click the card of the module you want to modify.
Note
Remember that, if the module contains branches, select the branch from the branches list to be redirected to the Overview.
In the Overview, click Settings, or go to Branch Edition > Settings. You can make changes to the Basic, Errors and Dependencies tab as if you were creating the module. The Module's name is the only field that cant' be edited.