Actions
Actions are nodes that add business logic and functionalities to your app. With actions, you can:
call external or internal services (with the HTTP Request action);
assign values to variables (with Set Variable and Get Variable);
create conditionals or cycles (with Branch);
perform mathematical operations (with Functions);
define error codes to track them on the transaction log (with Fail or Set Response Code).
There are different actions available in Studio. See below to learn how to use them.
Important
Before assigning values for each action, read Input and Output Parameters to learn how to transfer data in a transaction.
General
Compares two values (a & b) and returns true or false as a response depending on whether the condition is met or not. The value type can be: number, string, boolean or date. Conditions are equal or not equal, and if the values are numbers, there are two additional conditions, less than and greater than.
The Branch action is used when you need to create two paths. For example, you can use this action during the login verification and, instead, have a branch action that, if the user verification fails, logs the error in the transaction log.

To create a path for the "true" and "false" conditions, click the true or false tags below the Branch action, and drag them to their respective action nodes to connect with them.
After the true and false flows are executed, the transaction flow continues from the main flow, such as the End node in the example above.
Goes through an array to capture, use or edit its information and implements a custom logic path for each iteration.
For example, you have to implement a new bank benefit that only applies to those clients that are 65 years old or older. With the Iterator action, you can go through an array of accounts and, for each array row, run the while custom path, that is in charge of verifying if the user is 65 years old or less.
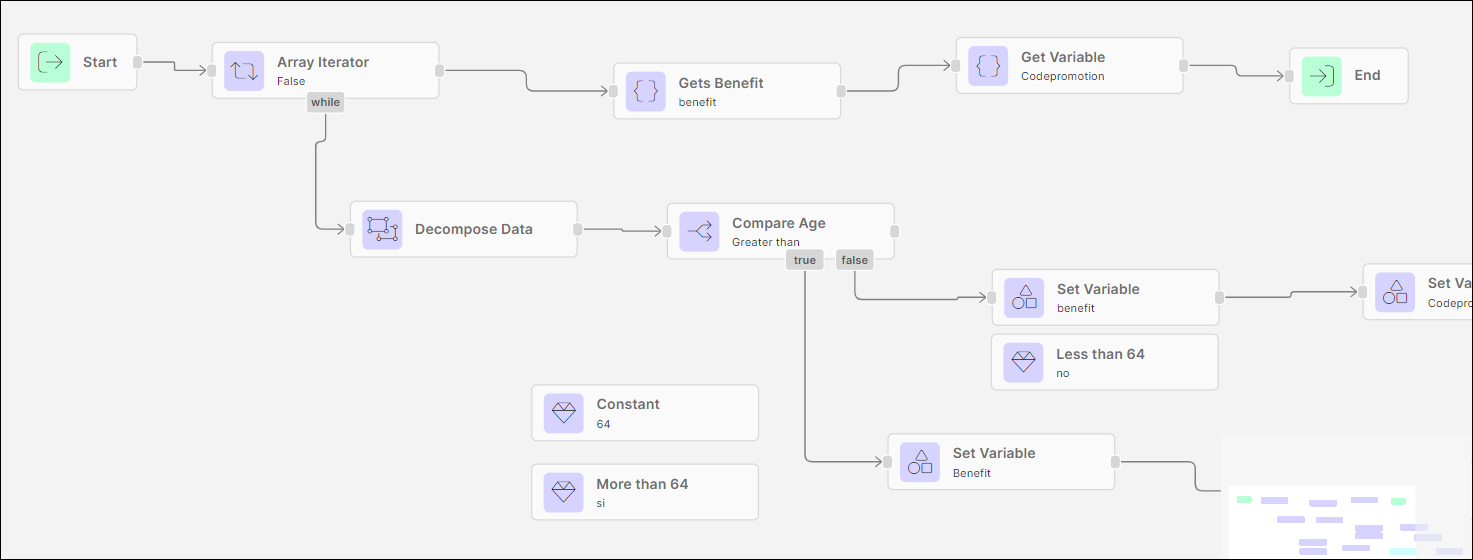
Once the array is verified, the transaction flow continues from the main flow, such as the Gets Benefits Get Variable action in the example above.
Defines a fixed value that can be used in the transaction flow by invoking it with other actions. The value can be a number, string, a boolean value or a date.
In the Iterator example, the number 64 is set as a constant and is then retrieved as input by the Branch action to compare this value with the user's age. This way, if the user is more than 64 years old, the true path assigns a promotion or benefit to the user, and if they are 64 of below, it doesn't.
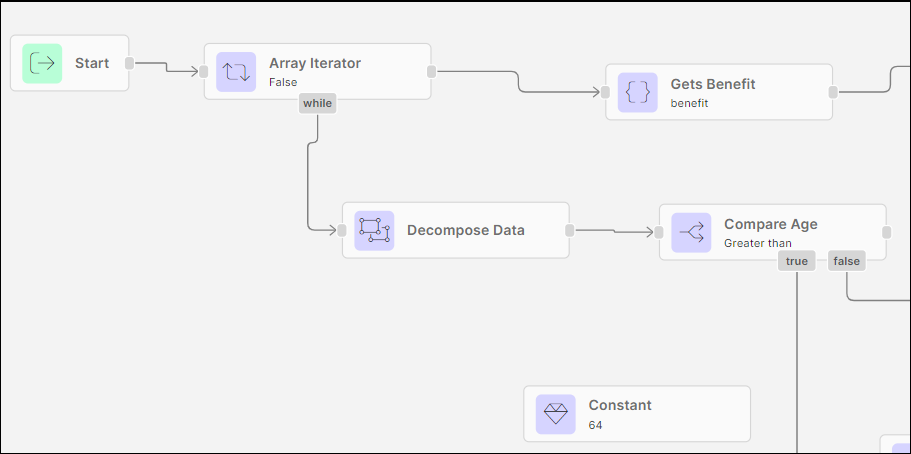
Sets a variable value that can be used where necessary within the transaction. To set a variable value, you configure the action's inputs and retrieve a value set in, for example, a constant action.
This value is used in the flow with the Get Variable action.
Gets the variable value saved with the Set Variable action to be used in the transaction flow.
Divides an object to get data for every component separately. For example, as in the Iterator example, you have to implement a new bank benefit that only applies to those clients that are 65 years old or older. With the Iterator action, you go through an array of accounts. For each array row, you can run the while custom path and include a Decompose action that separates every piece of data from all the rows in the array. With Decompose, you can extract the age of the users to use it on the flow and apply the necessary promotion rules.
Groups a list of objects received and creates a complex object as a result.
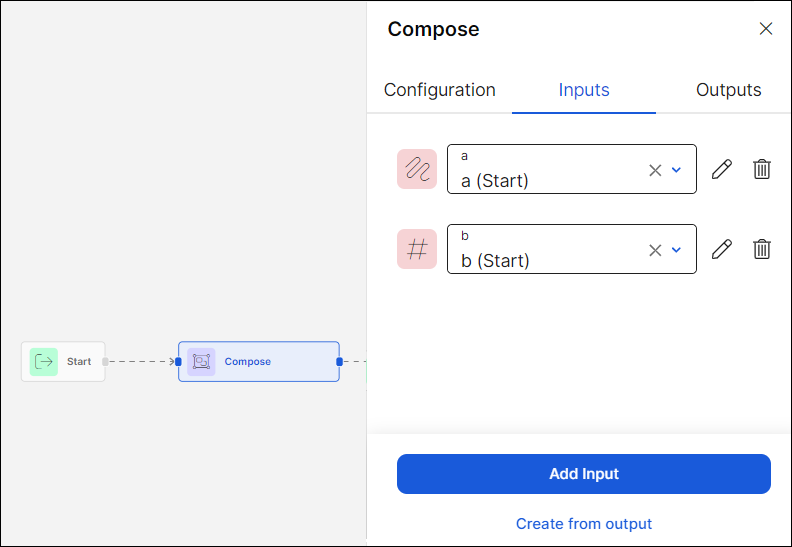
Creates parallel flows that execute HTTP requests in parallel. Parallel nodes allow you to execute several HTTP requests in parallel to reduce and optimize the transaction execution time. For example, if after a login, you need to retrieve products from a user's bank account, such as the account balance, products available and credit cards balance, the transaction consolidate all data it into a single screen for the end user.
Parallel flows are independent from each other. This means that each flow's data does not depend on information obtained during the execution of another flow. Because of this, after making the first call, the transaction continues its execution on another flow without waiting for a response.
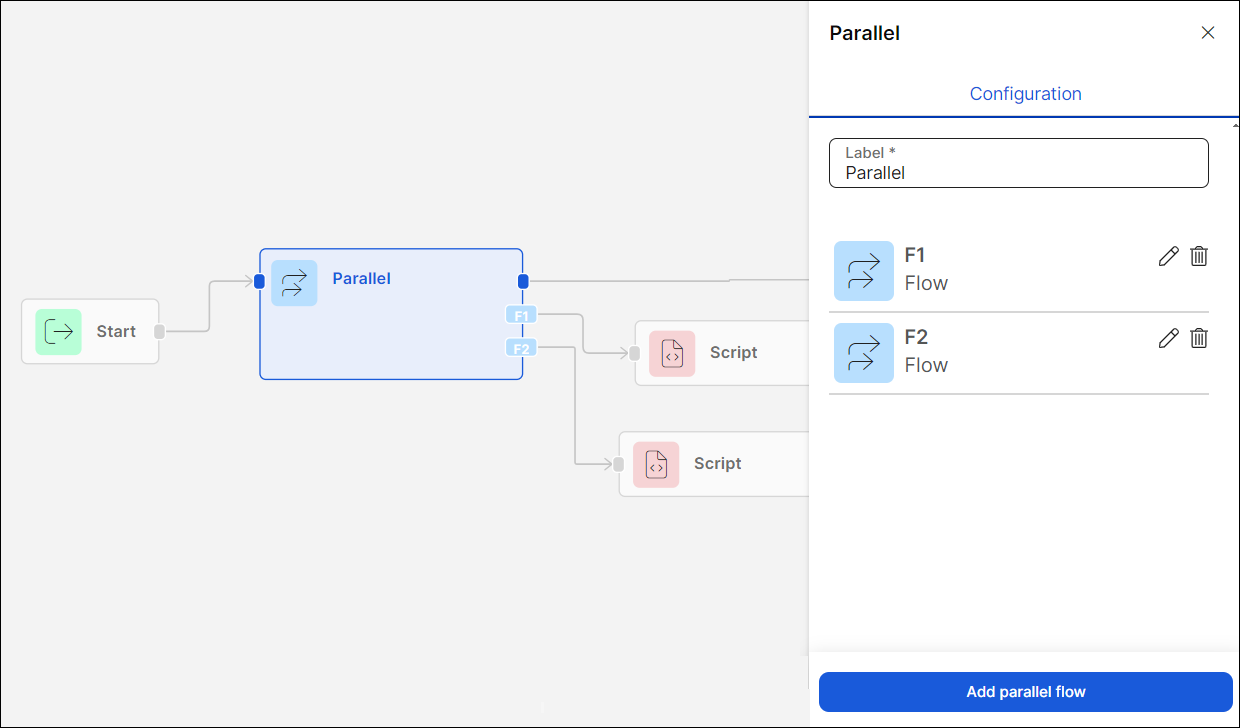
When you drag a parallel node to the canvas, two flows are created by default, named F1 and F2. Build the required flow after each parallel's socket as you would do with any transaction. To learn how to create a transaction, refer to Create a Configurable Transaction.
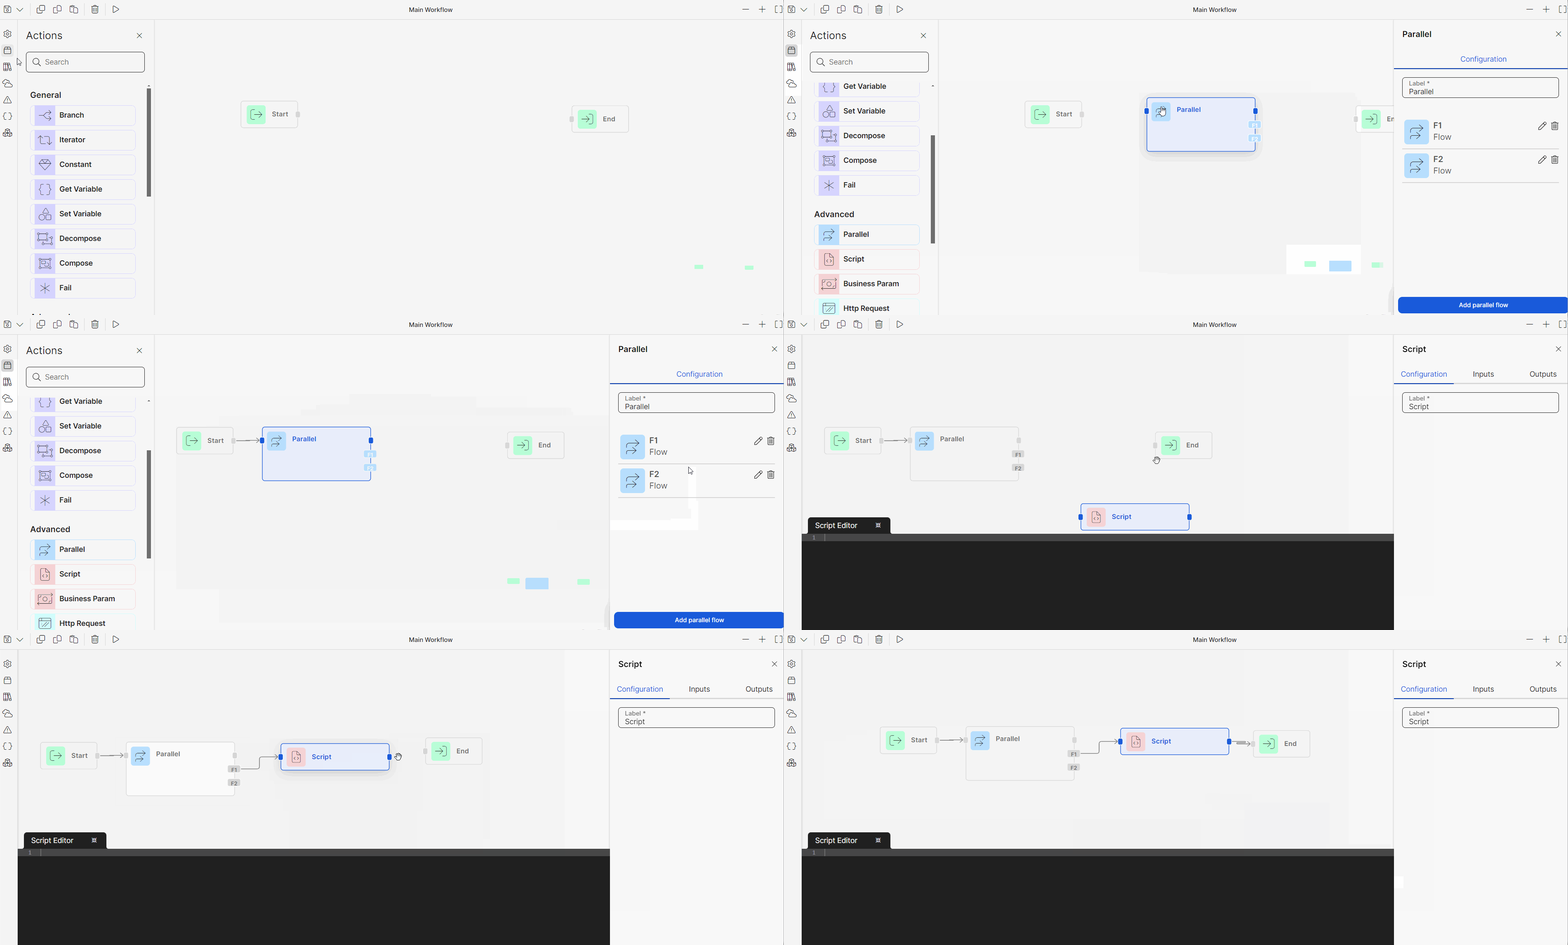
When you click the Parallel node, you can:
Click Add parallel flow to create a new parallel flow.
Click the pencil icon to edit a parallel flow's name.
Click the trashcan icon to delete a parallel flow.
Note
You can create up to 9 parallel flows in the same transaction. Additionally, you can create parallels within parallels to further optimize the transaction.
In the example below, you implemented a new transaction that, following a login transaction, triggers three parallel flows. Flow F1 obtains the user credit cards' information, F2 gets information about the user's personal loans, and F3 retrieves information about the user's additional products, such as debit cards or fixed term deposits. Then, the transaction obtains all the responses and continues with the main flow, which is the Script named Consolidated next to the parallel node. The remaining steps of the flow consolidate all the data on the home banking landing page for the end user and generates a payment calendar with all the information obtained.

Steps are executed in the following order:
The transaction runs F1's script to prepare data.
Then, it executes F1's request.
Without waiting for a response, the transaction executes F2's script to prepare data.
It executes F2's HTTP request.
It runs F3's script to prepare data.
It executes F3's HTTP request.
Then, the transaction receives the response from the three parallel flows.
With all this information, the transaction continues from the "Consolidated" script and runs the rest of the steps in this sequencial order until the End node.
Best Practice
Parallel actions only work with HTTP requests. This means that every flow must contain an HTTP Request action, or a REST or SOAP service. If they do not contain any requests, the actions will be executed in sequencial order.
Sets a response code and a message to a transaction when it fails and saves the value on the transaction log. This action can also finish the transaction's execution.
As opposed to the Set Response Code action, Fail can only be used at the end of a transaction.
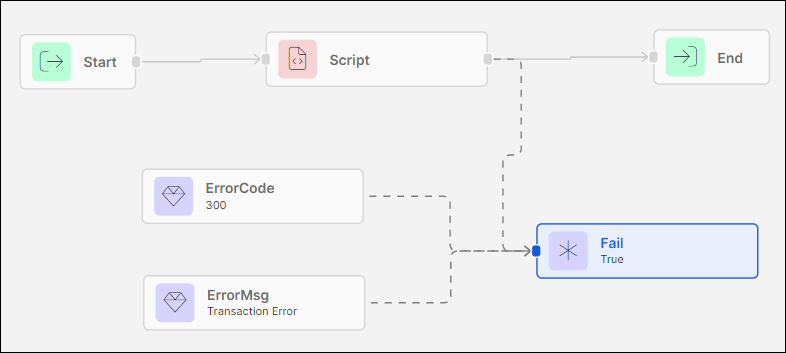
Error code and message values are usually set by creating Constant actions, and by retrieving this information as Inputs. See below for an example of a Fail action node that is retrieving its inputs from two Constant actions.
Note
The response code and message set will appear on the transaction log when the transaction fails.
Advanced
It is used to build functions that are not yet available as actions, or to build complex logic in a compact way, such as decrypting users' information, or logging errors into the transaction log. It can also be used to interpret a service's response retrieved with an HTTP Request action.
When selecting the Script action node, the Script Editor opens, where you can directly paste and edit your script. See Create a Configurable Transaction to read about a scenario using the Script action.

Obtains a business parameter from Middleware that can be used in the transaction.
Allows to invoke a service. This action complements the Script action's functionality, since you can create a request to the service with the Script action and then implement the HTTP Request to consume the service.
For example, you can invoke BRM's internal service and call any of its APIs. With a Script action, you set the endpoint with the url, method, headers and a body with all the parameters you are sending to the service. Then, with the Http Request action, you execute the service call that will return a .json with the results. You always need a Script action or a lambda process to interpret the Http Request's response.

Sets a response code to a transaction, depending on the operation's result, and saves the value on the transaction log. It can also finish the transaction's execution.
This action allows you to configure a response code, previously created in Middleware, to register number 10, which receives the transaction's response. The message displayed to the user is stored in register number 11.
As opposed to the Fail action, this action can be used in any step of the transaction.
Functions
With this action, you can perform operations related to date values. Results can be in numeric or date format.
Allows to perform mathematical functions between values.
Allows to perform various generic actions between data, transforming values depending on the type of operation selected.
Allows you to compare two boolean values with the and, or , and not functions.