Registers & Arrays Panel
With Devtools you can visualize, create, and edit registers and arrays on your application while it is executing on your device.
This panel shows registers and arrays in real time, while they are executing on the application, for the context selected on the contexts drop-down menu. This panel refreshes every time you perform a new action on your app or you change the view your navigating.
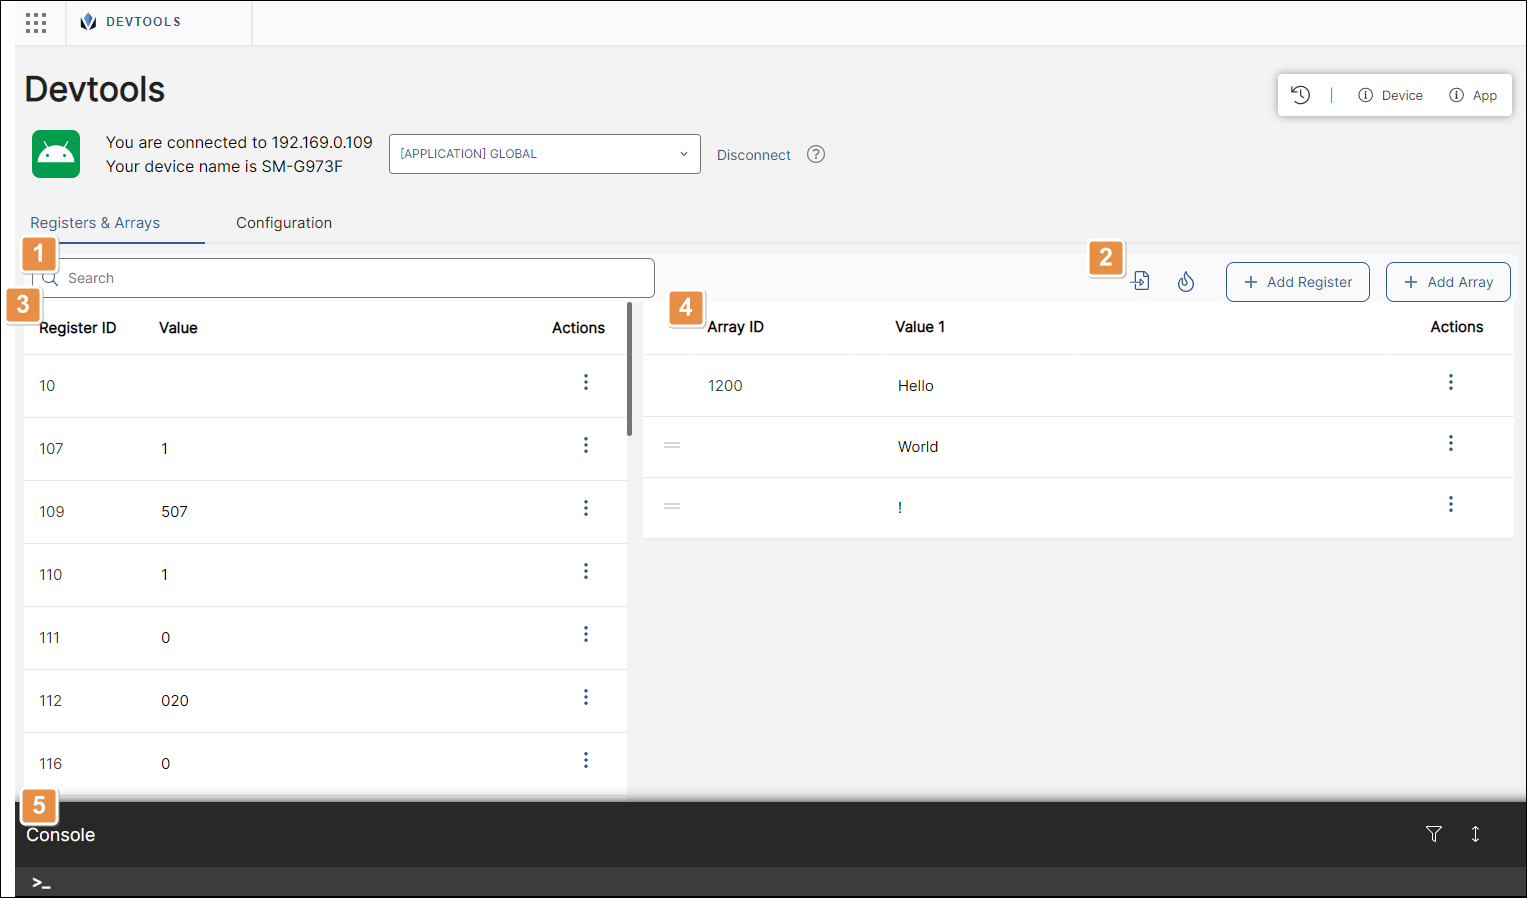
You can see registers on the left side of the screen, and arrays on the right side. See the annotated sample image below to learn more about this panel.

Search bar. Use this search bar to find arrays and registers by name or value.
Tools. They are described in order of appearance.
Export Context
Click to export the app’s state to your computer in .JSON format. This includes registers and arrays and their values set on the application in the moment you click export.
Burn context in your device
Click to upload a .JSON file and replicate or clone in your device the registers and arrays’ values contained in the file. A new modal window appears. Locate the file in your computer, then click Burn.
Add Register
Click here to add a new register to the registers' section of the screen. A new, blank register appears at the top of the list. Add an ID and click the save icon. Then, edit its value.
Add Array
Click here to add a new array to the arrays' section of the screen. A new, blank array ID field appears at the top of the list. Add the ID and click the save icon. Then, locate the new array on the list and add its value to the Value 1 field.
Registers section. See a list of registers in real time while you are interacting with your application depending on the context you are navigating.
Register ID
Register's identification.
Value
Register's value. This field is editable. Click the value to edit it. Type the new value and click the save button.
Actions
View History
View a record of updates made to the selected register.
Delete Register
Click to delete this register from the application on this device.
Arrays section. See a list of arrays in real time while you are interacting with your application depending on the context you are navigating.
Array ID
Array's identification.
Value 1
Array's value. This field is editable. Click the value to edit it. Type the new value and click the save button.
You can also add more value columns. Hover over the Value 1 column and click the add "+" icon. A Value 2 column appears where you can add a new value for the array. You can add as many values as necessary.
Actions
Add row
Click to add a new row below each value. You can add a value to that new row.
Delete row
This option is not available for the first row. Click to delete additional rows.
View History
View a record of updates made to the selected array. This option only appears on the first row.
Console. This console shows logs for every action performed in the application and allows you to execute commands. To open it, click the expand button on the top right corner of the console. See Console to learn more about this section and how to interact with it.
Important
After updating registers or arrays, or creating new ones, you must send a refresh command on the console. Type ECOMPONENTNAME(REFRESH), then press Enter.
Console
The Devtools' console is accessible from the Registers & Arrays panel. It displays logs for every event executed in the application and allows you to interact with the application by sending configuration commands that impact on the app while it is executing.

It details the events and elements that are being executed in the app with their name, category, time, and also the context that is being analyzed. You can differentiate between types of processes, register values, screens that are being visualized on the app, and more.
if you want to filter the logs, click the filter icon next to the expand icon, and the Processes, Screens and Events categories appear. You can select more than one at the same time, and also filter results by date.
To update the application you are executing so that updates reflect on your device, you can use one of the following commands:
Command | Function | Example |
|---|---|---|
ECOMPONENTNAME(REFRESH) | Use this command on the console to refresh a component on your device after making updates, such as creating or editing registers or arrays. | ECOMPONENTONE(REFRESH) |
V{idView}|{idLayout}:{idSequence} | Use this command on the console to refresh the whole screen. | VV00|contents1:S012 |