Create or Edit a Theme
You can create or edit themes from the Themes page (Style > Themes).
To create a new theme, click + Create Theme. To edit an existing theme, find the theme you want to edit by browsing the list or using the search bar and click Edit.
A new page opens, where you can configure the different sections of your app theme: Variables, Styles, Custom, CSS and Settings. The Variables tab opens by default, and you must click the other sections to make changes. Refer to the image below to learn more about these sections.
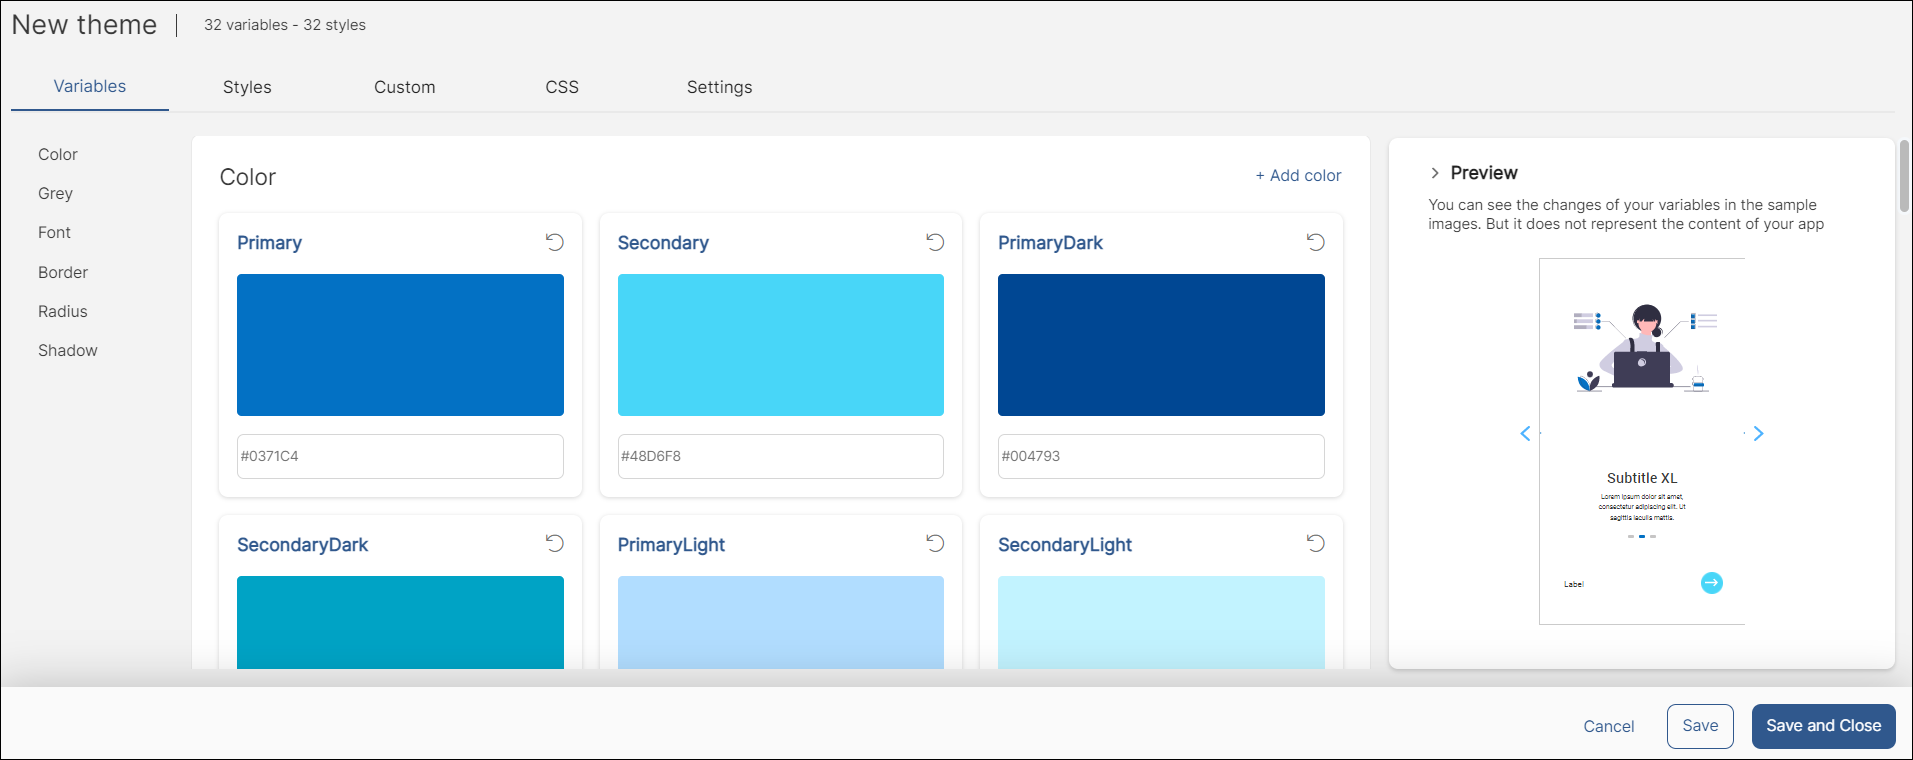
Variables. This section contains a set of variables whose values are applied to the style attributes of your app. Variables can be simple or complex. Read the Variables section below to learn more.
Styles .This section contains a set of predefined styles that will be assigned to the components of a screen. Predefined styles are applied to the CSS Class attribute of the components: components in the screen acquire all the properties or attributes configured for that style.
Custom. This section contains a list of custom styles already created in Studio. You can edit existing or create new custom styles for your theme.
CSS. This section allows you to create specific styles for web applications using a CSS code editor.
Settings. This section contains basic information of the theme that will let you identify it within the Veritran Studio environment.
Note
Note: The Preview allows you see the changes made to the variables in each of the sample screens.
Once you make your changes, click Save to save and continue making changes or Save and Close to save and go back to the Themes page. To apply a theme to your application, go to your app settings and select the theme you would like to apply. Go to App Settings to learn more.
Please note that, if your app contains modules (with or without a theme applied), there are some rules in place regarding theme inheritance. To learn about this topic, read the Theme Inheritance section within Instancing a Component-type Module.
Variables
Variables can be simple or complex. Simple variables are those in which you can configure only one value while complex variables are those in which you can configure more than one value. Learn more about how to configure them in the table below:
Color: Set the colors of the style properties. The variables are Primary, Secondary, PrimaryDark, SecondaryDark, PrimaryLight, SecondaryLight, Success, Warning and Danger. | Click the color you want to edit. A color panel opens, where you can choose the value by changing the color scale in the slider or maintaining the cursor pressed and selecting the color. You can also type the color code. You can add up to three new colors in addition to the fixed variables by clicking Add Color. |
Grey: Set the colors in different shades of grey of the style properties. GreyLighter, Grey , GreyDarker, Text, Backgroundand White. | Go to the color you want to edit. You can select the shade by moving the thumb control of the slider or typing the color code. You can add up to three new colors in addition to the fixed variables by clicking Add Grey. |
Font: Set the values of style properties that will be applied to the texts in the app. | Hover the cursor over the variable you want to modify and click Edit. Change the font, type the size and change the measurement unit of the font. You can add up to three new colors in addition to the fixed variables by clicking Add Font. |
Border: Set the values of style properties that will be applied to the borders of the elements included in your app. The types of borders available are light, regular or heavy. | Hover the cursor over the variable you want to modify and click Edit. Type the size and choose the measurement unit of the border. You can add up to three new borders in addition to the fixed variables by clicking Add Border. |
Radius: Set the values of style properties that will be applied to the corner radius of the components within your app. The types of radii available are small, medium and large. | Hover the cursor over the variable you want to modify and click Edit. Select the radius by moving the thumb control of the slider. You can also change the measurement unit in the drop-down menu. You can add up to three new radii in addition to the fixed variables by clicking Add Radius. |
Shadow: Set the values of style properties that will be applied to the shadows of the components within your app. The types of shadows available are small, medium and large. | Hover the cursor over the variable you want to modify and click Edit. You can edit four values: Blur, Spread, X axis shift and Y axis shift. You can also change the shadow color from a drop-down menu. |
Styles
Read the table below to learn more about how to configure the available styles of the components within the screens of your app:
Button: Styles available are Main, Main Outline, Main Text, Second, Second Outline and Second Text | Hover the cursor over the button style you want to modify and click Edit to change the attributes using the values available in drop-down menus. When you finish, click Ok. You can add up to three new button styles by clicking Add Button. |
Checkbox: Styles available are Filled Check and Outline Check. | Hover the cursor over the checkbox style you want to modify and click Edit to change the attributes using the values available in drop-down menus. When you finish, click Ok. You can add up to three new styles by clicking Add Checkbox. |
Input: Styles available are Regular Input, Password Input, Success Input, Warning Input and Error Input. | Hover the cursor over the input style you want to modify and click Edit to change the attributes using the values available in drop-down menus. When you finish, click Ok. You can add up to three new input styles by clicking Add Input. |
Panel: Styles available are Panel Primary. PanelBackground and PanelContent . | Hover the cursor over the panel style you want to modify and click Edit to change the attributes using the values available in drop-down menus. When you finish, click Ok. You can add up to three new panel styles by clicking Add Panel. |
Radio: The only style available is Regular Radio. | Hover the cursor over the radio style you want to modify and click Edit to change the attributes using the values available in drop-down menus. When you finish, click Ok. You can add up to three new radio styles by clicking Add Radio. |
Switch: The only style available is Regular Switch. | Hover the cursor over the switch style you want to modify and click Edit to change the attributes using the values available in the drop-down menus. When you finish, click Ok. You can add up to three new switch styles by clicking Add Switch. |
Text: Styles available include Caption, Label, Label2, Legal, Legal2, Paragraph, Paragraph2, SubtitleRegular, SubtitleRegular2, SubtitleXL, TitleRegular, TitleRegular2, TitleXL and TitleXL2. | Hover the cursor over the text style you want to modify and click Edit to change the attributes using the values available in drop-down menus. When you finish, click Ok. You can add up to three new text styles by clicking Add Text. |
Custom
Refer to the annotated image below to learn more about how to manage the Custom section and to create or edit custom styles.
Note
You should only use custom styles if you need further styles to the predefined available in the Styles section.
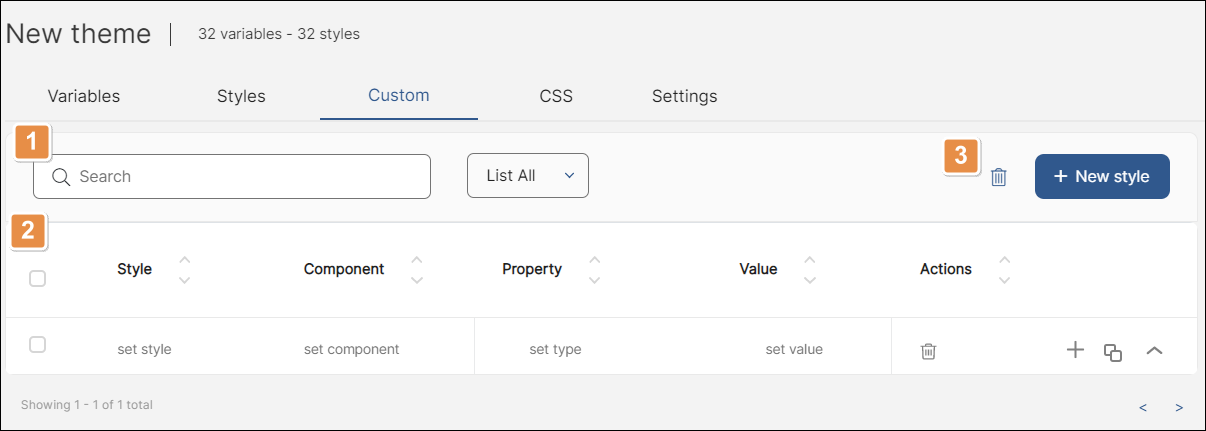
Search bar and sorting criteria. Search custom styles by components, style names, types or values. Click the down arrow to see the complete list of custom styles or choose to show a limited number of styles.
Custom styles list. See a list of custom styles created, if any. Read the table below to learn about the information displayed. You will also need to complete these fields to create a new custom style.
Style
Set the name for your custom style. Add this name to the CSS Class attribute in every component of a screen where you want to apply this style.
Component
Set a general name for a type of component. This way, the custom style will apply to every component of the same type that lives within your app, without the need of applying the CSS attribute individually.
Property
Establish a group of attributes for the style. Some attributes are width, height, backgroundColor, fontSize. You can also add some categories from the Variables section, like Font, Border, Radius or Shadow.
Value
Set values to the attributes that were configured in the “Property” field. You can add a value for an attribute or set a variable already configured in the Variables tab field by using the {{variableName}} syntax. If the configured variable is complex, a three-circle icon will be displayed. To change the values of its properties, click the three-circle icon. You can change the Font variable and the Details (Family, Size, Weight, Style, Color).
Actions
Each icon is explained in order of appearance below:
Delete Style
Delete the selected style.
Add New Property
Add a new line to create a new property with its value.
Duplicate Style
Create an exact copy of the selected style.
Expand to Edit
Extend the editing area of the style and obtain details on properties and value.
Tools.
Delete selected styles
Select one or more styles by checking the box next to the entry and click here to delete them.
+ New style
Click to add a new custom style and complete the required fields.
CSS
The CSS editor allows you to define special styles for web applications. To create a new style, choose one of the two alternatives: uploading a CSS file or writing valid CSS directly.
To upload a CSS file, click Upload a CSS file and select the file you want to upload from your system.
To write CSS, click the caption (Type or paste valid CSS here) and write valid CSS. Some of the valid styles and properties are Properties, Pseudo Classes and Media Queries.
Important
Use this section only to configure specific properties for web applications that are not supported by Veritran Studio.
Settings
Learn more about the fields you will complete to configure the application theme settings in the table below:
Name | Add a name to your app theme. |
Tags | Add keywords related to your theme to identify it. |
Describe your theme | Add a short description of your theme. |
Thumbnail | Upload the logo that represents your theme in the Veritran Studio environment. |
Logo | Upload the logo that will appear in the screens of your app. |