[en] Linear Navigation

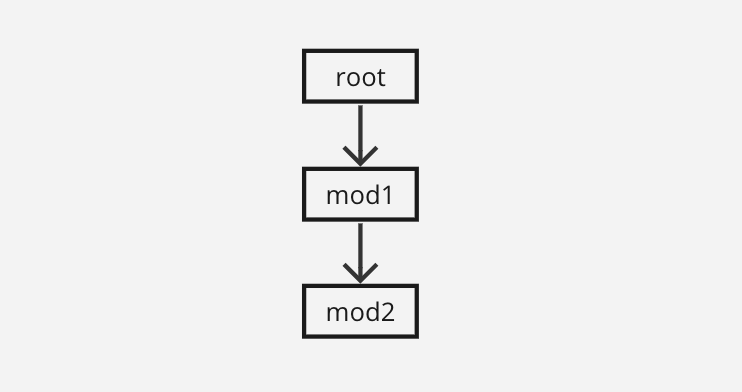
[en] The parent app appears at the zero or root level.
[en] Then, modules are invoked in stack method. This means that the first module appears at level 1, and, from that module, you can invoke any other modules.
[en] Whenever a module is closed, the navigation goes back to the previous module. For example, considering the image above, when the mod2 module is closed, the app user will be taken to the mod1 module. Then, when mod1 is closed, the user will be taken to the screen of the app from which the module was originally invoked.
[en] There are no limitations to the number of modules that can be invoked within the parent app or module. The navigation will have as many levels as modules invoked from the parent app or module.
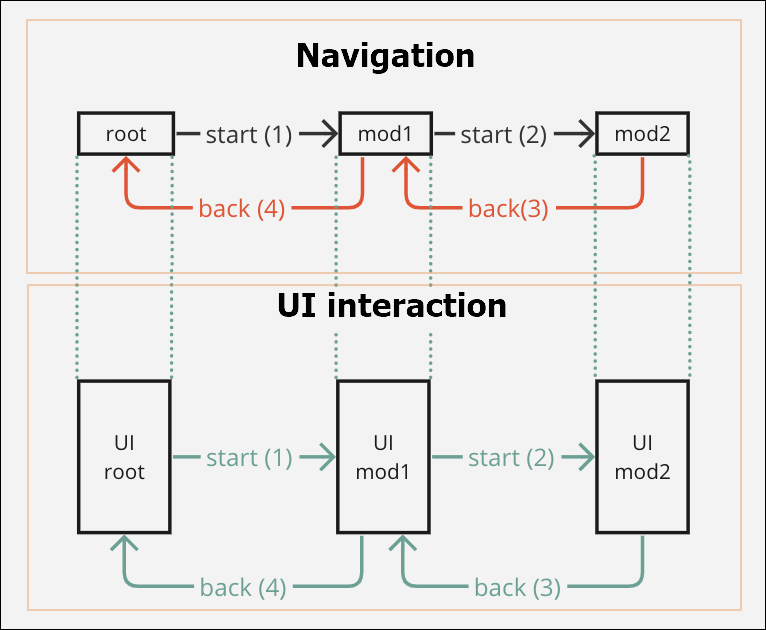
[en] In this section you can see the two main aspects of the navigation case: first, the navigation itself - that is to say, when the module is invoked and appears on screen and then, when it is closed, to which predecessor (either a module or the parent app) it goes back. Then, the UI interaction, which refers to the visual impact of the navigation in the app, that is to say, the screens that will be shown to the app user.
[en] The image below shows the navigation in steps and how the user will see the navigation in the app. In this case, the root is the parent app and from that app, you invoked the first module, mod1, which in turn invokes a second module called mod2. The table below describes the different steps in the navigation and explains how you should perform each action executed in each step when you are working in Studio, with examples. To learn more about how to create and edit a module and then invoke its content from an app, read the following use case.

Nota
[en] Use the scroll bar to the right to see all the columns in the table below.
[en] Action executed | [en] Navigation step | [en] Syntax | [en] Description | [en] Explanation and examples |
|---|---|---|---|---|
[en] root opens mod1 | [en] start (1) | [en] LMOD1(INTERFACE1) | [en] You are at the root level in the parent app and you invoke the module mod1. | [en] You are in the Sign in screen of the app. You need to reuse the content of the module mod1, which contains an onboarding screens flow. To reuse it, you must invoke the module's screen flow from a component within the Sign in screen. [en] For this example, you define that, when the app user clicks on the Sign in button, the module's content (that is, the screens flow) is invoked. Therefore, you select the button component, go to the right panel and then to the Actions tab. In the On Click attribute of the Events and Actions section, you click the vertical-three dot icon. The Create new link opens, and you select Module Screen from the drop-down menu. Then, you select the screens flow you want to link and click Ready to link. For this example, the syntax displayed will be L28E76850A1C48D8F4D2700A4FBB027(HOME), where L represents the screens flow, 28E76850A1C48D8F4D2700A4FBB027 represents the screens flow selected, and (HOME) represents the container view where the screens flow opens. |
[en] root -> mod1(root) | [en] N/A | [en] N/A | [en] The screens flow of the module mod1 is displayed on screen. The flow is invoked from the root app (parent app). | [en] The app displays the container view that represents the first screen of the screens flow invoked of the module mod1 . Mod1 screens flow contains three screens. |
[en] mod1 opens mod2 | [en] start (2) | [en] LMOD2(INTERFACE2) | [en] You are at level 1, in the module mod1 and, from this module, you invoke the module mod2. | [en] You are in the third screen of the onboarding screens flow of the module instanced. For this example, you define that, when the app user clicks on an arrow icon, the user must be redirected to another screen with a Welcome message, which is part of the screens flow set in module mod2. Therefore, you select the icon component that represents the arrow, go to the right panel and then to the Actions tab. In the On Click attribute of the Events and Actions section, you set the Module Screen you need to invoke, as explained before. |
[en] root-> mod1(root) -> mod2(mod1) | [en] N/A | [en] N/A | [en] The screens flow of the module mod2 is displayed on screen. The flow is invoked from the module mod1. | [en] The app displays the container view that represents the first screen of the screens flow invoked of the module mod2. For this example, the first container view is a screen that shows a Welcome message together with a list of useful links. |
[en] mod2 back-close | [en] back (3) | [en] E__CURRENT_MODULE_ [en] INTERFACE__(CLOSE) | [en] You are in module mod2 (level 2) and you configure an event to close it. Importante[en] The event to close a module can only be configured in the module itself. You cannot indicate the parent app or another module to close it. | [en] You have to close the module mod2. To close the module, you have to set an event in a component of the screen in the screens flow. In this case, the screen flow of mod2 contains a screens flow of two screens, and you need to set the event in the second screen of the flow. Th event will indicate the current screen opened to close the screens flow. [en] For this example, you define that the closing of the module is executed when the user clicks on the the text label component that reads a Ready to work! message. You go to the right panel and then to the Actions tab. In the On Click attribute of the Events and Actions section, you click the vertical-three dot icon. The Create new link opens, and you select Interface Message from the drop-down menu. Then, select CLOSE MODULE, which appears by default. Nota[en] Even though interface messages are communicated to the parent app, the CLOSE MODULE message is an exception and the message is communicated to the module itself. [en] For this example, the syntax displayed will be E__CURRENT_MODULE_INTERFACE__(CLOSE), where E represents the closing event requested, CURRENT_MODULE_INTERFACE represents the screens flow invoked and (CLOSE) represents the event to be executed when the app user performs the action. Importante[en] The parent app shows only one screen at the same time - this means that only one screen is live and in execution at the same time. |
[en] root-> mod1(root) | [en] N/A | [en] N/A | [en] The app shows the module mod1. | [en] The module mod2 closed and now the parent app displays the module mod1 again, following the linear navigation stack. |
[en] mod1 back-close | [en] back (4) | [en] E__CURRENT_MODULE_ [en] INTERFACE__(CLOSE) | [en] You are in module mod1 (level 1) and you configure an event to close it. | [en] You have to close the module to go back to the screen of the parent app. To close the module, you have to set an event in the module that indicates the current screen opened - that is to say, the onboarding screen mentioned before, to close. [en] To close the module, you have to follow the same instructions given above: select a component within the screens flow and define the interface message CLOSE MODULE. |
[en] root | [en] N/A | [en] N/A | [en] The app goes back to the root level (level 0) and shows the screen of the parent app. | [en] You set events to close all the modules and now the app user sees the screen of the parent app. |