[en] Create or Edit a Constant
[en] Create a Constant
[en] The sections below explain how to configure a constant using the use case explained in the [en] Create or Edit a Decisionarticle. Under this use case, GoldBank asked you to set a rewards program ("GoldAwards"), under which clients will receive cashback for their purchases. GoldBank informs you the cashback percentage that applies to each purchase made. This is a set of specific reference numbers and you have to build the decision based on it:
[en] Refer to the instructions below to learn how to configure the contract.
[en] On the Constants page, click + Create. First, you have to set the basic configuration of the constant that results in the constant contract (you will then see these data in the Constant contract tab). Only after you configure the contract, you will be able to configure the constant values.
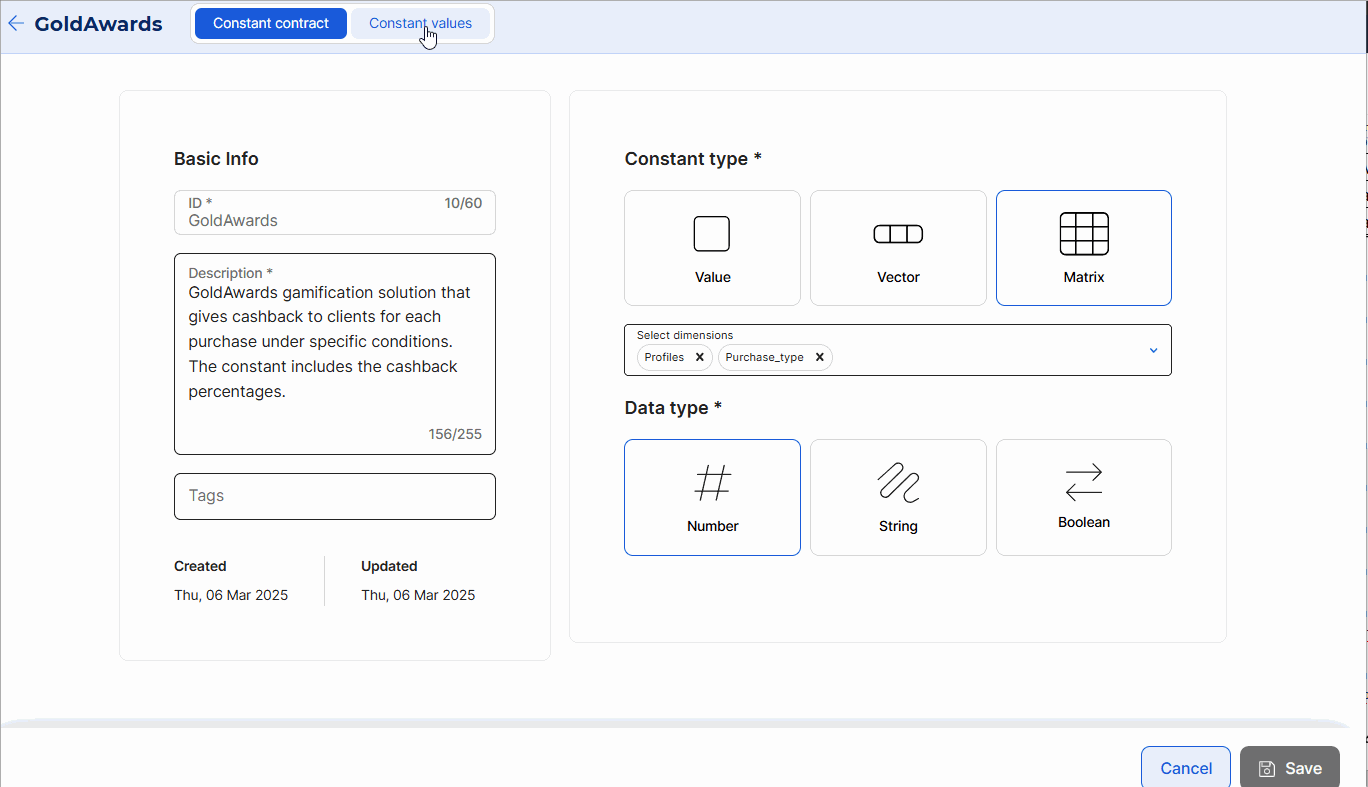
[en] Complete the Basic info section. The ID and Description fields are mandatory.
[en] In the ID field, enter the name that identifies the constant. For this example, enter GoldAwards.
Nota
[en] The ID name cannot be modified in the future.
[en] In the Description field, enter a text to describe the purpose of the constant. For this example, enter GoldAwards gamification solution that gives cashback to clients for each purchase under specific conditions. The constant includes the cashback percentages.
[en] In the Tags field, you can enter keywords that allow you and your team to easily identify the constant. For this example, do not enter any tags.
[en] In the Constant type section, select the type of constant that defines whether it contains one or more values and the dimensions to which the type will be related. Learn more in the table below.
Importante
[en] You can set one constant type. Depending on the type, you will be able to select one or more dimensions.
[en] Value
[en] Constant with only one value. For example, considering the GoldAwards program, you can select this type if you want to set that on March 1st (GoldBank's aniversary) all users obtain 200% cashback for their purchases.
[en] If you select this type, you can't select a dimension.
[en] Vector
[en] Constant with more than one value and applicable to only one dimension. For example, considering the GoldAwards program, you can select this type if you want to set cashback percentages for purchases made by users based on their profile only.
[en] If you select this type, you can only select one dimension.
[en] Matrix
[en] Constant with more than one value and applicable to only one dimension. For example, considering the GoldAwards program, you can select this type if you want to set cashback percentages for purchases made by users based on their profile and operation type.
[en] For this example, select Matrix.
[en] Then, in the Select dimensions drop-down menu, select Profile and Purchase_type.
[en] In the Data type section, select the data type that will be applied to each of the values defined for the constant: choose String if the value will be alphanumeric, select Number if the value is a number, or Boolean if the value will be true or false. For this example, select Number.
[en] Click Save. The information configured will appear in the Constant contract tab and the Constant values tab will appear available for configuration.
Importante
[en] The Constant values tab won't appear unless you save the new constant.
[en] If you are creating a new constant, the Constant values tab will only appear after you saved the contract previously described.
[en] The constant values will be applied in the the decision logic that must be evaluated by the BRMS to define a specific result, that will in turn impact the app user.
[en] Considering the contract defined, the Constant values page shows a data matrix including the selected dimensions and their values. In this table, you can set the constant values that apply in each case where one Profile value and one Purchase type value are met. You will then use these constant values in the rules of the decision.
Nota
[en] The top right of the page reminds you the data type selected for the constant. All values in the constant must be set under this type.
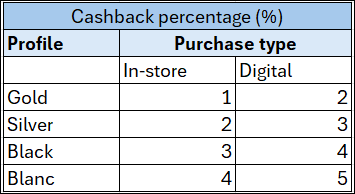
[en] Follow the instructions below to complete the matrix based on the Cashback Percentage (%)chart previously shown.
[en] In the Gold and In-Store constant value enter 1.
[en] In the Gold and Digital constant value enter 2.
[en] In the Silver and In-Store constant value enter 2.
[en] In the Silver and Digital constant value enter 3.
[en] In the Black and In-Store constant value enter 3.
[en] In the Black and Digital constant value enter 4.
[en] In the Blanc and In-Store constant value enter 4.
[en] In the Blanc and Digital constant value enter 5.
[en] In the Default column under the Purchase type dimension, enter 1 for all constant values.
[en] In the Default row under the Profile dimension, enter 1 for all constant values.
Nota
[en] Default values indicate that, if one of the dimension values is met but the other isn't, the cashback percentage will be the default value set. In addition, if there is a desynchronization in the dimensions, the app won't return an error and would in turn bring the default value. For example, if the purchase is made by a user with the Blanc profile but through a website (which is not included in the dimensions), the cashback percentage will be 1, that is, the default percentage.
[en] Click Save.
[en] Now that you set the constant values, go to the Decision and configure the rules applicable to the GoldAwards project. To learn more, read Create or Edit a Decision.
[en] Edit a Constant
[en] To edit a constant, go to the Constants page. Go through the list to find the constant you want to edit or use the search bar and click it. The constant opens in the Constant contract tab, where you can edit all fields unless the constant ID. To make changes to the rules, click Constant values and make any required changes. Then, click Save.